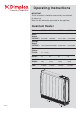
A world of expertise Operating Instructions IMPORTANT These instructions should be read carefully and retained for future use. Note also the information presented on the appliance. Quantum Heater Models: QM070 QM100 QM125 QM150 792/880W 1017/1130W 1242/1380W Storage Output 230/240V~: 1435/1560W 2042/2220W 2540/2760W 3024/3300W Boost Output 230/240V~: 567/630W Rated Charge Period: 7.7 - 7 Hours Bricks: 18 24 30 36 Installed Weight: 91kg 115kg 142kg 165kg kWh: 10.9kWh 15.4kWh 19.
IMPORTANT IMPORTANT These instructions should be read carefully and retained for future use. Note also the information presented on the appliance. WARNING - THE SURFACE OF THIS HEATER CAN BE HOT. • The surface temperatures of this heater are within the requirements of EN60335-2-61, the European Standard covering the safety requirements for Electric Storage Heaters, and momentary contact with any part of the heater should not cause injury.
• Surfaces of the heater should not be covered or obstructed as this can cause excessive temperatures that can be hazardous and may cause safety cut-outs to operate. This will stop the heater from working. • Do not put clothes, fabrics or any combustible materials on the heater. • Do not allow curtains to come within 250mm (10”) of the top and 75mm (3”) ends of the heater. Do not allow any obstruction to be placed on the floor within 300mm (12”) of the front of the heater and 75mm (3”) of each side.
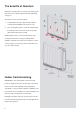
The benefits of Quantum Quantum is designed to be a responsive heating system that meets your comfort requirements while optimising energy use. The heater releases heat in two ways: 1. A small amount of heat is dispersed by ‘natural’ convection and radiation from the heater case. 2. The vast majority of heat is released using the builtin fan that pushes hot air out from the heat outlet grille at the bottom of the product.
Function Compared with traditional storage heaters the amount NOTE of energy released from the outer case of the heater is significantly reduced. This allows more efficient running DUE TO THE LOW ENERGY LOSSES FROM THE because the Quantum is heating the room only when HEATER CASING OF THE HEATER THE SURFACE you want it to. TEMPERATURE OF THE HEATER MAY APPEAR TO BE LOW BUT THIS IS NORMAL.
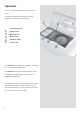
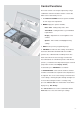
Operation The user controls are located on the top right of the heater. The heater is fitted with an adjustable electronic temperature controller and three buttons. 1 2 Programmable timer 1 2 3 4 5 Display screen ‘Menu’ button ‘Back’ button ‘Advance’ button ‘Selector Dial’ 3 4 5 The minimum room temperature setting is 7°C and may be used for protection against frost. The maximum temperature setting available is 26°C. A temperature of approximately 20°C represents a normal room temperature.
Control Functions The heater controls can easily be adjusted by using a combination of the three buttons and the selector dial, which can be rotated and pressed. 1. The DISPLAY SCREEN shows the options available at each stage of the adjustment. 1 2 2. MENU displays the options available; Date / Time - Setting today’s date / time. Timer Mode - Setting the timer to your individual requirements. Display - Adjustment of screen brightness and 3 contrast.
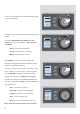
Setting the Date and Time Your Quantum controller incorporates a real time clock with calendar function. The time clock has a battery backup that will keep the clock running in the event of a mains power outage. To adjust the time or date follow the steps below. Note - the display screen will return to standard display after a period of 20 seconds of inactivity. 1 Main Menu Press the MENU button (1). 2 Date / Time Timer Mode Select Date / Time by pressing the control dial (2).
Choosing and Setting a Timer Mode Your Quantum controller comes pre-programmed with a set of operating periods. There are five options available - three presets, one user set up and one without a timer; 1. Out All Day (pre-programmed) - has the following preset times Monday to Sunday, which can be altered if desired; 06.00 am until 08.30 am 05.00 pm until 10.00 pm 2. Home All Day (pre-programmed) - has the following preset times Monday to Sunday, which can be altered if desired; 06.30 am until 09.
To choose a Timer Mode press Menu and rotate the dial Main Menu to select ‘Timer Mode’. Date / Time Timer Mode 1 2 Display Options Select the mode required, again by rotating and pressing 1 the dial. Timer Mode For options Out All Day, Home All Day and User Timer, three choices are available - Select, Preview and Modify. Out All Day Home All Day Holiday User Timer No Control 2 Select - choose this timer option. Preview - view the times currently set. Modify - change the times used.
In Holiday mode the number of days that the room will be unoccupied for can be adjusted together with the Holiday required room temperature. Active Days 14 Temperature 07 When No Control mode is selected, a confirmation Timer Mode Out All Day Home All Day Holiday User Timer No Control is displayed on the screen. This enables the heater to operate without any preset times and adjustments are made only by changing the room temperature using the selector dial.
Display Settings To adjust the screen settings choose Display from the Display Main Menu. Screen contrast and brightness can be Contrast adjusted to personal preference by rotating the selector Brightness dial. Options The Options menu enables you to choose time formats to suit your preferences. These are; • Format Time - either 12 or 24 hour settings. Options Format Time DST Rule • DST Rule - Daylight Saving setting.
Important During the initial operation some odour may be noticed due to the newness of materials used in manufacture. This is normal and will disappear after a short period of use. It is however advisable to keep the room well ventilated. ROOMS MUST BE WELL VENTILATED AND YOUNG CHILDREN, CAGED BIRDS, OR PERSONS WITH RESPIRATORY COMPLAINTS MUST NOT REMAIN IN CLOSE PROXIMITY TO THE HEATER DURING THE FIRST 48 HOURS OF THE COMMISSIONING PERIOD. THIS MUST BE DONE FOR EACH HEATER (STAGGERED OVER A FEW DAYS).
- 14 -
- 15 -
After Sale Service If this product appears damaged when first received or does not function correctly contact us by e-mail aftersales@ dimplex.co.uk or ring 0844 879 35 88 and we will be able to help. For ROI please phone 01 842 4833. Do not return the product in the first instance as this may delay us providing you with a satisfactory service. ACCIDENTAL DAMAGE IS NOT COVERED UNDER THE WARRANTY. Your product is guaranteed for two years from the date of purchase.