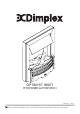
OPTIMYST INSET RTOPI20BR & RTOPI20CH 08/51576/0 Issue 2 The product complies with the European Safety Standards EN60335-2-30 and the European Standard Electromagnetic Compatibility (EMC) EN55014, EN60555-2 and EN60555-3 These cover the essential requirements of EEC Directives 2006/95/EC and 2004/108/EC
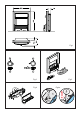
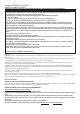
Fig.1 Fig.2 Fig.4 Fig.3 Fig.
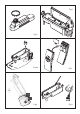
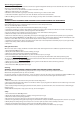
Fig.6 Fig.5 Fig.6a Fig.8 Fig.7 Fig.
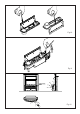
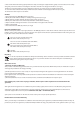
Fig.10 Fig.11 Fig.
Dimplex OPTIMYST Inset Fires Model: RTOPI20BR, RTOPI20CH IMPORTANT: THESE INSTRUCTIONS SHOULD BE READ CAREFULLY AND RETAINED FOR FUTURE REFERENCE Important Safety Advice: When using electrical appliances, basic precautions should always be followed to reduce the risk of fire, electrical shock and injury to persons, including the following: If the appliance is damaged, check with the supplier before installation and operation. Do not use outdoors.
Installation Instructions Before installing this appliance in an existing chimnney, we recommend that; 1. You have your chimney cleaned by a competent chimney sweep. 2. You block off the chimney flue. This procedure is important for the efficient operation of the heating unit and will also reduce heat loss up the chimney. Installation. Ensure that all packing items are removed (read any warning labels carefully). Retain all packing for possible future use e.g.
Tips for using your appliance. 1. With the flame setting on minimum the unit will use approximately 40ml of water per hour and will last 3 times as long than when it is at maximum flame setting. 2. Do not tilt or move the fire while there is water in the tank or sump. 3. Make sure that the fire is on a level floor. 4. The flame control knob ‘D’ Fig.2 may be turned up or down to give a more realistic effect. 5. Sometimes the flames appear more real when the flame control knob is turned down. 6.
9. Put a small amount of washing up liquid into the sump, and using the supplied brush, gently clean all surfaces in the sump and gently clean the transducer including the metal discs located in the top grooved surface. (See Fig.9) 10. When cleaned, thoroughly rinse the sump with clean water to remove all traces of washing up liquid. 11. Clean the outlet surface of the sump lid with the brush and flush out thoroughly with water. (See Fig.10) 12. Reverse the above steps to reassemble. Air filter. 1.
Within the extended warranty period we undertake to repair or exchange this product free of charge providing: a) Proof of purchase such as a sales receipt can be provided, showing that the appliance was bought within the 24-months prior to registering the defect/fault. b) The appliance was correctly installed and operated in accordance with the manufacturer’s instructions and used solely for domestic purposes.
Troubleshooting Symptom Cause Corrective Action The flame effect will not start. Mains plug is not plugged in. Check plug is connected to wall socket correctly. Low water level. Check that the water tank is full and there is water in the sump. Low voltage connector not connected properly. Check that the connector is inserted correctly. (See Fig.6) (See Fig.6) The flame effect is too low.
OPTIMYST is a trade mark of GDC Group Ltd. DIMPLEX MILLBROOK HOUSE GRANGE DRIVE HEDGE END SOUTHAMPTON TEL: 0844 879 3588 FAX: 0844 879 3583 WEBSITE: www.dimplex.co.uk Republic of Ireland Tel. 01 8424833 SO30 2DF [c] GDC Group Ltd, All rights reserved. Material contained in this publication may not be reproduced in whole or in part, without prior permission in writing of Dimplex.