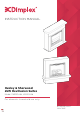
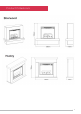
INSTRUCTION MANUAL Huxley & Sherwood 2kW Revillusion Suites Model: SWD20-AU, HXY20-AU For domestic household use only.
IMPORTANT THESE INSTRUCTIONS SHOULD BE READ CAREFULLY AND RETAINED FOR FUTURE REFERENCE. CAUTION: FAILURE TO FOLLOW THESE INSTRUCTIONS MAY CAUSE INJURY AND/ OR DAMAGE AND MAY INVALIDATE YOUR WARRANTY Please read the operating instructions carefully before using your product for the first time and keep them in a safe place.
• Although this appliance complies with safety standards, we do not recommend its use on deep pile carpets or on long hair type of rugs • The appliance must be positioned so that the plug is accessible. • If the supply cord is damaged it must be replaced by the manufacturer or service agent or a similarly qualified person in order to avoid a hazard. • Keep the supply cord away from the front of the appliance.
WARNING: KEEP BATTERIES OUT OF REACH OF CHILDREN • Swallowing may lead to serious injury in as little as 2 hours or death, due to chemical burns and potential perforation of the oesophagus. • If you suspect your child has swallowed or inserted a button battery immediately call the 24-hour Poisons Information Centre on 13 11 26 (in Australia) or 0800 764 766 (in New Zealand) for fast, expert advice. • Examine devices and make sure the battery compartment is correctly secured, e.g.
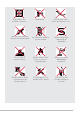
Exposed to the weather outdoors Near water If the power cable wires are frayed or cut Where small children may be left unattended No extension leads or power boards Where the power cable may be damaged On a slope or uneven surface Where there is risk of fire or close to a naked flame Where it may be damaged by chemicals Where there is a risk of interference by foreign objects This product is not made for DIY repair If there is a risk of water falling on the unit 5
Specifications Model no. Colour/Finish Wattage Heat Settings Thermostat Control Remote Control Warranty Dimensions (w x d x h) SWD20-AU HXY20-AU White 2000 2 Y Y 2 years 1380 x 415 x 1245 1400 x 415 x 1225 For greater precision, please always refer to the rating label placed on the product.
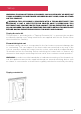
Product Dimensions 7
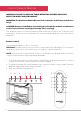
Setup Operating Temperature -20°-40°C Fixed Wiring In some jurisdictions this appliance is supplied without a plug. This is to comply with local regulations. In such instances, this appliance must be installed by a suitably qualified installer and the means for disconnection must be incorporated in the fixed wiring in accordance to the local wiring rules.
Setup WARNING: FALLING OR TIPPING APPLIANCES CAN CAUSE INJURY OR DEATH OF YOUNG CHILDREN, PLEASE ENSURE CHILDREN DO NOT CLIMB, HANG OR STAND ON THIS PRODUCT. WARNING: THIS APPLIANCE IS PROVIDED WITH A TIPPING RESTRAINT. THIS RESTRAINT IS NOT A SUBSTITUTE FOR PROPER ADULT SUPERVISION. THIS RESTRAINT MAY PROVIDE PROTECTION AGAINST TIPPING FURNITURE. DO NOT ALLOW CHILDREN TO CLIMB ON FURNITURE. FAILURE TO DETACH THIS RESTRAINT BEFORE MOVING FURNITURE MAY RESULT IN INJURY AND DAMAGE.
Control Panel & Remote WARNING: FAILURE TO FOLLOW THESE OPERATING INSTRUCTIONS MAY RESULT IN INJURY AND/OR DAMAGE. WARNING: The Revillusion Built-in Electric Firebox must be installed properly before usage. CAUTION: Except for installation and cleaning described in the manual, an authorised service representative should perform any other servicing. The manual controls for the Revillusion Built-in Electric Firebox are located on the front panel. Touch an icon to activate.
Control Panel & Remote To replace the battery: 1. Remove the screw, push down on the battery cover located on the back side of the remote control. Slide the battery cover open. 2. Install 3V (CR2032) Lithium battery in the battery holder. The positive side (+) of the battery faces up. 3. Close the battery cover and replace the screw. Discard leaking batteries: Dispose of batteries in the proper manner according to provincial and local regulations.
Operation Operating Instructions Icon A B Function Power/Standby Heat Description Press to turn the unit on or put it in Standby mode. When the unit is turned back on, it will retain the previously used settings (except timer). Heat On Press to turn heat On (indicated by 1 short beep and the icon appearing on the display). The display will show the current heater temperature setting. Use the Temp Up/Down icon to change the heater temperature setting.
Operation User Modes: Mode Name /Description 0 Action (Actions cannot be input by remote control) 0 Change Celsius ( C) to Fahrenheit ( F) Press both Temp down ( ) and Temp up ( ) on the unit and hold until beep is heard and display flashes. (To revert back to Celsius repeat this action) Disable/Enable Heat Options ) and Heat cycle ( ), Hold both Flame cycle ( on the product, for 5 seconds, when the heater has been disabled the product will beep.
Cleaning Maintenance Inspect the built-in firebox regularly depending on conditions and at a minimum, yearly intervals. Remove dust and clean the logs, grate and base as required. WARNING: Disconnect power and allow heater to cool before attempting any maintenance or cleaning to reduce the risk of fire, electric shock or injury. CAUTION: Except for installation and cleaning described in this manual, an authorized service representative should perform any other servicing.
Warranty Please refer to the warranty card in the box for warranty information. For any troubleshooting advice, please contact the relative Customer Care Centre below. Glen Dimplex Australia Pty Ltd 8 Lakeview Drive, Scoresby 3179, Victoria Australia Ph: 1300 556 816 Glen Dimplex New Zealand Ltd 38 Harris Road, East Tamaki, Auckland 2013 New Zealand Ph: 0800 666 2824 Recycling: Do not dispose of electrical appliances as unsorted municipal waste. Use separate collection facilities.
Customer Care: 1300 556 816 customer.care@glendimplex.com.au www.dimplex.com.au Supplied by Glen Dimplex Australia 8 Lakeview Drive, Scoresby, Victoria, 3179 © Glen Dimplex Australia. All rights reserved. Material contained in this publication may not be reproduced in whole or in part, without prior permission in writing of Glen Dimplex Australia.