
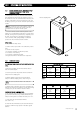
Technical data

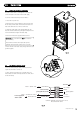

1133..00 CCHHAANNGGIINNGG CCOOMMPPOONNEENNTTSS
IIMMPPOORRTTAANNTT::
When changing components ensure that both
the gas and electrical supplies to the boiler are isolated
before any work is started.
See Section 12 : “Annual Servicing” for removal of case, panel,
door etc.
3300
© Dimple
x Boiler
s 2008
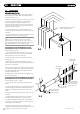
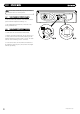
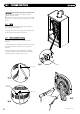
1133..11 IIGGNNIITTEERR
1. Disconnect the two feed wires, earth wire and electrode
lead noting their positions (Fig. 53).
2. Undo the two screws securing the igniter to its bracket and
remove the igniter. Reassemble in reverse order.
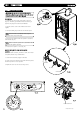
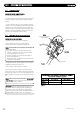
1133..22 SSPPAARRKK AANNDD SSEENNSSIINNGG EELLEECCTTRROODDEESS
1. Disconnect the electrode leads, noting their positions
(Fig. 56).
2. Using a 3mm Hex key, remove the retaining screws securing
each of the electrodes to the burner door and remove the
electrodes.
3. Check the condition of the sealing gaskets and replace if
necessary. Reassemble in reverse order and then check that
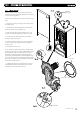
the electrode gaps are as shown in Fig. 54 & 55.
FFiigg.. 5533
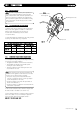
FFiigg.. 5544
FFiigg.. 5555
FFiigg.. 5566
Igniter
Gasket
6mm ± 0.5
to Burner
4mm ± 0.5
10mm ± 0.5