Bellingham 12kW Multi-fuel stove (BLM12SE) Please hand these instructions to the stove user when installation is complete. Leave the system ready for operation and instruct the user in the correct use of the appliance and operation of controls. Installation should only be carried out by a suitably qualified installer. Dimplex recommend using an installer who is registered with HETAS (UK) or with INFO (Republic of Ireland). Installation must comply with all current Building Regulations.
-2- B 1 F C D K (Dia) H G A J I E Table 1 - Dimensions A B C D E F G H I J K Bellingham 12kw 696 680 35 340 120 383 70 155 193 549 152 Note: All Dimensions in mm. Dimensions stated may be subject to a slight ± variation. ( 25.4mm = 1”) Bellingham 12kw (BLM12SE) Table 2 - Technical Specification Wood Solid Fuel (Ancit) Nominal heat output kW 11.6 11.5 Efficiency % 74.8 74.0 CO Emission (@13% O2) % 0.23 0.
-3- 4 5 Solid, non-combustible material e.g.
-4- 8 9 Fire proof seal or fire cement SEAL 150mm max 150mm max 30mm min 10 11 C B A CLOSURE PLATE
Bellingham 12kW (BLM12SE) -5- IMPORTANT: THESE INSTRUCTIONS SHOULD BE READ CAREFULLY AND RETAINED FOR FUTURE REFERENCE Important Safety Advice Please read these instructions carefully before installing or using this appliance. Failure to do so may result in damage to persons and property.
-6- Connect the flue pipe to the stove making sure that it fits snugly into the base of the flue collar . Seal the collar and flue connection with fire cement or with other suitable high temperature sealant. Add flue sections as required; note that all flue sockets must face upwards. Ensure that the flue pipe end is no closer than 76mm to the side or rear of the chimney walls. It is essential that all connections between the stove and the chimney flue are sealed and made airtight.
-7- Operating Instructions Warning: This appliance and its operating handles become hot when the stove is in use and for some time afterwards. For your safety use the glove provided. Initial Firing of Stove Please note that the stove paint and fire cement cures during the inital firing period. Upon first lighting, smoke may rise from the surface of the stove as the paint cures and this can give off a strong smell, however this is quite normal.
-8- Safety Notes for Your Guidance Troubleshooting FIRES CAN BE DANGEROUS. Always use a fire guard in the presence of children, the elderly or the infirm. Inform all persons the dangers of high temperatures during operation of the appliance including the stove pipe. 1. Poor heat output a. Stove too small for room: Seek advice from a Qualified Heating Engineer as to (kW) output required for the room size. As a guideline the volume of the room in cubic feet divided by 500; e.g.
-9- The Clean Air Act 1993 and Smoke Control Areas Under the Clean Air Act local authorities may declare the whole or part of the district of the authority to be a smoke control area. It is an offence to emit smoke from a chimney of a building, from a furnace or from any fixed boiler if located in a designated smoke control area.
- 10 -
- 11 - Bellingham 12kW (BLM12SE) 1 19 3 6 27 18 17 23 10 9 8 14 5 16 12 21 15 28 11 13 2 20 24 4 22 7 BELLINGHAM 12KW STOVE (BLM12SE) - SPARE PARTS Item Description Part Number Item Description Part Number 1 HINGE 1/70095/0 15 DOOR CATCH LH 1/70319/0 2 LEG 1/70096/0 16 GRATE BAR 1/70420/0 3 REAR BRICK HOLDING BRACKET 1/70184/0 17 FLUE CAP 1/70570/0 4 HAND TOOL 1/70186/0 18 FLUE GASKET 1/70843/0 5 DOOR PIN 1/70188/0 19 GLASS FIXING BRACKETS 1/7089
Great Britain: GDC Group Ltd Millbrook House Grange Drive Hedge End Southampton SO30 2DF Northern Ireland: Glen Dimplex Northern Ireland 5 Charlestown Avenue Charlestown Industrial Estate Craigavon Co. Armagh BT63 5ZF Republic of Ireland: Dimpco Ltd Old Airport Road Cloghran Co Dublin Ireland t f e w t f e w t f e w +44 (0)844 879 3588 +44 (0)1489 773050 aftersales@dimplex.co.uk www.dimplex.co.uk +44 (0) 2838 337 317 +44 (0) 2838 350 208 info@glendimplexni.co.uk www.glendimplexni.co.
Westcott 4.3kW Multifuel Inset Stove For Standard 16” Fireplace Opening Please hand these instructions to the stove user when installation is complete. Leave the system ready for operation and instruct the user in the correct use of the appliance and operation of controls. Installation should only be carried out by a suitably qualified installer that is registered with HETAS (UK) or with the Irish Nationwide Fireplace Organisation (INFO). Installation must comply with Building Regulations.
1 B 2 H J B 45˚ A K C E D C L (Dia) G F A Table 1 - Dimensions A B C D E F G H J K L Westcott Insert 598 492 538 255 393 105 185 190 88 365 152 Note: All Dimensions in mm. Dimensions stated may be subject to a slight ± variation. ( 25.4mm = 1”) Westcott Inset WST4i Table 2 - Technical Specification Wood Solid Fuel Nominal heat output kW 4.3 3.9 Efficiency % 80.9 75.0 CO Emission (@13% O2) % 0.67 0.56 Flue Gas Temp °C 215 162 Flue Gas Mass Flow g/s 2.
5 6 1 3 2 7 7 8 Fireplace Opening 400mm (16”) X 5 non combustible wall min thick Y fireback and insulated infill X 4 CONSTRUCTIONAL HEARTH NON COMBUSTIBLE 125mm THICK MINIMUM min 225mm 6 Z 9 Z = At least 150mm or to a suitably heat resistant wall Typical installation Lintel or Gather Clay Flue pipe Fireback to BS1251 Change in flooring level to distinguish hearth Constructional Hearth min 125mm thick min 75mm Z
-1- Wescott 4.3kW Multifuel Inset Stove (WST4i) IMPORTANT: THESE INSTRUCTIONS SHOULD BE READ CAREFULLY AND RETAINED FOR FUTURE REFERENCE Important Safety Advice Please read these instructions carefully before installing or using this appliance. Failure to do so may result in damage to persons and property.
-2- the contents including the fixing bar (Fig 4). 3. Secure the fixing bar using the hinge pins and after feeding the tightening bar through the fixing bar, add the washers and wingnut onto the end (1 & 2, Fig 5). 4. Open the sealing kit supplied and glue sealing rope into the channel on rear edge of appliance (3, Fig 6). Use suitable protective gloves when handling glue to prevent contact. In case of contact, wash immediately with plenty of water. 5.
-3- Air Controls Primary air is controlled via the sliding vents (Fig 2a) in the bottom of the door; this provides a conventional air draught to the bed of the fire. Moving the slider to the right increases the air intake, to the left reduces the air intake. Secondary air is controlled via the sliding vent (Fig 2b) above the door.
-4- Stove Body The stove is finished with a heat resistant paint and this can be cleaned with a soft brush. Do not clean while the stove is hot, wait until it has cooled down. The finish can be renovated with a suitable brand of paint. Glass Panels Clean the glass panels when cool with a proprietary glass cleaner. Highly abrasive substances should be avoided as these can scratch the glass and make subsequent cleaning more difficult.
Westcott 4.3kW Inset (WST4i) 17 10 16 15 18 19 3 14 2 13 12 8 9 11 1 7 20 6 4 5 WESTCOTT 4.
Bellingham 4.7kW Multifuel Inset Stove For Standard 16” Fireplace Opening Please hand these instructions to the stove user when installation is complete. Leave the system ready for operation and instruct the user in the correct use of the appliance and operation of controls. Installation should only be carried out by a suitably qualified installer. Dimplex recommend using an installer who is registered with HETAS (UK) or with INFO (Republic of Ireland).
-2- B 1 H J 45˚ A K C E D L (Dia) G F Table 1 - Dimensions A Bellingham Inset 4.7kw 600 B C D E F G H J K L 500 540 250 393 111 167 192 150 340 152 Note: All Dimensions in mm. Dimensions stated may be subject to a slight ± variation. ( 25.4mm = 1”) Bellingham Inset BLM4iSE Table 2 - Technical Specification Wood Solid Fuel Nominal heat output kW 4.7 4.7 Efficiency % 81.8 72.8 CO Emission (@13% O2) % 0.24 0.
-3- 4 5 1 2 7 6 6 7 3 4 5
-4- 8 9 B 8 9 C A 10 11 10 Typical installation X Fireplace Opening 400mm (16”) non combustible wall min thick Y Lintel or Gather Fireback to BS1251 fireback and insulated infill X Clay Flue pipe Change in flooring level to distinguish hearth CONSTRUCTIONAL HEARTH NON COMBUSTIBLE 125mm THICK MINIMUM min 225mm Z Z = At least 150mm or to a suitably heat resistant wall Constructional Hearth min 125mm thick Z min 75mm
-5- Bellingham 4.7kW Multifuel Inset Stove (BLM4iSE) IMPORTANT: THESE INSTRUCTIONS SHOULD BE READ CAREFULLY AND RETAINED FOR FUTURE REFERENCE Important Safety Advice Please read these instructions carefully before installing or using this appliance. Failure to do so may result in damage to persons and property.
-6- 7. 8. contact with the fascia. Place hand through the stove collar and tighten the wingnut on the clamping bar (7, Fig 7). The clamp creates pressure when it contacts the chimney/lintel. The stove should be tightly sealed to the fireplace fascia. Table 3 Stove distance X from wall Min Wall Thickness Y If required the stove may be secured directly to the fascia using the fixing screw holes (8, Fig 9).
-7- Commissioning Upon completion of installation, the stove and flue system should be tested by a suitably qualified person to make sure it is safe for normal use. A smoke draw test should be completed to check for soundness of joints and seals and also that all smoke and fumes are taken from the appliance up the chimney and emitted safely. First warm the flue with a blowlamp or similar for about 10 minutes. Place a lit smoke pellet on the centre of the grate with the air controls open.
-8- De-Ashing This insert stove is fitted with a removable log bar and grate. It is important to de-ash the stove regularly to prevent ash build up which may impede the primary air input. Where possible, it is best to wait until the stove and ash has cooled fully before removing the ash pan. To remove, open the stove door by turning the handle anti-clockwise (Fig 9 C) then using the hand tool provided lift the ash pan out of the fire (Fig 4).
-9- The Clean Air Act 1993 and Smoke Control Areas Under the Clean Air Act local authorities may declare the whole or part of the district of the authority to be a smoke control area. It is an offence to emit smoke from a chimney of a building, from a furnace or from any fixed boiler if located in a designated smoke control area.
- 10 -
- 11 - Bellingham 4.7kW Inset (BLM4iSE) 8 5 6 4 19 17 23 10 7 16 24 14 15 21 20 12 11 9 3 2 22 1 13 18 BELLINGHAM 4.
Great Britain: GDC Group Ltd Millbrook House Grange Drive Hedge End Southampton SO30 2DF Northern Ireland: Glen Dimplex Northern Ireland 5 Charlestown Avenue Charlestown Industrial Estate Craigavon Co. Armagh BT63 5ZF Republic of Ireland: Dimpco Ltd Old Airport Road Cloghran Co Dublin Ireland t f e w t f e w t f e w +44 (0)844 879 3588 +44 (0)1489 773050 aftersales@dimplex.co.uk www.dimplex.co.uk +44 (0) 2838 337 317 +44 (0) 2838 350 208 info@glendimplexni.co.uk www.glendimplexni.co.
Bellingham 4.7kW Wood Only Inset Stove For Standard 16” Fireplace Opening Please hand these instructions to the stove user when installation is complete. Leave the system ready for operation and instruct the user in the correct use of the appliance and operation of controls. Installation should only be carried out by a suitably qualified installer. Dimplex recommend using an installer who is registered with HETAS (UK) or with INFO (Republic of Ireland).
-2- B 1 H J 45˚ A K C E D L (Dia) G F Table 1 - Dimensions A Bellingham Inset 4.7kw 600 B C D E F G H J K L 500 540 250 393 111 167 192 150 340 152 Note: All Dimensions in mm. Dimensions stated may be subject to a slight ± variation. ( 25.4mm = 1”) Bellingham Inset BLM4iWB Table 2 - Technical Specification Wood Nominal heat output kW 4.7 Efficiency % 81.8 CO Emission (@13% O2) % 0.24 Flue Gas Temp °C 233 Flue Gas Mass Flow g/s 3.
-3- 4 5 1 2 7 6 6 7 3 4 5
-4- 8 9 B 8 9 A 10 11 10 Typical installation X Fireplace Opening 400mm (16”) non combustible wall min thick Y Lintel or Gather Fireback to BS1251 fireback and insulated infill X Clay Flue pipe Change in flooring level to distinguish hearth CONSTRUCTIONAL HEARTH NON COMBUSTIBLE 125mm THICK MINIMUM min 225mm Z Z = At least 150mm or to a suitably heat resistant wall Constructional Hearth min 125mm thick Z min 75mm
-5- Bellingham 4.7kW Wood Only Inset Stove (BLM4iWB) IMPORTANT: THESE INSTRUCTIONS SHOULD BE READ CAREFULLY AND RETAINED FOR FUTURE REFERENCE Important Safety Advice Please read these instructions carefully before installing or using this appliance. Failure to do so may result in damage to persons and property.
-6- 7. 8. contact with the fascia. Place hand through the stove collar and tighten the wingnut on the clamping bar (7, Fig 7). The clamp creates pressure when it contacts the chimney/lintel. The stove should be tightly sealed to the fireplace fascia. Table 3 Stove distance X from wall Min Wall Thickness Y If required the stove may be secured directly to the fascia using the fixing screw holes (8, Fig 9).
-7- Commissioning Upon completion of installation, the stove and flue system should be tested by a suitably qualified person to make sure it is safe for normal use. A smoke draw test should be completed to check for soundness of joints and seals and also that all smoke and fumes are taken from the appliance up the chimney and emitted safely. First warm the flue with a blowlamp or similar for about 10 minutes. Place a lit smoke pellet on the centre of the grate with the air controls open.
-8- Safety Notes for Your Guidance Troubleshooting FIRES CAN BE DANGEROUS. Always use a fire guard in the presence of children, the elderly or the infirm. Inform all persons the dangers of high temperatures during operation of the appliance including the stove pipe. Use operating tools provided. 1. Poor heat output DO NOT OVER FIRE. It is possible to fire the stove beyond its design capacity. This could damage the stove, so watch for signs of over firing.
-9- The Clean Air Act 1993 and Smoke Control Areas Under the Clean Air Act local authorities may declare the whole or part of the district of the authority to be a smoke control area. It is an offence to emit smoke from a chimney of a building, from a furnace or from any fixed boiler if located in a designated smoke control area.
- 10 -
- 11 - Bellingham 4.7kW Wood Only Inset (BLM4iWB) 8 5 6 4 19 17 23 10 7 16 24 14 15 21 20 12 11 9 3 2 22 1 13 18 BELLINGHAM 4.
Great Britain: GDC Group Ltd Millbrook House Grange Drive Hedge End Southampton SO30 2DF Northern Ireland: Glen Dimplex Northern Ireland 5 Charlestown Avenue Charlestown Industrial Estate Craigavon Co. Armagh BT63 5ZF Republic of Ireland: Dimpco Ltd Old Airport Road Cloghran Co Dublin Ireland t f e w t f e w t f e w +44 (0)844 879 3588 +44 (0)1489 773050 aftersales@dimplex.co.uk www.dimplex.co.uk +44 (0) 2838 337 317 +44 (0) 2838 350 208 info@glendimplexni.co.uk www.glendimplexni.co.
Bellingham 5kW Multi-fuel stove (BLM5SE) Please hand these instructions to the stove user when installation is complete. Leave the system ready for operation and instruct the user in the correct use of the appliance and operation of controls. Installation should only be carried out by a suitably qualified installer. Dimplex recommend using an installer who is registered with HETAS (UK) or with INFO (Republic of Ireland). Installation must comply with all current Building Regulations.
-2- B 1 F C D K (Dia) H G A J I E Table 1 - Dimensions A B C D E F G H I J K Bellingham 5kw 596 466 35 233 120 368 70 140 195 465 127 Note: All Dimensions in mm. Dimensions stated may be subject to a slight ± variation. ( 25.4mm = 1”) Table 2 - Technical Specification Bellingham 5kw Wood kW 5.0 Solid Fuel (Ancit) kW 4.9 Wood % 84.3 Solid Fuel (Ancit) % 85.0 Wood % 0.34 Solid Fuel (Ancit) % 0.27 Wood °C 210 Solid Fuel (Ancit) °C 215 Wood g/s 3.
-3- 4 5 Solid, non-combustible material e.g.
-4- 8 9 Fire proof seal or fire cement 150mm max SEAL 150mm max 10 11 C A B CLOSURE PLATE
Bellingham 5kW (BLM5SE) -5- IMPORTANT: THESE INSTRUCTIONS SHOULD BE READ CAREFULLY AND RETAINED FOR FUTURE REFERENCE Important Safety Advice Please read these instructions carefully before installing or using this appliance. Failure to do so may result in damage to persons and property.
-6- Connect the flue pipe to the stove making sure that it fits snugly into the base of the flue collar . Seal the collar and flue connection with fire cement or with other suitable high temperature sealant. Add flue sections as required; note that all flue sockets must face upwards. Ensure that the flue pipe end is no closer than 76mm to the side or rear of the chimney walls. It is essential that all connections between the stove and the chimney flue are sealed and made airtight.
-7- Operating Instructions baffle plate. The stove must not be operated with the door left open. Warning: This appliance and its operating handles become hot when the stove is in use and for some time afterwards. For your safety use the glove provided. The stove is not suitable for overnight burning, however it can be banked up to burn for extended periods. Before refuelling, empty the ashpan, especially when burning solid fuel.
-8- Safety Notes for Your Guidance FIRES CAN BE DANGEROUS. Always use a fire guard in the presence of children, the elderly or the infirm. Inform all persons the dangers of high temperatures during operation of the appliance including the stove pipe. Use operating tools provided. DO NOT OVER FIRE. It is possible to fire the stove beyond its design capacity. This could damage the stove, so watch for signs of over firing.
-9- The Clean Air Act 1993 and Smoke Control Areas Under the Clean Air Act local authorities may declare the whole or part of the district of the authority to be a smoke control area. It is an offence to emit smoke from a chimney of a building, from a furnace or from any fixed boiler if located in a designated smoke control area.
- 10 -
- 11 - Bellingham 5kW (BLM5SE) 7 8 10 9 11 12 13 3 14 15 2 6 16 1 17 4 5 18 19 21 20 BELLINGHAM 5KW STOVE (BLM5SE) - SPARE PARTS Item Description Part Number Item Description Part Number 1 DOOR 1/70099/0 13 GRATE BAR 1/70420/0 2 HINGE 1/70095/0 14 BAFFLE PLATE 1/70108/0 3 DOOR PIN 1/70188/0 15 LINER BRICK PACK (2xREAR, 2xSIDE) 3/23128/0 4 DOOR HANDLE ASSEMBLY 4/19089/0 16 GRATE FRAME 1/70421/0 5 DOOR CATCH 1/70181/0 17 RIDDLE ARM 1/70422/0 6 DOOR GLA
Great Britain: GDC Group Ltd Millbrook House Grange Drive Hedge End Southampton SO30 2DF Northern Ireland: Glen Dimplex Northern Ireland 5 Charlestown Avenue Charlestown Industrial Estate Craigavon Co. Armagh BT63 5ZF Republic of Ireland: Dimpco Ltd Old Airport Road Cloghran Co Dublin Ireland t f e w t f e w t f e w +44 (0)844 879 3588 +44 (0)1489 773050 aftersales@dimplex.co.uk www.dimplex.co.uk +44 (0) 2838 337 317 +44 (0) 2838 350 208 info@glendimplexni.co.uk www.glendimplexni.co.
Bellingham 8kW Multi-fuel stove (BLM8) Please hand these instructions to the stove user when installation is complete. Leave the system ready for operation and instruct the user in the correct use of the appliance and operation of controls. Installation should only be carried out by a suitably qualified installer. Dimplex recommend using an installer who is registered with HETAS (UK) or with INFO (Republic of Ireland). Installation must comply with all current Building Regulations.
-2- B 1 F C D K (Dia) H G A J I E Table 1 - Dimensions A B C D E F G H I J K Bellingham 8kw 616 566 35 283 120 368 70 140 195 485 152 Note: All Dimensions in mm. Dimensions stated may be subject to a slight ± variation. ( 25.4mm = 1”) Bellingham 8kw (BLM8) Table 2 - Technical Specification Wood Solid Fuel (Ancit) Nominal heat output kW 8.0 8.3 Efficiency % 80.0 79.6 CO Emission (@13% O2) % 0.36 0.19 Flue Gas Temp °C 313 317 Flue Gas Mass Flow g/s 4.
-3- 4 5 Solid, non-combustible material e.g.
-4- 8 9 Fire proof seal or fire cement 150mm max SEAL 150mm max 30mm min 10 11 C A B CLOSURE PLATE
Bellingham 8kW (BLM8) -5- IMPORTANT: THESE INSTRUCTIONS SHOULD BE READ CAREFULLY AND RETAINED FOR FUTURE REFERENCE Important Safety Advice Please read these instructions carefully before installing or using this appliance. Failure to do so may result in damage to persons and property.
-6- Connect the flue pipe to the stove making sure that it fits snugly into the base of the flue collar . Seal the collar and flue connection with fire cement or with other suitable high temperature sealant. Add flue sections as required; note that all flue sockets must face upwards. Ensure that the flue pipe end is no closer than 76mm to the side or rear of the chimney walls. It is essential that all connections between the stove and the chimney flue are sealed and made airtight.
-7- Operating Instructions baffle plate. The stove must not be operated with the door left open. Warning: This appliance and its operating handles become hot when the stove is in use and for some time afterwards. For your safety use the glove provided. The stove is not suitable for overnight burning, however it can be banked up to burn for extended periods. Before refuelling, empty the ashpan, especially when burning solid fuel.
-8- Safety Notes for Your Guidance FIRES CAN BE DANGEROUS. Always use a fire guard in the presence of children, the elderly or the infirm. Inform all persons the dangers of high temperatures during operation of the appliance including the stove pipe. Use operating tools provided. DO NOT OVER FIRE. It is possible to fire the stove beyond its design capacity. This could damage the stove, so watch for signs of over firing.
-9- After Sales Service As a sign of our commitment to quality, all new Dimplex solid fuel stoves are guaranteed against casting faults and other manufacturing defects for 10 years in the case of non-boiler stoves and 5 years in the case of boiler models, subject to certain conditions and exclusions. The guarantee covers the main body of the stove and external cast parts under normal domestic use - it does not cover use in commercial premises. The guarantee period begins on the date of purchase.
- 10 -
- 11 - Bellingham 8kW (BLM8) 10 9 3 11 13 12 15 14 8 4 7 2 16 1 17 5 6 19 20 22 18 21 BELLINGHAM 8KW STOVE (BLM8) - SPARE PARTS Item Description Part Number Item Description Part Number 1 DOOR 1/70198/0 13 LOG BAR 1/70573/0 2 DOOR HINGE 1/70610/0 14 GRATE BAR 1/70420/0 3 HINGE 1/70095/0 15 BAFFLE PLATE 1/70203/0 4 DOOR PIN 1/70188/0 16 LINER BRICK PACK (2xREAR, 2xSIDE) 3/23129/0 5 DOOR HANDLE ASSEMBLY 4/19089/0 17 GRATE FRAME 1/70572/0 6 DOOR CATCH
Great Britain: GDC Group Ltd Millbrook House Grange Drive Hedge End Southampton SO30 2DF Northern Ireland: Glen Dimplex Northern Ireland 5 Charlestown Avenue Charlestown Industrial Estate Craigavon Co. Armagh BT63 5ZF Republic of Ireland: Dimpco Ltd Old Airport Road Cloghran Co Dublin Ireland t f e w t f e w t f e w +44 (0)844 879 3588 +44 (0)1489 773050 aftersales@dimplex.co.uk www.dimplex.co.uk +44 (0) 2838 337 317 +44 (0) 2838 350 208 info@glendimplexni.co.uk www.glendimplexni.co.
Westcott 12kW Stove Please hand these instructions to the stove user when installation is complete. Leave the system ready for operation and instruct the user in the correct use of the appliance and operation of controls. Installation should only be carried out by a suitably qualified installer that is registered with HETAS (UK) or with the Irish Nationwide Fireplace Organisation (INFO). Installation must comply with Building Regulations.
1 H C L (Dia) J D G A B K F E Table 1 - Dimensions A B C D E F G H J K L Westcott 12kW 688 640 652 326 670 104 50 356 113 538 150 Note: All Dimensions in mm. Dimensions stated may be subject to a slight ± variation. ( 25.4mm = 1”) Table 2 - Technical Specification Nominal heat output Efficiency CO Emission (@13% O2) Westcott 12kW Wood kW 12.1 Solid Fuel (Ancit) kW 12.2 Wood % 73.1 Solid Fuel (Ancit) % 71.0 Wood % 0.68 Solid Fuel (Ancit) % 0.
4 5 2 1 x2 6 Z Z = At least 150mm or to a suitably heat resistant wall (See table 3) Solid, non-combustible material e.g.
10 11 B SEAL CLOSURE PLATE C D A A 12 13
Westcott 12kW -1- IMPORTANT: THESE INSTRUCTIONS SHOULD BE READ CAREFULLY AND RETAINED FOR FUTURE REFERENCE Important Safety Advice Please read these instructions carefully before installing or using this appliance. Failure to do so may result in damage to persons and property.
-2- If there is no existing chimney then either a prefabricated block chimney or a twin walled insulated stainless steel flue to BS4543 can be used. These chimneys must be fitted in accordance with the manufacturers instructions and in compliance with Building Regulations. This product must not be installed on a shared flue.
-3- Commissioning Upon completion of installation, the stove and flue system should be tested by a suitably qualified person to make sure it is safe for normal use. A smoke draw test should be completed to check for soundness of joints and seals and also that all smoke and fumes are taken from the appliance up the chimney and emitted safely. First warm the flue with a blowlamp or similar for about 10 minutes. Place a lit smoke pellet on the centre of the grate with the air controls open.
-4- De-Ashing To de-ash the grate insert the notch on the riddle hand tool into the peg on the side of the stove (D - Fig 11), then draw the tool forwards and backwards with a slow positive action (Fig 12). The ash pan should be emptied each time after operating the stove so not to let build up of ash occur. Where possible, it is best to wait until the stove and ash has cooled before removing the ash pan.
-5- After Sales Service As a sign of our commitment to quality, all new Dimplex solid fuel stoves are guaranteed against casting faults and other manufacturing defects for 10 years in the case of non-boiler stoves and 5 years in the case of boiler models, subject to certain conditions and exclusions. The guarantee covers the main body of the stove and external cast parts under normal domestic use - it does not cover use in commercial premises. The guarantee period begins on the date of purchase.
WESTCOTT 12kW 15 4 7 5 2 14 11 10 9 13 3 8 1 16 2 12 WESTCOTT 12kW STOVE - SPARE PARTS Item Description Part No 1 Door Accessory Pack (x1 LH, x1 RH) MF09001 2 Grate Accessory Pack (incl Grate Outer, x10 Grate bars) MF09002 3 Adjustable Grate Plate MF09003 4 Baffle Plate Accessory Pack MF09004 5 Air Wash Deflector Plate 3011015 6 Primary Air Slide MF09006 7 Grate/Ashpan Operating Tool MF09007 8 Front Bar (Log bar) MF09008 9 Legs Accessory Pack (x2 off) MF09009 10 Do
DIMPLEX MILLBROOK HOUSE GRANGE DRIVE HEDGE END SOUTHAMPTON SO30 2DF TEL: 0845 600 5111 FAX: 01489 773050 WEBSITE: www.dimplex.co.uk Republic of Ireland Tel: 01 842 8222 [c]A Division of GDC Group Ltd. All rights reserved. Material contained in this publication may not be reproduced in whole or in part, without prior permission in writing of GDC Group Ltd.
Westcott 4.3kW Multifuel Inset Stove For Standard 16” Fireplace Opening Please hand these instructions to the stove user when installation is complete. Leave the system ready for operation and instruct the user in the correct use of the appliance and operation of controls. Installation should only be carried out by a suitably qualified installer that is registered with HETAS (UK) or with the Irish Nationwide Fireplace Organisation (INFO). Installation must comply with Building Regulations.
1 B 2 H J B 45˚ A K C E D C L (Dia) G F A Table 1 - Dimensions A B C D E F G H J K L Westcott Insert 598 492 538 255 393 105 185 190 88 365 147 Note: All Dimensions in mm. Dimensions stated may be subject to a slight ± variation. ( 25.4mm = 1”) Westcott Inset WST4i Table 2 - Technical Specification Wood Solid Fuel Nominal heat output kW 4.3 3.9 Efficiency % 80.9 75.0 CO Emission (@13% O2) % 0.67 0.56 Flue Gas Temp °C 215 162 Flue Gas Mass Flow g/s 2.
5 6 1 3 2 7 7 8 Fireplace Opening 400mm (16”) X 5 non combustible wall min thick Y fireback and insulated infill X 4 CONSTRUCTIONAL HEARTH NON COMBUSTIBLE 125mm THICK MINIMUM min 225mm 6 Z 9 Z = At least 150mm or to a suitably heat resistant wall Typical installation Lintel or Gather Clay Flue pipe Fireback to BS1251 Change in flooring level to distinguish hearth Constructional Hearth min 125mm thick min 75mm Z
-1- Wescott 4.3kW Multifuel Inset Stove (WST4i) IMPORTANT: THESE INSTRUCTIONS SHOULD BE READ CAREFULLY AND RETAINED FOR FUTURE REFERENCE Important Safety Advice Please read these instructions carefully before installing or using this appliance. Failure to do so may result in damage to persons and property.
-2- the contents including the fixing bar (Fig 4). 3. Secure the fixing bar using the hinge pins and after feeding the tightening bar through the fixing bar, add the washers and wingnut onto the end (1 & 2, Fig 5). 4. Open the sealing kit supplied and glue sealing rope into the channel on rear edge of appliance (3, Fig 6). Use suitable protective gloves when handling glue to prevent contact. In case of contact, wash immediately with plenty of water. 5.
-3- Air Controls Primary air is controlled via the sliding vents (Fig 2a) in the bottom of the door; this provides a conventional air draught to the bed of the fire. Moving the slider to the right increases the air intake, to the left reduces the air intake. Secondary air is controlled via the sliding vent (Fig 2b) above the door.
-4- Stove Body The stove is finished with a heat resistant paint and this can be cleaned with a soft brush. Do not clean while the stove is hot, wait until it has cooled down. The finish can be renovated with a suitable brand of paint. Glass Panels Clean the glass panels when cool with a proprietary glass cleaner. Highly abrasive substances should be avoided as these can scratch the glass and make subsequent cleaning more difficult.
Westcott 4.3kW Inset (WST4i) 17 10 16 15 18 19 3 14 2 13 12 8 9 11 1 7 20 6 4 5 WESTCOTT 4.
Westcott 5kW Stove Westcott 8kW Stove Please hand these instructions to the stove user when installation is complete. Leave the system ready for operation and instruct the user in the correct use of the appliance and operation of controls. Installation should only be carried out by a suitably qualified installer that is registered with HETAS (UK) or with the Irish Nationwide Fireplace Organisation (INFO). Installation must comply with Building Regulations.
1 H C D L (Dia) J G A B K F E Table 1 - Dimensions A B C D E F G H J K L Westcott 5kW 580 540 416 208 434 105 55 336 120 425 128 Westcott 8kW 602 554 544 272 564 102 55 309 126 418 154 Note: All Dimensions in mm. Dimensions stated may be subject to a slight ± variation. ( 25.4mm = 1”) Table 2 - Technical Specification Nominal heat output Efficiency CO Emission (@13% O2) Westcott 5kW kW 5.0 8.0 Solid Fuel (Ancit) kW 5.4 8.1 Wood % 79.7 76.
4 5 2 1 6 Z Z = At least 150mm or to a suitably heat resistant wall (See table 3) Solid, non-combustible material e.g.
10 11 SEAL CLOSURE PLATE C B D A 12 13
Wescott 5kW & 8kW -1- IMPORTANT: THESE INSTRUCTIONS SHOULD BE READ CAREFULLY AND RETAINED FOR FUTURE REFERENCE Important Safety Advice Please read these instructions carefully before installing or using this appliance. Failure to do so may result in damage to persons and property.
-2- If there is no existing chimney then either a prefabricated block chimney or a twin walled insulated stainless steel flue to BS4543 can be used. These chimneys must be fitted in accordance with the manufacturers instructions and in compliance with Building Regulations. This product must not be installed on a shared flue.
-3- Commissioning Upon completion of installation, the stove and flue system should be tested by a suitably qualified person to make sure it is safe for normal use. A smoke draw test should be completed to check for soundness of joints and seals and also that all smoke and fumes are taken from the appliance up the chimney and emitted safely. First warm the flue with a blowlamp or similar for about 10 minutes. Place a lit smoke pellet on the centre of the grate with the air controls open.
-4- Shut down Periods If shutting down the stove for long periods (e.g. for summer months) make sure that all ash is removed from the stove and that the chimney flue ways and baffle plate are brushed clean. When the stove is cold a vacuum cleaner may be used to remove any residual ash or soot. Close the door and leave all air inlets open fully. This action will ensure air circulation through the appliance and will help to avoid corrosion and condensation within the appliance during this shut down period.
-5- After Sales Service As a sign of our commitment to quality, all new Dimplex solid fuel stoves are guaranteed against casting faults and other manufacturing defects for 10 years in the case of non-boiler stoves and 5 years in the case of boiler models, subject to certain conditions and exclusions. The guarantee covers the main body of the stove and external cast parts under normal domestic use - it does not cover use in commercial premises. The guarantee period begins on the date of purchase.
WESTCOTT 5kW 6 14 3 2 7 5 15 12 9 8 11 4 16 13 10 1 WESTCOTT 5kW STOVE - SPARE PARTS Item Description Part No 1 Door MF09015 2 Grate Accessory Pack (incl Grate Outer, Grate inner, Con Rod) MF09016 3 Adjustable Grate Plate MF09017 4 Front Bar (log bar) MF09018 5 Air Wash Deflector Plate 3011013 6 Baffle Plate MF09020 7 Grate/Ashpan Operating Tool MF09007 8 Legs Accessory Pack (x2 off) MF09009 9 Primary Air Slide MF09021 10 Air slide knob Accessory Pack (x1 steel, x1 b
WESTCOTT 8kW 6 7 5 15 2 4 13 9 11 3 12 8 16 1 14 WESTCOTT 8kW STOVE - SPARE PARTS Item Description Part No 1 Door MF09025 2 Grate Accessory Pack (incl Grate Outer, Grate inner LH & RH, Connector, Con Rod) MF09026 3 Adjustable Grate Plate MF09027 4 Front Bar (log bar) MF09028 5 Air Wash Deflector Plate 3011014 6 Baffle Plate MF09030 7 Grate/Ashpan Operating Tool MF09007 8 Legs Accessory Pack (x2 off) MF09009 9 Primary Air Slide MF09031 10 Air slide knob Accessory Pa
DIMPLEX MILLBROOK HOUSE GRANGE DRIVE HEDGE END SOUTHAMPTON SO30 2DF TEL: 0845 600 5111 FAX: 01489 773050 WEBSITE: www.dimplex.co.uk Republic of Ireland Tel: 01 842 8222 [c]A Division of GDC Group Ltd. All rights reserved. Material contained in this publication may not be reproduced in whole or in part, without prior permission in writing of GDC Group Ltd.
Westcott 8kW, 13kW & 21kW Boiler Stoves Please hand these instructions to the stove user when installation is complete. Leave the system ready for operation and instruct the user in the correct use of the appliance and operation of controls. Installation should only be carried out by a suitably qualified installer that is registered with HETAS (UK) or with the Irish Nationwide Fireplace Organisation (INFO). Installation must comply with Building Regulations.
1 H C L (Dia - inch) J D P (Dia BSP inch) M G B O A K N F E Table 1 - Dimensions A B C D E F G H J K L M N O P Westcott 8kW Boiler 706 56 526 263 538 150 82 419 134 542 6” 315 321 320 1” Westcott 13kW Boiler 775 56 574 287 587 165 82 457 137 617 6” 315 356 345 1½” Westcott 21kw Boiler 839 56 634 317 657 165 82 503 140 681 6” 340 374 390 1½” Note: All Dimensions in mm, except L & P in inch.
4 5 3 (x 2) 2 5 4 (x 2) 1 6 Z = At least 150mm or to a suitably heat resistant wall (See table 3) Z Z 7 Solid, non-combustible material e.g.
11 12 C B D A E 1.
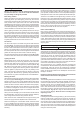
2. CENTRAL HEATING & HOT WATER (INDIRECT LINK UP) USING 4 TAPPINGS - STOVE AS PRIMARY HEAT SOURCE 22mm open vent Expansion pipes Cold Water Tank Header Tank Domestic Hot Water Heat Soak To Solar Panels Feed pipe shut off Indirect Hot Water Tank Gravity Flow 28mm Pipe Drain Cock Pipe Stat 90°C Gravity return 28mm pipe Pipe Stat 45°C Radiators Central Heating 22mm pipe Use Diagonal Tappings for each circuit Radiators Drain cock at lowest point Circulating pump 3.
-1- Wescott 8kW, 13kW & 21kW Boiler Stoves (WST8XB, WST13XB, WST21XB) IMPORTANT: THESE INSTRUCTIONS SHOULD BE READ CAREFULLY AND RETAINED FOR FUTURE REFERENCE Important Safety Advice Please read these instructions carefully before installing or using this appliance. Failure to do so may result in damage to persons and property.
-2- chimney must be swept before connection to the stove and swept every six months thereafter. (Fig 6) shows the minimum distances required from the hearth edge to the sides of the stove. If there is no existing chimney then either a prefabricated block chimney or a twin walled insulated stainless steel flue to BS4543 can be used. These chimneys must be fitted in accordance with the manufacturers instructions and in compliance with Building Regulations.
-3- Boiler Connection Warning: This stove should only be connected to your heating system by a qualified plumber or heating engineer (Hetas approved or equivalent) with experience in fitting boiler stoves. If it is not linked correctly it could result in serious damage to your home heating system. General: The design and installation of the heating system will be unique to each application. Plumbing should be carried out in accordance with relevant Building Regulations and safe practices.
-4- Lighting the Stove Place fire lighters or paper and kindling on the grate. Light the fire at base leaving all air controls open. Allow the fuel to reach a steady glow and build the fire up gradually. Once you have a good fire established across the grate bed, further fuel can be added as required. Running the Stove When your fuel is well alight you can start to restrict the primary air intake. If burning wood only the primary air control can be fully closed.
-5- baffle plate on back and side plate, lift plate and replace remaining brick, making sure it has located in position. This must be done when the stove is cold. Troubleshooting 1. Poor heat output a. Stove too small for room: Seek advice from a Qualified Heating Engineer as to (kW) output required for the room size. As a guideline the volume of the room in cubic feet divided by 500; e.g. room 15’x15’x8’ would require 3.6kW approx. b.
20 13 18 19 16 21 15 14 8 5 4 1 2 22 3 7 6 25 24 23 12 9 10 11 17 Westcott 8kW, 13kW & 21kw Boiler Stove - SPARE PART NUMBERS Item Description Westcott 8kW boiler Westcott 13kW boiler Westcott 21kW boiler 1 Door 3011030 3011050 3011070 2 Door Hinges 3011031 3011031 3011031 3 Door Handle Assembly 3011032 3011052 3011072 4 Glass 3011033 3011053 3011073 5 Glass Fixing Brackets 3011034 3011034 3011034 6 Primary Air Slide 3011035 3011055 3011075 7 Primary Air Kn
DIMPCO (A Glen Dimplex Company) AIRPORT ROAD CLOGHRAN CO DUBLIN IRELAND Customer Service Contacts: Tel: +353 1 842 8222 Fax: +353 1 842 8091 Website: www.service@dimpco.ie [c] A Division of GDC Group Ltd. All rights reserved. Material contained in this publication may not be reproduced in whole or in part, without prior permission in writing of GDC Group Ltd.