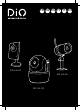
FR NL ES PT IT EN ED-CA-02 ED-CA-04 ED-CA-03 FR
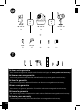
C ou, of, o ou, of, o ED - CA - 02 ED - CA - 02 ED - CA - 02 1x 1x 1x + 5V 1,5A 1x 1x 2x 2x 1x 5m RJ45 Activer votre garantie Pour activer votre garantie, remplissez le formulaire en ligne sur www.getdio.com/warranty Activeren van uw garantie Vul om uw garantie te activeren het onlineformulier in op www.getdio.com/warranty. Activar la garantía Para activar la garantía, rellene el formulario en línea en www.getdio.com/warranty.
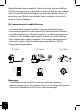
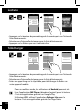
Configurer la caméra 1. Téléchargez l’application. Téléchargez l’application depuis l’App Store ou Google Play. Nom de l’application : DiO Cam 2. Allumez la caméra. Branchez l’adaptateur de courant à la caméra. NE BRANCHEZ PAS le câble Ethernet ! EC-CA-02 EC-CA-03 EC-CA-04 EC-CA-02 EC-CA-03 EC-CA-04 Lorsque le témoin vert s’allume selon un cycle d’une durée longue et de trois durées brèves, la caméra est prête pour une connexion sans fil directe. Cela prend en général moins d’une minute. 3a.
L’identifiant de caméra apparaît. Entrez le mot de passe par défaut 123456 et enregistrez les paramètres. Lorsque le témoin vert s’allume selon un cycle d’une durée longue suivie de deux durées brèves, la connexion sans fil directe est établie. Vous voyez alors la vue de la caméra. Passez à l’étape 4. 3b. Connexion avec le câble Ethernet. • Connectez votre appareil mobile à votre routeur domestique.
4. Paramètres Wi-Fi Avancés Entrez le mot de passe admin (par défaut 123456) Choisissez le bon routeur Wi-Fi pour votre réseau local. • La caméra se déconnectera pendant environ 40 secondes pour redémarrer la connexion Wi-Fi. Lorsque la caméra Voer wachtwoord in est connectée au Geavanceerd routeur, le témoin vert reste allumé.
Installation de la caméra ED-CA-02 ED-CA-03 Direct / Instantané / Lecture Direct camera 1 camera 2 camera 3 FR ED-CA-04
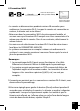
Instantané Crée une capture d’écran. Active ou désactive le volume en mode Direct. Enregistre la vidéo dans la carte mémoire de l’appareil. Définit ou rétablit une présélection. Maintenez l’icône appuyée pour parler et écouter (Push to Talk). Retourne à l’écran d’accueil. Réglage du ton de l’image. Selon l’environnement d’utilisation, vous souhaiterez peut-être changer le ton de l’image (plus chaud ou plus froid). Suivez cette procédure.
Lecture P List playback video YY-MM-DD HH:MM:SS YY-MM-DD HH:MM:SS select event filter start YY/MM/DD HH:MM stop YY/MM/DD HH:MM YY-MM-DD HH:MM:SS YY-MM-DD HH:MM:SS YY-MM-DD HH:MM:SS YY-MM-DD HH:MM:SS YY-MM-DD HH:MM:SS Cancel OK YY-MM-DD HH:MM:SS YY-MM-DD HH:MM:SS YY-MM-DD HH:MM:SS YY-MM-DD HH:MM:SS YY-MM-DD HH:MM:SS • Appuyez sur le bouton de paramétrage de la caméra puis sur l’icône de liste d’événements. • Sélectionnez l’intervalle de temps pour la liste d’événements.
Panoramique et inclinaison (ED-CA-03) • Dans le Direct, vous pouvez commander la direction de la caméra en balayant l’écran du doigt. Définit ou rétablit une présélection. Paramètres d’usine Appuyez pendant 5 secondes sur le bouton de réinitialisation sur le câble d’alimentation pour redémarrer le système. Le système rétablira les paramètres par défaut et vous pourrez configurer le Wi-Fi. Hotline www.getdio.com BE + 32 900 51 100 (Tarif nat. / Nat.
Installeren van de camera 1. Download de app. Download de app via de App Store / Google Play. Naam van de app: : DiO Cam 2. Schakel de camera in. Netvoedingsadapter aansluiten. Ethernetkabel NIET aansluiten. EC-CA-02 EC-CA-03 EC-CA-04 EC-CA-02 EC-CA-03 EC-CA-04 Als de groene indicator begint te knipperen in een herhaalde cyclus van 1 keer lang en 3 keer kort, dan is de camera klaar om draadloze verbinding te maken. Normaal duurt dit minder dan 1 minuut. 3a. Draadloze verbinding.
Het id-nummer van de camera verschijnt. Voer het standaardwachtwoord 123456 in en sla de instellingen op. Als de groene indicator 1 keer lang en vervolgens 2 keer kort knippert, dan betekent dit dat de draadloze verbinding succesvol gemaakt is. U ziet nu het camerabeeld verschijnen. Ga naar stap 4. 3b. Ethernetkabel verbinding. • Verbind uw mobiele toestel met uw thuisrouter. • Sluit de camera aan op uw thuis-wifirouter met de ethernetkabel en schakel vervolgens de camera in.
Choisissez le bon routeur Wi-Fi pour votre réseau local. 4. Wifi-instelling M Geavanceerd Voer wachtwoord in (standaard 123456) Selecteer de juiste wifirouter voor uw lokale netwerk. • De camera gaat circa 40 seconden offline om opnieuw op te starten voor wifiverbinding. Als de camera correct is met de Introducir verbonden contraseña Avanzada de administrador wifirouter, dan blijft de groene indicator aan.
Monteren van de camera ED-CA-02 ED-CA-03 ED-CA-04 Livebeeld / Snapshot / Afspelen Livebeeld camera 1 camera 2 camera 3 NL
Snapshot W Tik om een foto te maken van het beeld op het scherm. Tik om het volume in/uit te schakelen in de Livebeeld-modus. Tik om videobeelden op te nemen op de ingebouwde geheugenkaart. Tik om een vast punt op te geven of ernaar terug te keren. Houd uw vinger op het pictogram om een gesprek te voeren in beide richtingen. Tik om terug te keren naar de startpagina. Beeldtoon instellen. Volg vanwege het verschil in soorten omgevingen indien nodig de hier beschreven stappen om de kleurtoon (warm vs.
Weergave List playback video YY-MM-DD HH:MM:SS YY-MM-DD HH:MM:SS select event filter start YY/MM/DD HH:MM stop YY/MM/DD HH:MM YY-MM-DD HH:MM:SS YY-MM-DD HH:MM:SS YY-MM-DD HH:MM:SS YY-MM-DD HH:MM:SS YY-MM-DD HH:MM:SS Cancel OK YY-MM-DD HH:MM:SS YY-MM-DD HH:MM:SS YY-MM-DD HH:MM:SS YY-MM-DD HH:MM:SS YY-MM-DD HH:MM:SS • Tik op het pictogram Camerainstelling en vervolgens op het pictogram Gebeurtenissenlijst. • Selecteer de tijdsinterval voor de gebeurtenissenlijst.
Pannen en kantelen (ED-CA-03) • In de Livebeeld-modus kunt u de camera bedienen door met uw vinger te vegen. Tik om een vast punt op te geven of ernaar terug te keren. Standaardfabrieksinstellingen Houd de resetknop op de voedingskabel gedurende 5 seconden ingedrukt; het systeem start het resetproces. Het systeem herstelt alle fabrieksinstellingen en u kunt de wifi-instelling starten. Hotline www.getdio.com BE + 32 900 51 100 (Tarif nat. / Nat.
Configuración de la cámara 1. Descarga de la aplicación Descargue la aplicación en APP Store/Google Play. Nombre de la aplicación: DiO Cam 2. Encienda la cámara. Conecte el adaptador de alimentación. NO conecte el cable Ethernet. EC-CA-02 EC-CA-03 EC-CA-04 EC-CA-02 EC-CA-03 EC-CA-04 Cuando el LED verde inicie un ciclo repetido de una intermitencia larga seguida de tres cortas, la cámara estará lista para la conexión inalámbrica directa. Por lo general, se tarda menos de 1 minuto. 3a.
Aparecerá el ID de la cámara. Introduzca la contraseña por defecto, 123456, y guarde los ajustes. Cuando el LED verde realiza una intermitencia larga seguida de dos cortas, significa que la conexión inalámbrica se ha realizado correctamente. Aparecerá la vista de la cámara. Vaya al paso 4. 3b. Conexión con el cable Ethernet. • Conecte su dispositivo móvil al router doméstico. • Conecte la cámara al router Wi-Fi doméstico utilizando el cable Ethernet y, a continuación, encienda la cámara.
Selecteer de juiste wifirouter voor uw lokale netwerk. 4. Ajustes Wi-Fi Avanzada Introducir contraseña de administrador (predeterminada 123456) Seleccione el router Wi-Fi correspondiente a su red local. • La cámara se desconectará durante unos 40 segundos para restablecer la conexión Wi-Fi. Cuando la cámaraIntroduza está conectada al router Wi-Fi a palavraAvançadas passe de admin correctamente, el LED verde permanece encendido.
Instalación de la cámara ED-CA-02 ED-CA-03 ED-CA-04 Visión en vivo / Instantánea / Reproducción Visión en vivo camera 1 camera 2 camera 3 ES
Instantánea Toque para capturar imágenes de pantalla. Toque para encender/apagar el volumen en modo de visión en vivo. Toque para grabar vídeos en la tarjeta de memoria del dispositivo. Toque para configurar o restablecer el valor predeterminado. Toque y mantenga el icono para hablar en ambos sentidos (pulsar para hablar).Avancés Toque para volver a la página principal. Ajuste de tonalidad de imagen.
Reproducción P List playback video YY-MM-DD HH:MM:SS YY-MM-DD HH:MM:SS select event filter start YY/MM/DD HH:MM stop YY/MM/DD HH:MM YY-MM-DD HH:MM:SS YY-MM-DD HH:MM:SS YY-MM-DD HH:MM:SS YY-MM-DD HH:MM:SS YY-MM-DD HH:MM:SS Cancel OK YY-MM-DD HH:MM:SS YY-MM-DD HH:MM:SS YY-MM-DD HH:MM:SS YY-MM-DD HH:MM:SS YY-MM-DD HH:MM:SS • Toque los iconos de configuración de la cámara y de lista de eventos. • Seleccione el intervalo de tiempo para la lista de eventos.
Panorámica e inclinación (ED-CA-03) • En la visión en vivo, controle en sentido de la cámara deslizando los dedos. Toque para configurar o restablecer el valor predeterminado. Ajustes de fábrica Mantenga pulsado el botón de reinicio del cable eléctrico durante 5 segundos para que el sistema inicie el proceso de reinicio. El sistema se restablecerá en los valores de fábrica y podrá proceder con la configuración de la Wi-Fi. Hotline www.getdio.com BE + 32 900 51 100 (Tarif nat. / Nat.
Configure a câmara 1. Transferência da aplicação. Transfira a APLICAÇÃO a partir da APP Store/Google Play. Nome da APLICAÇÃO:: DiO Cam 2. Ligue a câmara. Ligue o adaptador de alimentação. NÃO ligue o cabo Ethernet. EC-CA-02 EC-CA-03 EC-CA-04 EC-CA-02 EC-CA-03 EC-CA-04 Quando o LED VERDE inicia um ciclo de repetição de uma intermitência longa seguida por 3 intermitências curtas, a câmara está pronta para Ligação sem fios direta. Normalmente, demora menos de 1 minuto. 3a. Ligação sem fios direta.
Vai aparecer a ID da câmara. Introduza a palavra-passe predefinida 123456 e guarde as definições. Quando o LED verde efetua uma intermitência longa seguida de 2 intermitências curtas, significa que a ligação sem fios direta foi estabelecida com sucesso. Verá imediatamente a vista da câmara. Avance para o Passo 4. 3b. Ligação com cabo Ethernet. • Ligue o dispositivo móvel ao seu router doméstico.. • Ligue a câmara ao seu router Wi-Fi doméstico utilizando o cabo Ethernet, de seguida, ligue a câmara.
4. Definição de Wi-Fi In Avancés Entrez le mot de passe admin (par défaut 123456) Choisissez le bon routeur Wi-Fi pour votre réseau local. • A câmara vai ficar offline durante cerca de 40 segundos para reiniciar para a ligação Wi-Fi. Quando a câmara corretamente a um router Voerliga wachtwoord in Geavanceerd (standaard 123456) Wi-Fi, o LED verde vai permanecer aceso.
Instalação da câmara ED-CA-02 ED-CA-03 ED-CA-04 Vista em direto / Instantâneo / Reprodução Vista em direto camera 1 camera 2 camera 3 PT
Instantâneo R Toque para captar imagens de ecrã. Toque para ligar/desligar o volume no modo Vista em direto. Avancés Toque para gravar vídeo no cartão de memória do dispositivo. Toque para definir ou regressar ao ponto predefinido. Toque continuamente no ícone para falar em ambos os sentidos (Premir para falar). Geavanceerd Toque para regressar à página principal. Ajuste do tom de imagem.
Reprodução List playback video YY-MM-DD HH:MM:SS YY-MM-DD HH:MM:SS select event filter start YY/MM/DD HH:MM stop YY/MM/DD HH:MM YY-MM-DD HH:MM:SS YY-MM-DD HH:MM:SS YY-MM-DD HH:MM:SS YY-MM-DD HH:MM:SS YY-MM-DD HH:MM:SS Cancel OK YY-MM-DD HH:MM:SS YY-MM-DD HH:MM:SS YY-MM-DD HH:MM:SS YY-MM-DD HH:MM:SS YY-MM-DD HH:MM:SS • Toque na Definição da câmara e, de seguida, no ícone Lista de eventos. • Selecione o intervalo de tempo para a lista de eventos.
Rodar e Inclinar (ED-CA-03) C • Na Vista em direto, controle a direção da câmara deslizando os dedos. Toque para definir ou regressar ao ponto predefinido. Predefinição de fábrica Prima continuamente o botão Reset no cabo de alimentação durante 5 segundos e o sistema vai iniciar o processo de reposição. O sistema vai restaurar para as predefinições de fábrica e pode iniciar a configuração Wi-Fi. Hotline www.getdio.com BE + 32 900 51 100 (Tarif nat. / Nat.
Configurazione della videocamera 1. Download dell’app Scaricare l’APP dall’APP Store o da Google Play. Nome APP : DiO Cam 2. Accendere la videocamera. Collegare l’alimentatore. NON collegare il cavo Ethernet. EC-CA-02 EC-CA-03 EC-CA-04 EC-CA-02 EC-CA-03 EC-CA-04 Quando il LED VERDE inizia il ciclo composto da un lampeggio lungo seguito da 3 brevi, la videocamera è pronta per la connessione Wireless diretta. In genere serve meno di un minuto. 3a. Connessione Wireless diretta.
Apparirà l’ID della videocamera. Inserire la password predefinita 123456 e salvare le impostazioni. Quando il LED verde fa un lampeggio lungo seguito da 2 brevi, significa che la connessione wireless diretta è stata stabilita con successo. A questo punto apparirà la visualizzazione videocamera. Passare al Punto 4. 3b. Connessione Ethernet. • Collegare il dispositivo mobile al router di casa. • Collegare la videocamera al proprio router wifi con il cavo Ethernet e accendere la videocamera.
(predefinição 1234556) Escolha o router Wi-Fi adequado para a sua rede local 4. Configurazione Wi-Fi Avanzate Inserire la Password amministratore (default 123456) Scegliere il router Wi-Fi appropriato per la propria rete locale • La videocamera rimarrà offline per circa 40 secondi per poi riavviarsi per la connessione Wifi. Una volta che laAdmin videocamera si sarà Enter Password Advanced (default 123456) correttamente collegata al router wifi, il LED verde rimarrà acceso.
Installazione della videocamera ED-CA-02 ED-CA-03 ED-CA-04 Visualizzazione live / Snapshot / Riproduzione Visualizzazione live camera 1 camera 2 camera 3 IT
Snapshot Avancés Toccare per catturare le immagini sullo schermo. Toccare per attivare/disattivare il volume in modalità V isualizzazione Live. Geavanceerd Toccare per registrare un video nella scheda di memoria del dispositivo. Toccare per impostare o tornare a un punto preimpostato. Tenere premuta l’icona per parlare in entrambe le direzioni Avanzada (Push-to-Talk). Toccare per tornare alla pagina principale. Regolazione toni immagine.
Riproduzione P List playback video YY-MM-DD HH:MM:SS YY-MM-DD HH:MM:SS select event filter start YY/MM/DD HH:MM stop YY/MM/DD HH:MM YY-MM-DD HH:MM:SS YY-MM-DD HH:MM:SS YY-MM-DD HH:MM:SS YY-MM-DD HH:MM:SS YY-MM-DD HH:MM:SS Cancel OK YY-MM-DD HH:MM:SS YY-MM-DD HH:MM:SS YY-MM-DD HH:MM:SS YY-MM-DD HH:MM:SS YY-MM-DD HH:MM:SS • Toccare l’icona delle impostazioni della videocamera e poi quella dell’elenco eventi. • Selezionare l’intervallo di tempo per visualizzare l’elenco eventi.
Panoramica e Inclinazione (ED-CA-03) • Nella Visualizzazione Live, regolare la direzione della videocamera facendo scorrere il dito. Toccare per impostare o tornare a un punto preimpostato. Configurazione predefinita in fabbrica Tenere premuto il tasto Reset sul cavo di alimentazione per 5 secondi per avviare il processo di ripristino. Il sistema ripristina così le impostazioni di fabbrica e si potrà avviare la configurazione Wi-Fi. Hotline www.getdio.com BE + 32 900 51 100 (Tarif nat. / Nat.
Setup the camera 1. App download. Download the APP from APP Store/Google Play. APP name:is l’App Store ou Google Play. 2. Power up the camera. Plug in power adapter. do NOT plug in Ethernet cable ! EC-CA-02 EC-CA-03 EC-CA-04 EC-CA-02 EC-CA-03 EC-CA-04 When GREEDN LED starts a repeat cycle of one long flash followed by 3 short flashes, the camera is ready for Direct Wireless Connection. Normally it takes less than 1 minute. 3a. Direct Wireless Connection.
The camera ID will show up. Enter the default password 123456 and save the settings. When the Green LED long flashes once followed by 2 short flashes, it means the direct wireless connection is success fully established. You’ll see the camera view right now. Please go on to Step 4. 3b. Connection via Ethernet cable. • Connect your mobile device to your home router.
4. Wi-Fi Setting C Avancés Entrez le mot de passe admin (par défaut 123456) Choisissez le bon routeur Wi-Fi pour votre réseau local. • Camera will offline for around 40 seconds to reboot for Wifi connection. When camera connectsVoer to wifi routerin correctly, Green LED wachtwoord Geavanceerd (standaard 123456) will stay ON • Go to the Wi-Fi setting on your mobile device again, makeSelecteer sure de the wifi juiste voor uwIf router you are connecting to is the same as the camera’s wifirouter wifi router.
Camera installation ED-CA-02 ED-CA-03 ED-CA-04 Live view / Snapshot / Playback Live view camera 1 camera 2 camera 3 EN
Snapshot Geavanceerd P Tap to capture screen images. Tap to turn on/off the volume in Live View mode. Avanzada Tap to record video in device memory card. Tap to set or return preset point. Tap and hold the icon to talk in both direction Avançadas (Push to Talk). Tap to return to the main page. Image Tone Adjustment Avanzate Due to different types of environment, when necessary, please follow the steps descripted here to adjust the color tone (warm vs. cool) of the image.
Playback List playback video YY-MM-DD HH:MM:SS YY-MM-DD HH:MM:SS select event filter start YY/MM/DD HH:MM stop YY/MM/DD HH:MM YY-MM-DD HH:MM:SS YY-MM-DD HH:MM:SS YY-MM-DD HH:MM:SS YY-MM-DD HH:MM:SS YY-MM-DD HH:MM:SS Cancel OK YY-MM-DD HH:MM:SS YY-MM-DD HH:MM:SS YY-MM-DD HH:MM:SS YY-MM-DD HH:MM:SS YY-MM-DD HH:MM:SS • Tap the Camera Setting and then the Event List icon. • Select the time interval for the event list. • Tap the file that you want to playback from the list.
Pan & Tilt (ED-CA-03) • In the Live View, control camera direction via finger swipe. Tap to set or return preset point. Factory default setting Press and hold the reset button on the power cable for 5 seconds and the system will start the reset process. The system will restore to factory default and you may start the Wi-Fi setup. Hotline www.getdio.com BE + 32 900 51 100 (Tarif nat. / Nat.
Déclaration de conformité à la réglementation de la FCC : Cet appareil est conforme à la section 15 de la réglementation de la FCC. Le fonctionnement est soumis aux deux conditions suivantes : (1) cet appareil ne doit pas provoquer d’interférences nuisibles et (2) il doit supporter toute interférence reçue, y compris celles qui peuvent perturber le fonctionnement.
doméstico é proibida! As baterias/acumuladores que contêm substâncias perigosas estão marcados com os símbolos na parte lateral. Estes símbolos indicam que é proibido eliminar estas baterias/acumuladores juntamente com o lixo doméstico. As abreviaturas para os respetivos metais pesados são: Cd= cádmio, Hg= mercúrio, Pb= chumbo.
www.getdio.