
Instructions


www.getdio.com
EN | 8
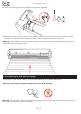
Warning, do not use any tools other than the adjustment tool provided.
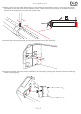
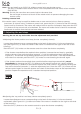
1 Adjusting the ‘down position’ end stop (shutter completely closed):
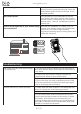
Locate the adjustment screw corresponding to the level of the motor; it is the one located on
top (see Figure IV.1.) (It does not matter if the motor is installed on the right or left side of the
housing).
Press the OFF ('O') button on the remote control to close the shutter completely.
- If the shutter stops before the required down position, increase the end stop by gradually
turning the top screw anti-clockwise (towards '+') with the adjustment tool provided (see
Figure IV.1.). The shutter will gradually descend as you turn the screw. If the adjustment lasts
more than two minutes, press the OFF ('O') button to start lowering the shutter again.
- If the shutter reaches the required down position before stopping automatically, stop it
immediately by pressing the OFF ('O') button on the remote control unit, raise it again by
pressing the ON ('I') button on the remote control unit, and correct it by gradually turning the
top screw clockwise (towards '-') with the adjustment tool. Press the OFF ('O') button on the
remote control again to close the shutter and check if the shutter stops at the required down
position. Repeat the operation until it reaches the required position.
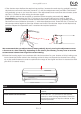
2 Adjusting the ‘up position’ end stop (shutter completely open):
Locate the adjustment screw corresponding to the level of the motor; it is the one located
underneath (see Figure IV.2.) (It does not matter if the motor is installed on the right or left side
of the housing).
Press the ON ('I') button on the remote control to open the shutter completely.
- +
-
+
- +
IV.1
IV. Adjusting the end stops
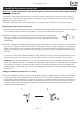
Note: You can install up to 12 DiO 1.0 wireless control units per shutter motor.
The DiO 1.0 wireless roller shutter motor is not compatible with the switch micro-module
(Ref 54700).
Warning: Do not use more than one control unit at the same time.
Do not forget to remove or block o the wired switch to prevent damaging the new
shutter motor.
Deleting a control unit
5 In certain cases, it may be useful to delete one or more control units to free up memory
(maximum 12 control units). To delete a control unit, press the ON ('I') button of the rst remote
control unit for 2 seconds. The motor will make a brief to-and-fro movement, then press the OFF
('O') button of the control unit to be deleted. The motor will make a brief to-and-fro movement
once more to confirm that the link has been deleted.