
Instructions

www.getdio.com
EN | 9
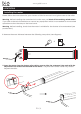
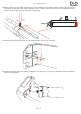
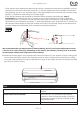
We recommend that you adjust the end stops gradually by only turning the adjustment screws
a few turns at a time. Warning, depending on the size of your shutter, you may have to turn the
screws several dozen times to get the correct setting.
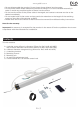
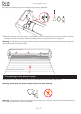
3 Close the housing again in accordance with the instructions for your shutter or blind, taking care
not to leave the power cable in the housing so that it does not impede the shutter from rolling
up, or the radio antenna in order to optimise the range of the signal and thus its connection with
your DiO 1.0 control unit(s).
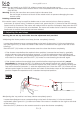
- If the shutter stops before the required up position, increase the end stop by gradually turning
the bottom screw anti-clockwise (towards '+') with the adjustment tool provided. The shutter
will gradually go up as you turn the screw. If the adjustment lasts more than two minutes, press
the ON ('I') button to start raising the shutter again.
- If the shutter reaches the required up position before stopping automatically, stop it
immediately by pressing the ON ('I') button on the remote control unit, lower it again by
pressing the OFF ('O') button on the remote control unit, and correct it by gradually turning
the bottom screw clockwise (towards '-') with the adjustment tool. Press the ON ('I') button on
the remote control again to open the shutter and check if the shutter stops at the required up
position. Repeat the operation until it reaches the required position.
- +
-
+
-
+
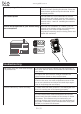
IV.2
Fully closed Press the OFF ('O') button on the remote
control.
Partial closure of the shutter Press the OFF ('O') button on the remote
control to start closing the shutter. Press the
same button again to stop the shutter at the
required position.
Fully open Press the ON ('I') button on the remote control.
Use