
User manual

•
The unit requires connection to a 230 AC 50Hz mains electricity supply.
•
It is recommended that the unit is connected to the lighting circuit via a 5 amp fused spur and using Twin & Earth 2-Core
round flexible cable of at least 1mm
2
gauge (waterproof cable should be used for outdoor installations).
•
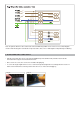
It is also advisable to install a single pole wall switch to allow easy control of the floodlight [Fig. 1].
WARNING: Isolate the power supply before installation.
The
Diodor LED Powerhouse
can be fixed in position by EITHER:
Option 1: Attaching the U bracket to the mounting surface and attaching the Powerhouse to the U bracket, or Option
2: Clamping the pipe bracket to the U bracket around a pipe or pole, and then attaching the Powerhouse.
If attaching the Powerhouse direct to a wall using the U bracket:
•
Select a mounting point which is strong enough to support the weight of the Powerhouse.
•
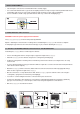
Attach the Powerhouse to the U bracket using the two securing bolts provided [Fig.2].
•
Position the unit against the mounting surface and mark the position for the U bracket, ensuring the wires can easily
reach the unit.
•
Use the U bracket Fixing Holes [Fig.3] to mark the 4 drill holes required to secure the U bracket to the wall (and mark the
cable outlet location if required).
•
Detach the Powerhouse from the U bracket, drill the wall and screw U bracket onto the wall using appropriate fixings
which are able support the weight of the Powerhouse.
•
Once the U bracket is securely attached to the wall, offer the Powerhouse up to the U bracket and secure using the
securing bolts, spring washers and washers provided [Fig.2].
•
Loosen the 4 screws holding the front of the connection box in place and remove.
•
Feed the wire through the cable gland on the connection box gently tightening gland nut up against the gland body
[Fig. 4] to ensure the wire(s) is secured in place and no water can get though into the connection box.
•
Wire the Powerhouse as described in Section 4.
2. WIRING REQUIREMENTS
3. FIXING
THE Diodor LED Powerhouse
3.1. OPTION
1: ATTACHING THE Diodor LED Powerhouse VIA THE U BRACKE
T