
Instruction Manual


21
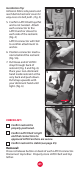
Installation Tip:
Unfasten fabric side panels and
reach behind restraint cover for
easy access to belt path. (Fig. 3)
5. Conrm LATCH belt lays at
and is not twisted. Attach
each connector to the
LATCH anchor closest to
each side of the restraint.
(Fig. 4)
LATCH connector will ‘click’
to conrm attachment to
anchor.
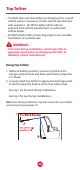
6. Position connector mecha-
nisms behind the restraint
(Fig. 5A).
7. Pull loose end of LATCH
strap through back of
restraint (Fig. 5 and Fig. 6).
Place your non-dominant
hand inside restraint at the
very back and push down.
Pull strap upwards with
your dominant hand until
tight. (Fig. 6)
CHECK LIST:
Conrm restraint is
properly positioned.
Conrm LATCH belt is tight
and that connections to
approved LATCH anchors are secure.
Conrm restraint is stable (see page 25).
Removal:
Press red release button on back of each LATCH connector.
Disconnect top tether. Properly store LATCH belt and top
tether.
3
4
5
6
A