
Installation Guide
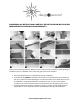


Start in the corner by placing the first panel with its trimmed side facing the wall. Use spacers
along each wall to maintain an expansion gap of 3/8 “ (8-12mm) between the wall and the
flooring. See Photo 5.
Remember that this product is primarily wood and needs room to expand and contract. Do
not attach the floor to any surface.
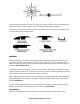
To attach your second panel, insert the end tongue of the panel into the end groove of the
first panel by rotating the plank down at an angle. Lower the panel flat to the floor. Line edges
up carefully. See Photo 6.
Continue along the wall until you reach the last full panel, connecting them as you go. To fit
the last panel, rotate the panel 180o with the pattern side facing up, place beside the row,
mark off the excess and saw. When using a handsaw, cut on the decorative side and when
using a circular saw cut with the decorative side down.
Begin the next row with the cut off piece from the previous row to stagger pattern. Pieces
should be a minimum of 10” (25cm) long and joint offset should be at least 16” (40cm) apart.
To Attach panels, tilt the panel you are attaching slightly upwards (about 15-25o) and rotate
downwards to place.The plank will click into place with light pressure.
Attach the second panel on the long side as described above. Be sure that the groove of the
short side of the panel is in alignment with the tongue of the panel on the floor.Then lower the
panel to the floor.The tongue and groove should lock together. Continue laying the remaining
panels in the same manner. See Photo 7.
To fit the last row, lay a panel on top of the previous row. With the tongue to the wall, lay
another panel upside down on the one to be measured and use it as a ruler. Don’t forget to
allow room for the spacers. Cut the panels and attach into position. See Photo 8 & 9.
Door Frames and heating vents also require expansion room. First cut the panel to the correct
length. Then place the cut panel next to its actual position and use a ruler to measure the
areas to be cut out and mark them. Cut out the marked points allowing the necessary
expansion distance on each side. See Photo 10.
www.designispersonal.com