
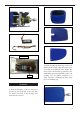
User Manual


15
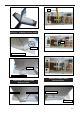
5) When you are satised with the align-
ment, hold the stabilizer in place with T- pins
or masking tape, but do not glue at this time.
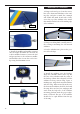
6) With the stabilizer held rmly in place,
use a pen and draw lines onto the stabilizer
where it and the fuselage sides meet. Do this
on both the right and le sides and top and
bottom of the stabilizer.
8) Using a modeling knife, carefully remove
the covering that overlaps the stabilizer
mounting platform sides in the fuselage. Re-
move the covering from both the top and the
bottom of the platform sides.
9) When you are sure that everything is
aligned correctly, mix up a generous amount
of 30 Minute Epoxy. Apply a thin layer to the
bottom of the stabilizer mounting area and
to the stabilizer mounting platform sides in
the fuselage. Putting the stabilizer in place
and realign. Double check all of your meas-
urements once more before the epoxy cures.
Hold the stabilizer in place with T-pins or
masking tape and remove any excess epoxy
using a paper towel and rubbing alcohol.
.
7) Remove the stabilizer. Using the lines you
just drew as a guide, carefully remove the
covering from between them using a mod-
eling knife.
When cutting through the covering
to remove it, cut with only enough pres-
sure to only cut through the covering it-
self. Cutting into the balsa structure may
weaken it.
Remove the covering
Cut
Epoxy
10) Aer the epoxy has fully cured, remove
the masking tape or T-pins used to hold the
stabilizer in place. Carefully inspect the glue
joints. Use more epoxy to ll in any gaps that
may exist that were not lled previously and
clean up the excess using a paper towel and
rubbing alcohol.
VERTICAL STABILIZER
INSTALLATION.
1) Using a ruler and a pen, locate the center-
line of the vertical stabilizer.
Pen