
Instructions / Assembly


15en
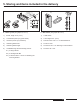
8.1. Preparation
Check to make sure that all required parts are included in
the package before you begin the installation. This ensures a
quick installation.
WARNING
There is a possible risk of injury or death if you do
not observe and comply with the following informa-
tion. Observe and comply with all listed instructions
prior to installation.
The installation, the connection and the initial operation of the
opener may only be carried out by technically knowledgeable
persons.
Only move the door when there are no persons, animals or
objects in the area of movement.
Always wear safety glasses when drilling the mounting holes
to protect your eyes from flying chips.
Wear protective gloves when handling burred materials.
Be careful when climbing or standing on a ladder while per-
forming work on the opener. Be sure you have a secure
footing.
CAUTION
There is a possible risk of property damage if you
do not observe and comply with the following infor-
mation. Observe and comply with all listed instruc-
tions before the installation.
Cover the opener so no dirt or contamination can get into the
opener if you have to drill in the area of the opener.
Remove or disable all door locks before the installation.
For a sectional door, remove the hand rope.
The mounting materials are designed for wooden garage
constructions and wood/metal garage doors. Only use the
supplied mounting material. Please consult your qualified
dealer if you require other mounting equipment for different
materials.
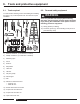
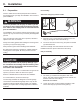
Pre-assembly
Attach the emergency release handle
1. Feed the cord (1) of the emergency release (motor car-
riage) (2) through the hole in the handle (3).
2. Tie a knot at the end of the cord (1) and push the handle
(3) towards the knot.
The final cord length can be shortened at the end of the
installation after the opener is attached to the ceiling.
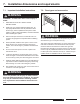
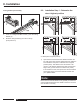
Rail pre-assembly
1
3
2
4
4
1. The chain (1) is inserted into the plastic chain chan-
nel (2). The chain channel guides the chain and also iso-
lates the chain from the C-rail (3).
Please do not remove!
2. Loosen the screws (4) with a phillips screwdriver, take
out the limit stops (2+3) and the chain guide (1).
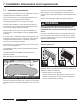
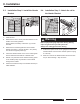
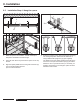
8. Installation