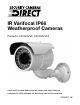
IR Varifocal IP66 Weatherproof Cameras Products: CFC6067VF, CFC6067VF2 Please read this manual before using your camera, and always follow the instructions for safety and proper use. Save this manual for future reference.
LEGAL NOTICE Security Cameras Direct’s products are designed to meet safety and performance standards with the use of specific Security Cameras Direct authorized accessories. Security Cameras Direct disclaims liability associated with the use of non-Security Cameras Direct authorized accessories. The recording, transmission, or broadcast of any person’s voice without their consent or a court order is strictly prohibited by law.
WARNINGS & CAUTIONS ! WARNING ! WARNING Do not use the camera if fumes, smoke or a strange odor is emitted from the unit, or if it seems to not function correctly. Disconnect the power source immediately and consult your supplier. Do not adjust or modify the camera’s internal circuits or power supply modules. No user serviceable parts exist inside. For internal settings and repairs, consult your supplier. Always follow the instructions in the installation guide when applying power.
WARNINGS & CAUTIONS CAUTION CAUTION Do not install the camera or route video cables near a TV, radio transmitter, magnet, electric motor, transformer, or audio speaker. Magnetic fields generated by these devices may distort the video image. Use the camera only in areas where the temperature and humidity are within the recommended specifications. iv www.scdlink.
TABLE OF CONTENTS Table of Contents SECTION 1 SECTION 2 SECTION 3 SECTION 4 SECTION 5 SECTION 6 Features. . . . . . . . . . . . . . . . . . . . . . . . . . . . . . . . 2 1.1 Camera components . . . . . . . . . . . . . . . . . . . 2 Installation. . . . . . . . . . . . . . . . . . . . . . . . . . . . . . 4 2.1 What’s in the box. . . . . . . . . . . . . . . . . . . . . . 4 2.2 What you need. . . . . . . . .
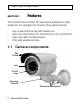
SECTION 1: FEATURES SECTION 1 Features The CFC6067VF and CFC6067VF2 cameras are weatherproof, highly durable, IR color day/night CCTV cameras. These cameras include: • • • • Easy-to-adjust varifocal lens with manual zoom Built-in IR LEDs reaching 164’ (CFC6067VF2) or 98’ (CFC6067VF) Heavy duty cable concealing bracket IP66-rated weatherproof case 1.1 Camera components Sun Shield Lens IR LED Array Mounting Bracket Directional Adjustments 2 www.scdlink.
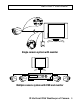
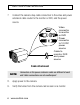
SECTION 1: FEATURES Connect Connect Single camera system with monitor Multiple camera system with DVR and monitor IR Varifocal IP66 Weatherproof Camera 3
SECTION 2: INSTALLATION SECTION 2 Installation 2.1 What’s in the box The camera package contains: • • • • Camera assembly Mounting screws and wall inserts (4 each) Hex key Instruction manual 2.2 What you need To install the camera, you will need: • • • Tools to attach the mounting bracket to the mounting surface Video and power extension cable 12 V DC power adapter or power source 2.3 Installing the camera 1.
SECTION 2: INSTALLATION 2. Drill holes into the mounting surface for the mounting screws, wall inserts, or other attachment hardware as needed. 3. If you are routing the drop cable through the mounting surface, drill a ¾” hole centered between the mounting screw holes. Mounting screw hole Hole for drop cable 4. Insert wall inserts into the mounting screw holes, if needed. 5.
SECTION 2: INSTALLATION 7. Connect the camera drop cable connectors to the video and power extension cable routed to the monitor or DVR, and the power source. Connect Video connector to monitor or DVR Power connector to 12 VDC power source Cable to monitor, DVR and power source Cable attachment NOTE Connectors on the power extension cable are different at each end! Cable connections are not weatherproof. 8. Apply power to the camera. 9. Verify that video from the camera can be seen on a monitor.
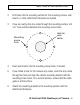
SECTION 3: AIMING THE CAMERA Aiming the Camera SECTION 3 1. Use the hex key provided to loosen the pan adjustment set screw, and turn the tilt adjustment lock ring counter-clockwise until the camera bracket can be rotated within the mounting base. NOTE During this procedure, only loosen the adjustment screws – do not remove them.
SECTION 3: AIMING THE CAMERA 3. While observing video from the camera, adjust the mounting bracket as necessary to aim the camera at your surveillance target. 4. Tighten the pan adjustment set screw and tighten the tilt adjustment lock ring to lock the camera in place. 5. Loosen the horizontal adjustment set screw. Correct the horizontal alignment of the picture, and then tighten the set screw. 6. Remove the caps from the focus and zoom adjustment screws on the back of the camera body.
SECTION 4: CLEANING SECTION 4 Cleaning Clean the camera lens and IR lamp shield with an approved glass cleaning solution and a lint free cloth. • • Remove all foreign particles, such as plastic or rubber materials, attached to the camera housing. These may cause damage to the surface over time. Dust can be removed from the unit by wiping it with a soft damp cloth.
SECTION 5: SPECIFICATIONS SECTION 5 Specifications Table 1. Specifications Model CFC6067VF CFC6067VF2 Image Sensor ¼” Sharp CCD 1/3” Sony CCD Resolution 420 TV Lines 540 TV Lines Lux Rating Pixels 0.0 Lux @ F2.0 IR on 811(H) x 508 (V) NTSC Clock Frequency NTSC: 19.0699 MHz Video output 1 Vp-p, 75Ω Automatic Gain Control (AGC) Auto Scanning system Synchronous system 2:1 Interlace Internal, negative sync.
SECTION 5: SPECIFICATIONS Model CFC6067VF CFC6067VF2 Sync Internal IR Control CDS Auto Sensor Control S/N ratio Operating temp > 48 dB (AGC off) 14˚F ~ 122˚F (-10˚C ~ +50˚C), RH 95% max Weatherproof Rating Power Size Weight IP66 12 V DC (±10%) @ 550mA 12 V DC (±10%) @ 700mA 5.5” (W) x 3.3” (W) x 3.1” (D) 10.2” (W) x 6.3” (H) x 4.1” (D) 2.86 lbs. 3.30 lbs.
SECTION 6: TROUBLESHOOTING SECTION 6 Troubleshooting Before sending the camera for repair, first, make sure that the camera is installed correctly, and then follow the suggestions listed below. If it still does not perform adequately, please consult your supplier or contact Security Cameras Direct at 800.316.6027. 1. 2. No picture on the monitor screen: a. Check that all connected devices are powered on. b. Confirm that the voltage is correct. c.
SECTION 6: TROUBLESHOOTING 3. c. Check the monitor display for ripple on other video channels. d. Check cable routing for proximity to high electrical or magnetic fields. The picture is not clear. a. Check the camera zoom and focus adjustments. b. Check that your monitor is correctly adjusted. c. Confirm that the glass in front of the lens is clean. If there is dust, dirt or fingerprints on the glass, the image quality will be affected.
SECTION 6: TROUBLESHOOTING 5. The camera doesn’t operate at night. a. Your cable run may be too long and you are experiencing a drop in voltage. CAUTION This camera is a precision instrument and when treated with care, will provide years of satisfactory performance. If a problem does occur, do not open the camera to make repairs. Servicing should always be referred to your supplier. 14 www.scdlink.