Model 200 Owner's Guide
Limited Lifetime Consumer Warranty Directed Electronics, Inc.
DALISM. THIS WARRANTY DOES NOT COVER LABOR COSTS FOR MAINTENANCE, REMOVAL OR REINSTALLATION OF THE UNIT OR ANY CONSEQUENTIAL DAMAGES OF ANY KIND. IN THE EVENT OF A CLAIM OR A DISPUTE INVOLVING DEI OR ITS SUBSIDIARY, THE PROPER VENUE SHALL BE SAN DIEGO COUNTY IN THE STATE OF CALIFORNIA. CALIFORNIA STATE LAWS AND APPLICABLE FEDERAL LAWS SHALL APPLY AND GOVERN THE DISPUTE. THE MAXIMUM RECOVERY UNDER ANY CLAIM AGAINST DEI SHALL BE STRICTLY LIMITED TO THE AUTHORIZED DEI DEALER'S PURCHASE PRICE OF THE UNIT.
Table of Contents Limited Lifetime Consumer Warranty . . . . . . . . . . . . . . . . . . . . . . . . . . . . i What Is Included . . . . . . . . . . . . . . . . . . . . . . . . . . . . . . . . . . . . . . . . . . . . . 3 Important Information. . . . . . . . . . . . . . . . . . . . . . . . . . . . . . . . . . . . . . . . . 3 System Maintenance . . . . . . . . . . . . . . . . . . . . . Your Warranty . . . . . . . . . . . . . . . . . . . . . . . . . . FCC/ID Notice . . . . . . . . . . . . . . . . . . . . . . .
Standard Configuration 2 © 2001 Directed Electronics, Inc.
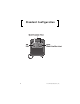
What is Included ■ A control module ■ A pair of two-button remote transmitters ■ A Stinger® Doubleguard® dual-output shock sensor (on-board the control module) ■ A back-up battery siren ■ Two back-up battery siren keys ■ The red status LED indicator light ■ A push-button Valet® switch ■ A mercury tilt switch ■ Failsafe® Starter Kill (on-board the control module) Important Information Congratulations on the purchase of your state-of-the-art security system.
runs out, you can simply throw the transmitter away and replace it with a new one. Your Warranty Your warranty card must be returned. If the warranty card is not returned, you do not have a warranty. It is also necessary to keep your receipt, which reflects that the product was installed by an authorized dealer. Make sure that you receive the warranty card from your dealer.
Transmitter Functions The receiver uses a computer-based Learn Routine to learn the transmitter buttons. This makes it possible to assign different transmitter buttons to different receiver functions. The transmitter initially comes programmed with Standard Configuration, but may also be customized by an authorized dealer. The buttons indicated in the instructions in this manual correspond to a Standard Configuration transmitter.
Using Your System The transmitter buttons indicated in this guide correspond to the standard transmitter configuration. Remember, this is not the only way your transmitter may be set up. Arming You can activate, or arm, the system by pressing on your transmitter for one second. When the system arms, you will hear a short siren sound, or chirp, and see the lights flash once.
When armed, your vehicle is protected in the following ways: ■ Light impacts will trigger the Warn Away® signal. When triggered, the siren will chirp and the parking lights will flash for a few seconds. ■ Heavy impacts will trigger the system. The full trigger sequence is 30 or 60 seconds of constant siren and flashing parking lights. ■ If the tilt switch is triggered or the ignition is turned on while the system is armed, the full trigger sequence will activate.
■ Pressing a third time within five seconds: The siren chirps three times followed by a long chirp. Zone Four is now bypassed. ■ Pressing a fourth time within five seconds: The siren chirps four times followed by a long chirp. Zones Two and Four are now bypassed. ■ Pressing a fifth time within five seconds: The siren chirps five times followed by a long chirp. All input zones, except the ignition (Zone 5), are now bypassed.
To disarm the security system, turn the ignition to the "on" position. Press the Valet switch the selected number of times (1-5 DRW-35 presses) within 15 seconds. The system should now disarm. If it does not, you may have waited too long to press the Valet switch; turn the ignition off and on and try again. LOCATION OF VALET SWITCH______________________________ IMPORTANT! The unit can be programmed to respond to 1-5 pulses of the Valet® switch for the disarm function.
To disable the back-up battery siren, follow these steps: 1. Locate the back-up battery siren. 2. Remove the water protective cap on the back side of the siren to expose the siren lock switch. 3. Insert the siren key into the siren lock switch and turn the key to the LEFT to disable the back-up battery siren. Once the vehicle battery has been reconnected or full charge is restored, the back-up battery siren can be re-enabled. To re-enable the back-up battery siren, follow these steps: 1.
Valet® Mode You can prevent your security system from automatically arming and triggering by using Valet® Mode. This is very useful when washing or servicing the vehicle. In Valet Mode, the security system will not arm, even with the remote transmitter, but all convenience functions will continue to operate normally. To enter or exit Valet® Mode with the Valet switch: 1. Turn the ignition on. 2. Turn the ignition off. 3. Press and release the Valet switch within 10 seconds.
that sensor or switch (along with any other sensors or switches sharing the same zone) for 60 minutes. If the bypassed sensor tries to trigger the system while it is being bypassed, the 60-minute bypass period will start over. This ensures that a sensor that continually triggers will remain bypassed. The mercury tilt switch, the optional luggage carrier/saddlebag protector, and the ignition switch (Zones 1, 3 and 5, see Table of Zones section) are protected differently by NPC.
Arming Diagnostics If the security system is armed while an input is active (a sensor is triggering) the siren will chirp once when arming and then one more time a few seconds later. This extra chirp is called Bypass Notification. The security system will ignore the input that was active when the system was armed, until the input goes away. Three seconds later the system will monitor that input normally.
Table of Zones The zone number is the number of LED flashes used by the security system to identify a specific input. The standard input assignments are listed in the following Table of Zones, along with spaces to write in any optional sensors or switches you have had installed.
However, if the transmitter buttons have been pressed many times out of range of the vehicle, or the battery has been removed, it may get out of sync with the control unit and fail to operate the system. To re-sync the remote control simply press on the transmitter several times within range of the receiver. The alarm will automatically re-sync and respond to the transmitters normally. Rapid Resume Logic This DEI® system will store its current state to non-volatile memory.
Power Saver Mode Your system will automatically enter Power Saver Mode while armed or in Valet Mode, after a period of time in which no operation has been performed. This lowers the current draw on the vehicle's battery and prevents the system from draining the battery. Power Saver Mode takes over under the following conditions: ■ Power Saver when the system is armed: After the system has been armed for 24 hours, the LED will flash at half its normal rate, decreasing the system's current draw.
Programming Options Programming options control what your system does during normal operation, and require few or no additional parts. However, some programming options may require additional installation labor. The following is a list of the program settings, with the factory settings in Bold: ■ Active arming (only with the transmitter) or passive arming (automatic arming 30 seconds after the ignition is turned off). ■ Arming/disarming confirmation siren chirps on or off.
Security & Convenience Expansions Here we have listed only some of the many expansion options available. Please contact your dealer for a complete explanation of all the options available to you. Backup Battery: The 520T keeps the system armed, triggers the alarm and keeps the starter kill active if main battery power is disconnected. Headlight and Parking Light Automation: The 545T Nite-Lite® will automatically turn on your parking and headlights when it gets dark.
Glossary of Terms Back-Up Battery Siren: Noise generating device responsible for generating the "chirps" you hear, as well as the sound you hear when the alarm is triggered. Control Unit: The "brain" of your system. It houses the microprocessor which monitors and controls all of the system's functions. Failsafe® Starter Kill: An automatic switch controlled by the security system which prevents the starter from cranking whenever the system is armed.
Trigger or Triggered Sequence: This is what happens when the alarm "goes off" or "trips". The triggered response of your system consists of 30 or 60 seconds of siren sounding and lights flashing. Valet® Switch: A small push-button switch mounted on the vehicle that is used to override the alarm when a transmitter is lost or damaged, or to enter or exit Valet® mode. Warn Away® Response: Lighter impacts will generate the Warn Away response, which consists of several seconds of siren chirps and light flashes.
✂ QUICK REFERENCE GUIDE: To arm using your remote Cut along dotted line and fold for a quick and easy reference to keep in your purse or wallet. ■ You can activate, or arm, the system by pressing on your transmitter for one second. When the system arms, you will hear a short siren sound, or chirp, and see the lights flash once. To disarm using your remote ■ To disarm the system, press . You will hear two chirps, and the parking lights will flash twice.
The company behind this system is Directed Electronics, Inc. Since its inception, DEI® has had one purpose, to provide consumers with the finest vehicle security and car stereo products and accessories available. The recipient of nearly 100 patents and Innovations Awards in the field of advanced electronic technology, DEI is ISO 9001 registered. Quality Directed Electronics products are sold and serviced throughout North America and around the world.