® 3000 Owner’s Guide
limited lifetime consumer warranty For a period of one calendar year from the date of purchase of this auto-security device, Directed Electronics promises to the ORIGINAL PURCHASER to repair or replace (with a comparable reconditioned model), free of cost, any electronic control module which proves to be defective in workmanship or material under normal use, SO LONG AS THE SYSTEM WAS SOLD, INSTALLED, AND SERVICED BY A PROFESSIONAL AUTO INSTALLER, AND REMAINS IN THE CAR IN WHICH THE SYSTEM WAS ORIGINALLY INS
OF TIME, LOSS OF EARNINGS, COMMERCIAL LOSS, LOSS OF ECONOMIC OPPORTUNITY AND THE LIKE. NOTWITHSTANDING THE ABOVE, MANUFACTURER DOES OFFER A LIMITED WARRANTY TO REPLACE OR REPAIR THE CONTROL MODULE AS DESCRIBED ABOVE. Some states do not allow limitations on how long an implied warranty will last or the exclusion or limitation of incidental or consequential damages. This warranty gives you specific legal rights, and you may also have other rights which vary from state to state.
table of contents limited lifetime consumer warranty . . . . . . . . . . . . . . . . . . . . .i trademarks and copyrights . . . . .ii table of contents . . . . . . . . . . . . .1 what is included . . . . . . . . . . . . . .2 important information . . . . . . . . .2 your warranty . . . . . . . . . . . . .3 remote configurations . . . . . . . . .4 standard configuration for in-key 2-button remote . . . . . .5 diagnostics . . . . . . . . . . . . . . . . . .16 arming diagnostics . . . . . . . . .
what is included z One control module/siren with built-in Tilt sensor and 24 pin main wiring harness (attached) z One Mini-Blue status LED z One 2-button Valet switch z One in-key 2-button remote z One 3-button remote z Two Merlin decal’s z This Owner’s Guide z Warranty Card important information Congratulations on the purchase of your state-of-the-art motorcycle security system. It has been designed to provide years of trouble-free operation.
note: Other than the remote controls, this system has no user-serviceable parts. Your authorized dealer can correct any system wiring problems and, if needed, can return any malfunctioning component to Directed Electronics for repair/replacement under the terms of the Limited Lifetime Warranty printed at the beginning of this guide. system maintenance The system requires no specific maintenance. The batteries in your remotes will last approximately one year under normal use.
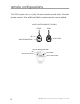
remote configurations The 3000 system has an in-key 2-button remote control and a 3-button remote control. Two additional Merlin remote controls can be added.
remote functions This system uses computer-based code learning to learn the remote buttons. This makes it possible to assign any remote button to any system function. The remotes initially come programmed with standard configuration. The buttons in all of the instructions in this manual correspond to a standard configuration remote. standard configuration for in-key 2-button remote Button The arming, disarming, and panic functions are controlled by this button.
Button An optional accessory convenience or expansion function that you have added to your system can be activated by pressing this button. Button Silent arm and disarm is controlled by this button. and Buttons When pressed together, these buttons disable the on-board control module tilt sensor and any optionally installed sensors. and Buttons Remotely enters or exits Valet. using your system The buttons used in the instructions in this manual correspond to the standard remote configuration.
While the system is armed, the LED status indicator will flash approximately once per second showing that the system is actively protecting your vehicle. If you hear more than one chirp when arming, refer to the Diagnostics section of this guide. These extra chirps confirm a malfunction autobypass. The security system also can be programmed to arm itself automatically without a remote (called passive arming).
disarming To disarm the system, press . You will hear two chirps and the parking lights will flash twice. If the siren chirps four times when disarming, refer to the Diagnostics section of this guide. This is called Tamper Alert. If the siren is active (sounding) when the system is disarmed you will hear three chirps but the system is not disarmed. (Refer to the Remote Siren Silencing section of this guide.) However, if the alarm completes the full trigger cycle when disarmed you will hear four chirps.
8. Then once. 9. Then once. This enters the final digit 1. auto-immobilisation Immobiliser circuits automatically activate after 30-seconds. Auto-immobilisation sequence: 1. Turn ignition off or disarm alarm. 2. After 30-seconds the systems Immobilisation circuits activate and engage the starter and engine interrupts. 3. LED flashes at ½ normal speed. Disarm the system when immobilised: Use one of the following methods to turn off auto-immobilisation. z Turn ignition on and press the mitter.
When you remote siren silence, the siren will either chirp 1 or 3 times. 1-chirp indicates that the system is still armed, and that all zones are inactive and being monitored. 3-chirps indicate that the system is still armed, and that at least one zone is still active and being bypassed. NOTE: If 3-chirps sound the input that is bypassed will remain bypassed until the activation ceases. remote chirp muting (3-button remote only) To temporarily turn off the arm or disarm chirps, use remote chirp muting.
remote sensor disable This can be performed anytime the system is armed. Follow the procedure listed below. 1. Arm the system. 2. Using the remote press 3. The indicators will flash four times; all Warn Away® zones of optionally installed sensors are now bypassed (zones two and three). 4. Using the remote press again. 5. The lights will flash four more times; All optional sensor Warn away and Full trigger zones and the Tilt Sensor are now bypassed 6. The sensor zones will reset when disarmed.
auxiliary channel bypass All alarm sensor inputs will be bypassed while a pulsed or timed auxiliary output is active. panic mode If you are threatened near your vehicle, you can attract attention by triggering the system with your remote! Just press for two sec- onds to enter Panic Mode. The siren will sound and the indicator lights will flash for the programmed duration (5-minutes maximum). To stop Panic Mode at any time press on the remote again.
remain on if Valet Mode has been entered. The LED status indicator will light steadily if you are entering Valet Mode. Note: The LED will turn off when the ignition is ON. To exit Valet Mode: 1. Turn the ignition On. 2. Enter your PIN code as described previously 3. When you enter the last digit the LED will light up, continue to hold the button. 4. The system will exit Valet mode and the status LED indicator will extinguish.
instant auto-arming bypass This will bypass the auto arm feature once only. 1. With the key, turn the ignition on, then off within two seconds. 2. The siren will chirp once to confirm auto arming bypass. 3. The system will not auto arm. note: The system will revert to normal auto arming when the system sees the ignition on for at least three seconds and then turned off, or the system is armed and disarmed with the remote.
note: Arming and disarming the system does not reset this function.The only ways to reset a bypassed zone are for it to not trigger for 60 minutes, or to turn on the ignition. If testing your system, it is important to remember that the NPC® programming can cause zones to be bypassed and appear to stop working. If five chirps are heard when disarming, NPC® has been engaged. If you wish to clear the NPC® memory, turn the ignition key on. NPC® is On/Off programmable.
diagnostics The microprocessor at the heart of your security system is constantly monitoring all of the switches and sensors that are connected to it. It detects any faulty switches and sensors and prevents them from disabling the entire system. The microprocessor will also record and report any triggers that occurred during your absence. arming diagnostics If the system is armed while an input is active (sensor triggering, etc.) the unit will chirp once when arming and then once more five seconds later.
disarming diagnostics Extra disarm chirps are the Tamper Alert. If four chirps are heard when disarming, the system was triggered in your absence. If four chirps are heard, the LED status indicator will indicate which zone was triggered when the ignition is turned on and will repeat 5-times (refer to the Arm/Disarm Diagnostic Chart and Table of Zones section). The system will retain this information in its memory. Refer to the Multiple Event Total Recall section of this guide.
table of zones The zone number is the number of LED flashes used by the system to identify a specific input. The standard input assignments are listed below, along with spaces to write in any optional sensors or switches you have had installed. If a Warning Zone response is triggered, the LED will not report it.
high frequency Your system transmits and receives at 433 MHz. This provides a cleaner spectrum with less interference and a more stable signal. rapid resume logic This security system will store its current state to non-volatile memory. If power is lost and then reconnected the system will recall the stored state from memory.
power saver mode z When in Valet mode, the LED will turn off 1-hour after entering Valet mode. z After 24 hours in the armed state, the LED will decrease the flash rate to 1/2 the normal rate; after 48 hours it will decrease to 1/4 the normal rate. z After 96 hours of no activity (arm, disarm, or alarm trigger) the alarm enters sleep mode. The alarms receiver, and LED turn off to save as much battery power as possible. The system is drawing next to no current in this mode.
programming options Programming options control what your system does during normal operation, and require few or no additional parts. However, some may require additional installation labor. Following is a list of the program settings, with the factory settings in bold: z Autoarming on or autoarming off of the alarm : Automatic arming 30-seconds after ignition turned off. z Arming/disarming confirmation siren chirps off, loud or quiet.
manual programming instructions It is a good idea to document changes by taking note of all feature changes made in programming mode. To enter the User Selectable Features programming: 1. Ignition on - Turn the ignition to the on/run position or start the engine. 2. Enter PIN - Your PIN code. FOR EXAMPLE: To enter a PIN code of 4301— Press four times, then once. This enters the digit 4. then three times, then once. This enters the digit 3 and then once.
6. Feature change - Press the button on the remote. If the system chirps once, the feature has just turned off or switched to the first setting in the grid slot for this feature; if the system chirps twice, the feature has just turned on or switched to the second setting in the grid slot. If the feature has more than two settings, continue pressing the on the remote to toggle through the settings (e.g.
user selectable features Then Press First Press Add new remote (autolearn) Set PIN code New remote learn arm/disarm only Auto arm on/off Chirps off/loud/quiet Select siren sounds New remote learn accessory output New remote learn silent mode Panic on/off Remote valet on/off New remote learn remote valet Siren Duration 30/60/90 seconds Reset to default (except transmitter and PIN code) New remote learn sensor disable Not used Not used Clear all remotes from memory NPC on/off user selectabl
auto (passive) arm - on/off z On: When the system sees the ignition turn off, it will begin a 30-second countdown before arming itself. The countdown is indicated by the system LED rapid flashing. After the first five seconds, you will hear one chirp and the indicators will flash. The system will arm 25 seconds later. z Off: The transmitter must be used to arm the system.
user selectable features descriptions - column two set pin code z This feature allows you to change your personal PIN code. For more information, please refer to the PIN Programming section of this guide. Factory default PIN number is 2. select siren sounds This feature allows you to select which siren sounds will be played back when the alarm is triggered. Use the following procedure to set this feature: 1. Enter the feature. 2. Press the button of the remote to begin the playing of siren sounds. 3.
system resets the one hour timer. If one hour passes and the zone has not triggered again, the zone is activated and can trigger the system again. NPC® monitors sensor inputs and the door trigger. If NPC® is turned off, the system will respond to repeated triggers on the sensor inputs and will do so indefinitely. Some states have laws regulating how many times a security system can trigger before it is considered a nuisance and the vehicle is towed away.
note: When programming a remote control to custom configuration, a remote button must first be learned to the arm/disarm. The rest of the features in this column can then be learned. A remote button can only be learned to one designated feature. That is, if the lock/unlock button is programmed for armed/disarmed (feature 1 in column 3), it cannot be programmed for another additional feature listed in column 3 of the User Selectable Features.
pin programming A PIN code can have one to four digits; each digit can be from 0-9. note: A PIN code cannot begin with a zero. Programming Procedure 1. Enter the feature location (column 2, row 1) in the userselectable programming grid. 2. Immediately press and release 3. Select each digit by pressing of the Valet switch. 1-9 times, and then press to enter the number into the system. To enter a zero, press only. To program a PIN code of 1032: A. Press and release hear one chirp. once and once.
PIN Code Confirmation Procedure Begin this procedure within 15 seconds of finishing the programming sequence or the new code will not be set. 30 1. Turn on the ignition. 2. Enter the new PIN code. 3. Press and hold for three seconds. z LED turns on: New PIN code is learned and programming is complete. z LED stays off: New PIN code is not learned and the system reverts to the old PIN code. Repeat the programming sequence.
glossary of terms Control Unit: The "brain" of your system hidden somewhere on the motorcycle where it is difficult for a thief to access. It houses the microprocessor which monitors your vehicle and controls all of the system's functions. The Merlin 3000 control unit houses the battery backup siren and Tilt sensor. Input: A physical connection to the system. An input can be provided by a sensor, switch or through an existing system on the motorcycle. LED: Blue light mounted somewhere on the motorcycle.
security & convenience expansions Here we have listed only some of the many expansion options available. Please contact your dealer for a complete list of all the options available to you. Field Disturbance Sensor: An invisible dome of coverage is established by installing the 508D "radar" sensor. Your security system can then react to any intrusions on the perimeter of the field with a warnaway response and if anyone were to intrude inside the dome the full alarm would sound.
✂ Cut along dotted line and fold for a quick and easy reference to keep in your purse or wallet. ✂ QUICK REFERENCE GUIDE function remote functions 3-button remote 2-button remote Arm/Disarm/Panic Accessory Output Silent Arm/Disarm N/A Sensor Disable Remote Valet + + + N/A ■ Transmit "Silent Arm/Disarm" to delete the arm/ disarm chirps for one operation only. ■ Transmit "Sensor Disable" once to bypass the sensor warn away chirps, twice to bypass sensors entirely.
✂ system disarm To enter Valet Mode without a transmitter, turn the key to the ON position and enter your PIN code. Continue to hold on the Valet switch for five seconds. pin code entry On the Valet switch, press the number of times corresponding to the first digit of your PIN, then press once. Press to enter a zero. Repeat this for each digit of your PIN code. There is a space provided below to note your pin code for future reference.
The company behind this system is Directed Electronics. Since its inception, Directed Electronics has had one purpose, to provide consumers with the finest vehicle security and car stereo products and accessories available. The recipient of nearly 100 patents and Innovations Awards in the field of advanced electronic technology, Directed is ISO 9001 registered. Quality Directed Electronics products are sold and serviced throughout North America and around the world.