AM9 Owner's Guide © 2010 Directed Electronics.
Congratulations Congratulations on the purchase of your state-of-the-art security/keyless entry and remote start system. Reading this Owner’s Guide prior to using your system will help maximize the use of your system and its many features. For more information please visit us online at: www.automatecarsecurity.com. For any additional questions please contact your authorized Directed dealer or Directed at 1-800-753-0600. Additional support is also available at: http://support.directed.
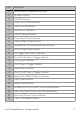
Contents Congratulations ................................................................................................ ii Important information ........................................................................................ ii Replacement Remote controls ..................................................................... ii Getting Started .................................................................................................3 System maintenance.......................................
Vehicle Page Mode .................................................................................20 Remote start ...........................................................................................20 Optional rear window defogger ...............................................................22 Timer Mode ...........................................................................................22 Short run/turbo mode .............................................................................
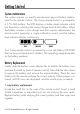
Getting Started System maintenance The system requires no specific maintenance beyond battery replacement for the remote controls. The 2-way remote control is powered by a 1.5V AAA battery. The LCD displays a battery level indicator which has three bars indicating the current charge level of the battery. When the battery reaches a low charge level that requires replacement, the remote control generates a single notification sound, and the battery level indicator flashes continuously.
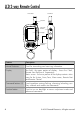
LCD 2-way Remote Control Front View Side View Antenna Function Button Display AUX Command Buttons Feature Description Internal Antenna Used for transmitting and receiving information Display Text field - the upper portion of display - shows the Clock, Remote Start Runtime or Temperature. Status screen - the lower portion of the display contains status icons for the System, Siren/horn, Alarm zones, Remote Start and Remote Control.
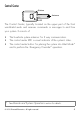
Control Center Button Antenna LED The Control Center, typically located on the upper part of the front windshield sends and receives commands or messages to and from your system. It consists of: • • • The In-vehicle system antenna: for 2 way communication. The control center LED: a visual indicator of the system’s status. The control center button: for placing the system into Valet Mode* and to perform the Emergency Override* operation. * See Remote and System Operations section for details.
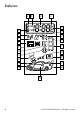
Display icons 4 5 6 7 8 3 1 2 AM PM 24 23 22 A 21 SAVE 20 9 10 11 12 19 INHIBIT 18 17 16 13 14 15 6 © 2010 Directed Electronics. All rights reserved.
Item Description 1 Vehicle Interior Temperature Indicator 2 Numeric Display 3 AM/PM Indicator 4 Alarm Clock Mode Indicator 5 Timer Function Indicator 6 Transmission Indication 7 Transmit Range Indicator 8 Power Saver Mode Indicator 9 Vibrate/Beep Mode Indicator 10 Temperature-Controlled Remote Start Indicator 11 Vehicle Page Mode Indicator 12 Full Trigger Shock Sensor Indicator 13 Hood/Trunk Open or Trigger Indicator 14 Parking Light Indicator 15 Door Open or Trigger Indicator
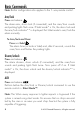
Basic Commands Note: Button configuration also applies to the 1- way remote control. Arm/lock Press and release The alarm arms, doors lock (if connected), and the siren/horn sounds and parking lights flash once. If Valet mode* is On, the doors lock and the arm/lock indicator** is displayed. Exit Valet mode to arm/lock the alarm normally. To Arm/lock and Panic Press and hold The alarm Arms (or Locks in Valet) and, after 2 seconds, sounds the siren/horn and flashes the parking lights.
For optional function (trunk release) Press and hold Activates the Aux output, such as trunk release or an expansion function that you have added to your system. The auxiliary output controls: . Remote start Press and release Activates (or if On, deactivates) the remote starter. The engine and parking lights turn On. LCD backlighting Press and release ** LCD backlighting turns on.
Advanced Commands Note: Button configuration also applies to the 1- way remote control. Additional auxiliary functions. Press and buttons simultaneously Activates an optional auxiliary convenience or expansion function that you have added to your system. The auxiliary output controls Press and buttons simultaneously Activates an optional auxiliary convenience or expansion function that you have added to your system.
Temperature Start mode* Press and and buttons simultaneously Activates the Temperature Start mode. Warning! Car should be parked in a well ventilated area when using this feature. Internal temperature Press , and buttons simultaneously (2-way only) Displays the internal vehicle temperature on the LCD for five seconds. Time/alarm clock Press and buttons simultaneously (2-way only) Turns On/Off the alarm clock. the remote control plays an ascending melody when On and a descending melody when Off.
Fahrenheit/Celsius select Press and and buttons simultaneously (2-way only) Changes temperature display from Fahrenheit (default) to Celsius. * 12 See Remote Start under Remote and System Operations for details. © 2010 Directed Electronics. All rights reserved.
Remote Operation The remote start system operates at 434 MHz and incorporates Directed’s proprietary A.S.K. out-board two-way remote. The high frequency combined with Binary Data communication achieves superior range with two-way communication. Paging features The control module sends a page to the remote as confirmation of a received command, or alarm system status.
Setting Features on the LCD Remote To enter the adjustment settings press and hold the for five seconds, the remote will sound twice confirming entry into the adjustment menu. Once in the adjustment menu, press and release the to advance to the desired feature. The number in parenthesis indicates the number of times the has to be pressed and released to access that feature. 1. 2. 3. 4. 5. 6. 7. Alarm clock set a. hour (2) b.
Remote and System Operations Passive arming/locking The system can be programmed to arm/lock itself automatically (called passive arming/locking). If the system is programmed for passive arming/ locking, it will automatically arm/lock 30 seconds after the ignition is turned off and the system detects that you have left the vehicle by opening and closing a door.
Triggered response (security only) A Triggered Response can be activated by any of the triggers listed below and consists of an alarm page along with the response described for each trigger. The default Triggered Response duration is 30 seconds but can be programmed from 1-180 seconds by your installer. • • • • • Shock Sensor Trigger - Heavy impacts to the vehicle will instantly sound the siren/horn and flash the lights for the programmed duration and report Zone 2.
Multi-level security arming (security only) Multi-Level Security Arming allows you to select which of the system’s inputs or sensors will be active and which will be bypassed when the system is armed. Pressing again within five seconds of arming the system activates the Multi-level security feature. Each time is pressed, a different security level is selected. To select the security levels: Press once: The siren chirps once. The system is armed with all zones active. Press a second time within five seconds.
Arming while driving (security only) Your security system can be armed while driving the vehicle. Press on the remote control for two seconds while the vehicle is running. The siren/horn will sound once to indicate that the security system is armed, and then once more to indicate that the ignition is on. The system will not respond to any input except the door triggers, and the starter kill relay (if installed) will not be activated.
To disarm/disable the system: 1. Turn the ignition to the ON position. 2. Press and release the control center button the preset number of times (one to five times) within15 seconds (the factory default setting is 1 press). After five seconds, the system will disarm/disable. If the system does not disarm/disable, you may have waited too long. Start over by turning the ignition off and on.
Panic Mode if you are threatened in or near your vehicle, you can attract attention by triggering the system with your remote control. Press and hold for two seconds. The siren sounds and the parking lights flash for the programmed siren duration. To stop panic made at any time, press on the remote control again. Vehicle Page Mode If a person in the vehicle would like to page the remote, press and hold the control center button for five seconds.
To remote start the vehicle: • Press on the remote control once. The parking lights flash to confirm that the vehicle will attempt to start. With gas vehicles the engine starts 4 seconds after the parking lights flash. With diesel vehicles the engine starts when the WAIT-TO-START indicator on the dashboard goes out or the programmed delay has ended.
Optional rear window defogger Pressing the , and simultaneously activates/deactivates the optional rear window defogger. The parking lights flash two times and the rear defogger is no longer active when the vehicle is remote started. When the same procedure is repeated, the defogger activates and the parking lights flash three times. If the vehicle interior temperature is greater than 55°F when the remote start is activated, the rear defogger does not turn on.
To activate: 1. Park the vehicle and set the parking brake. 2. Remove your foot from the brake pedal and leave the engine running. 3. Press and release the and buttons at the same time. The lights will flash to indicate the remote start has entered short run turbo mode. 4. Turn off the key, the engine will keep running. 5. Exit and secure the vehicle. The engine will turn off after the programmed run time. Temperature Start Mode Pressing the , and simultaneously activates the Temperature Start mode.
2. wait five seconds. Turn the ignition key to the OFF position. (The engine will stay running.) The engine will run until the pre-programmed time elapses or a shut-down input is received. (See the previous Remote Start section for a complete list of shut-down inputs.) This feature will not work if the brake pedal is being pressed. Power saver mode Your system will automatically enter Power Saver Mode while armed/ locked or in Valet Mode, after a period of time in which no operation has been performed.
Safety features This system has several important safety features to ensure proper operation of the motor and prevent accidental damage to the engine or its components. Starter-anti-grind circuitry Whenever the vehicle is remote started, advanced anti-grind circuitry prevents the starter from engaging, even if the key is turned to the start position. This prevents damage to the starter motor if the key is turned to the start position during remote start operation.
Diagnostics (security only) The microprocessor at the heart of your system is constantly monitoring all of the switches and sensors connected to it. It is designed to detect any faulty switches and sensors and prevents them from disabling the entire system. The microprocessor will also record and report any triggers that occurred during your absence. Refer to the Table of Zones sections of this guide for diagnostic information.
prevents annoying repetitive trigger sequences due to faulty door pin switches or environmental conditions such as thunder, jackhammers, airport noise, etc. Example: If the alarm triggers three times within a 60-minute period and each time the same sensor or switch triggers the alarm, NPC will interpret those triggers as false alarms. After the third trigger, NPC ignores, or bypasses, that sensor or switch (along with any other sensors or switches sharing the same zone) for 60 minutes.
Zone Description 1 Trunk Pin Dealer installed options 2 Instant trigger: a heavier impact detected by the shock sensor 3 Door switch trigger 4 Instant trigger: for optional sensors 5 Ignition trigger 6 Hood Pin Your system stores the last two triggered zones in memory. If your system has been triggered but the LED has been reset by turning on the ignition, your dealer can still recall the last two zones that were triggered. Contact your dealer for details.
your installer is programming the security system with the Directed Bitwriter, ignition lock and unlock are independent features that can be programmed separately. Important: The vehicle doors must be closed for the ignition lock feature to work. • Passive door locking (with passive arming) or Active door locking (only when arming with the transmitter). Passive locking allows the vehicle’s doors to lock when the security system passively arms (after the 30-second countdown).
nuisance. If your installer is programming the security system with the Directed Bitwriter, the full triggered response can be programmed for any duration ranging from 1 to 180 seconds. • Siren tones and chirp volume. The output of the Revenger™ Soft Chirp™ siren consists of six different tones in sequence. Any of these tones can be eliminated by a dealer, resulting in a unique, easily identifiable siren sound. The chirps can be either full volume or 6 decibels quieter than the full alarm blast.
Government Regulations This device complies with Part 15 of FCC rules. Operation is subject to the following two conditions: (1) This device may not cause harmful interference, and (2) This device must accept any interference received, including interference that may cause undesirable operation. This equipment has been tested and found to comply with the limits for a class B digital device, pursuant to Part 15 of the FCC Rules.
Warning! Safety First The following safety warnings must be observed at all times: Due to the complexity of this system, installation of this product must only be performed by an authorized Directed dealer. When properly installed, this system can start the vehicle via a command signal from the remote control/transmitter. Therefore, never operate the system in an enclosed area or partially enclosed area without ventilation (such as a garage).
After the remote start module has been installed, contact your authorized dealer to have him or her test the remote start module by performing the Safety Check outlined in the product installation guide. If the vehicle starts when performing the Neutral Safety Shutdown Circuit test, the remote start unit has not been properly installed. The remote start module must be removed or the installer must properly reinstall the remote start system so that the vehicle does not start in gear.
Patent Information This product is covered by one or more of the following U.S.