OWNER’S GUIDE INSTALLATION GUIDE APPLICABLE FOR MODELS OHV901 OHV901A OHV1021 OHV1021A OHV1202 OHDW17.
NON-TRANSFERABLE LIMITED ONE YEAR CONSUMER WARRANTY Directed Electronics (Directed) promises to the original purchaser that the new automotive video monitor and/or source unit(s) (the Product) that is purchased and installed from a Directed authorized dealer more than ninety (90) days after the purchase of a new vehicle are warranted for a period of one (1) year from date of purchase of the Product.
Table of Contents Safety Instructions . . . . . . . . . . . . . . . . . . . . . . . . . . . . . . . . . . . . . . . .5 Introduction . . . . . . . . . . . . . . . . . . . . . . . . . . . . . . . . . . . . . . . . . . . .6 How to Use this Guide . . . . . . . . . . . . . . . . . . . . . . . . . . . . . . . . . . . . . .7 What’s Included . . . . . . . . . . . . . . . . . . . . . . . . . . . . . . . . . . . . . . . . . .8 Getting Started . . . . . . . . . . . . . . . . . . . . . . . . . . . . . . . . . . . . . .
Record Tab .....................................................................................45 System Tab.....................................................................................46 Info Tab ........................................................................................48 Specifications . . . . . . . . . . . . . . . . . . . . . . . . . . . . . . . . . . . . . . . . . . .49 Upgrade Software . . . . . . . . . . . . . . . . . . . . . . . . . . . . . . . . . . . . . . . .
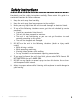
Safety Instructions Completely read the safety instructions carefully. Please retain this guide in a convenient location for future reference. 1. 2. 3. 4. 5. 6. 7. 8. d Keep the unit away from humidity. Keep the unit away from long exposure to the sunlight. Never pour any liquid into the unit to avoid damages or electrical shock. If any of the following situations occurs, get the unit checked by service personnel: ❍ Liquid has penetrated into the unit. ❍ The unit has been exposed to moisture.
Introduction Congratulations for choosing the DMP740 or DMP040, by Directed Video. This high performance product has been designed and engineered by Directed Electronics, the industry leader in high quality automotive security, audio, and video equipment since 1990. This unit is a high performance portable multimedia player and recorder which comes with a Li-Ion rechargeable-removable battery. With the DMP740, you can play audio or video files in various formats, and record audio/video.
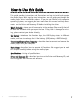
How to Use this Guide This guide provides instructions and illustrations on how to install and operate the media player. With step-by-step instructions, we will guide you through the media player driver installation process. If you are not familiar with computer operating systems, we suggest you learn more from this manual and help documents on the Driver and Recovery CD before installing the driver. What's Included—shows you all accessories in the package.
What’s Included ❍ DMP740 or DMP040 ❍ USB Cable ❍ Stereo Earphones ❍ Handy Bag ❍ AC Adapter ❍ Driver and Recovery CD ❍ AV-in/out Cable ❍ Audio Line In Cable ❍ Remote Control NOTE: The DMP740 battery should be charged ONLY with the provided adapter! NOTE: The accessories listed above may change without notice. NOTE: The DMP040 will have 2 AV-in/out cables.
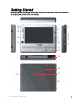
Getting Started OVERVIEW (DMP470 SHOWN) 19 20 21 22 d © 2005 Directed Electronics—all rights reserved 9
1. Earphone Jack 2. 3. 4. 5. 6. 7. 8. 9. 10. 11. 12. 13. 14. 15. 16. 17. 18. 19. 20. 21. 22. 10 Plug-in the earphones here. Plug-in the AV cable here to enable AV Line-Out to the AV Line-Out Jack external display (TV). AV Line-In Jack Plug-In the AV cable here to enable AV Line-In recording. Connect the mini USB connector of the supplied USB cable USB Connector here, and the other end to the PC host. DC-In Jack Plug-in the AC Adapter here to recharge battery.
NOTE: If holding the power off switch in the up position for 5-seconds does not shut down the media player, carefully use a straightened paper clip at the access hole shown on the back of the media player to reset the software. The power will shut-off. Operating Menu Displays Power on the media player, the main menu on LCD will display after the bootup animation. Following are the instructions for each menu option. NOTE: For the DMP040, the displays will show on an attached video device. MAIN MENU 1. 2.
VIDEO/MUSIC /PHOTO MENU 8. Menu Title: Shows selected menu. 9. List Title: Shows all files in a selected folder. 10. Scroll Bar: Scroll down to display additional titles. VOICE/AV RECORDING 14. Recording Time: Recording elapse time (hh:mm:ss). 15. Recording Quality: Indicate selected and operating recording quality. SET UP MENU 16. 17. 18. 19. 12 Scroll bar: Mean more tabs are available. Tabs: Include Display, Photo, Record, System, and Info Tabs. Setting Items: List tab item for adjusting.
USB Hard Disk The media player contains a 40GB mini-hard drive. You can operate the media player as an USB hard drive and copy personal data to it. Simply connect the media player to your computer, and use Windows Explorer to copy and manage your data. Lock Switch The media player has a lock to avoid accidental operation. Slide the Power/Lock Switch down to the lock position while power is on.
SD/MMC & MS Card Slot The media player has an SD/MMC and a MS slot. You can insert a Secure Digital Card, MultiMedia Card or a MS (Memory Stick) Card into its designated slot to allow your photos, videos, or music to be played or displayed on the DMP740 (displayed on a connected video unit for the DMP040). SD/MMC/MS slots Note: Use only one card slot at a time. Note: If you pull a memory card from the slot while you are viewing a video/picture or listening to an MP3 file, the unit may lock up.
Remote Control The remote control provides the following functions: ❍ ❍ ❍ ❍ ❍ ❍ ❍ ❍ ❍ ❍ ❍ OFF: press to power On/Off. TV/LCD: press to switch the output device between TV and the DMP740 (DMP740 only). z REC: press to start to record of each function. Exit: press to stop playback or go back to previous menu. MENU: press to go back to Main Menu. MUTE: press to mute the audio. S/T: press to select previous/next item on menu list. These two buttons function the same as pushing the Navigator button up/down.
Li-Ion Battery Recharging (DMP740 only) The DMP740 comes with a Li-Ion rechargeable battery. Charge the battery completely before using the DMP740 for the first time by following the steps below: 1. 2. Connect the supplied AC Adapter to AC outlet, and plug in the other end of the AC Adapter to the DC in-jack of the media player. While recharging, the power LED above the LCD screen will flash.
BATTERY CONSUMPTION REFERENCE (DMP740 ONLY) Battery Charge Indicator Full Discharged The media player uses a 2200 mAhr 11.1 V 3-Cell rechargeable Li-Ion battery. The battery usage will vary depending on the operating mode. A fully recharged battery has the following typical playback/recording times: ❍ ❍ d Video Playback/Video Record: can be used for about 3 hours. Music Playback/Music Record: can be used for about 7 hours.
Utility CD Included is a Utility CD (to be used on a PC). Insert the supplied CD into your CD-ROM, and the CD will auto-run the Setup program. On your computer screen, you will see the following display. ❍ ❍ ❍ ❍ ❍ ❍ ❍ Video Format Converter: Video converter utility for converting the format of video files. DivX Create Bundle: Free trial version of DivX Create Bundle provides the tools to create and play DivX videos with advanced features. User Manual: User manual in PDF format.
Connect & Disconnect from PC CONNECT THE MEDIA PLAYER TO COMPUTER 1. Slide the power/lock switch up to power on the media player. Wait until the main screen displays. The DMP040 will require use of the AC Power Adapter. Power/Lock Switch 2. Plug the mini-end of the supplied USB cable to the media player, and the other end to your computer’s USB port. USB Port 3. d Once connected to your computer, the media player should be detected by your computer operating system automatically.
NOTE: For Windows 98SE users, a driver is required to activate the media player on your computer. Refer to Upgrading Software/Firmware section of this manual for installation instructions for this driver. 20 4. After connection is initialized the following window will display on your computer. 5. Scroll down and select “Open Folder . . . ” to use Windows Explorer to view the contents of the media player’s hard drive.
6 You can then move, copy, or delete files using Windows Explorer. Note: In the example shown below the drive in the media player is identified as drive F: The drive letter may be different depending upon the configuration of the computer being used.
4. After connection is initialized, if your computer operating system fails to recognize the media player as a hard disk, then go to [Device Manager] by clicking "Start""Setting""Control Panel""System""Hardware", and look for [Toshiba MK4025GAS] under [Disk Drive] to check connection status. If the connection is failed, you will not find under Disk Drives a drive with a similar name such as [Toshiba MK4025GAS or DMP740 USB Device or DMP040 USB Device] (this is the hard drive in the media player).
and format it with the Windows formatting tool. When formation is completed, please refer to the Upgrading Software/Firmware sections of this manual for procedures to recover the system files, software, and firmware. NOTE: The www.directedmobilemedia.com web site will have the latest version of the software/firmware.
Basic Usage POWER ON AND OFF 1. 2. Slide the switch up once to power on the media player. After startup animation, you will see the main menu and can then continue using the media player. The DMP040 must be docked or utilize the AC Power Adapter. To power off the media player, slide the button up again. The following message will display, and the media player will shut down.
tus icon at the top of the LCD screen changes while adjusting volume. There are 16 steps of volume levels. The display is not applicable for the DMP040 (can be viewed only on external screen). VOLUME CONTROL—REMOTE CONTROL 1. To change the volume level, push the VOL +/VOL - buttons on the remote. The volume status icon at the top of the LCD screen changes while adjusting volume. There are 16 steps of volume level adjustment. 2. To mute the volume, press MUTE button.
VIDEO The media player supports playback of MPEG-4 SP, DivX 3.11/4/5, Motion JPEG, and WMV-9 SP@ML video files. Video can be playback at up to 30fps. Only supported file formats are shown on the list that are playable. NOTE: To view videos, the DMP040 must be connected to an external display. Figure 1 ❍ 1. 2. 3. 26 Figure 2 Play Video on media player : Connect the media player to the computer, refer to Connect and Disconnect from PC. Upload the files from the computer to the media player .
Refer to the Safely Remove media player from Computer section to disconnect the media player from computer after the files are transferred. 5. On the main menu, push the Navigation button up or down to the Video menu as shown in Figure 1 above. Press in on the Navigation button to display the Video folders as shown in Figure 2. 6.
9. Push the Navigation button to the right to fast-forward video playback, each push increments from FFx2, x4, x8, x16, and x1. (Push once to fastforward by 2x, twice to fast-forward 4x, etc.) Press in on the Navigation button to playback the video at normal speed. 10. Push the Navigation button left to rewind the playback, each push increments from RWx2, x4, x8, x16, and x1. (Push once to rewind by 2x, push twice to rewind 4x, etc.) Press in on the Navigation button to playback the video at normal speed.
NOTE: There is only one resume break stored at a time on the media player. If you play another video, the resume bookmark will be erased. The resume break does not apply to video played from memory cards. 13. If any file is not needed, you can delete it from file list. Push the Navigation button up or down to select the file, pushing the Navigation button left displays the left figure below (Delete).
4. With DivX DRM protection, video playing may be limited by the number of views. The video will no longer be able to be played after the rental is expired, and you will see the message below when you try to play it again. Press the Navigation button to acknowledge. ❍ Select Audio Track and Subtitle Track of DivX® File: DivX® video may support multiple language audio and subtitle tracks. You can select different languages for audio and subtitles to meet your needs during video playback. 1.
2. If the video has embedded multiple subtitle tracks, the "Please select Subtitle Track" message will display on LCD when you press the Navigation button in to play the DivX® video file. Use the Navigation button to choose a track and then press the Navigation button in to start the video. NOTE: The tracks now can only be shown as Track 1, Track 2, etc. This function will be updated by DivX® Network in the near future. 3. You can change audio and subtitle language during DivX® video playback.
Figure 3 ❍ 1. 2. 3. 4. 5. 6. 7. 32 Figure 4 Play Music on media player: Connect the media player to the computer, refer to Connect & Disconnect from PC. Upload the files from your computer to the media player. After the files are transferred, disconnect the media player from the computer. From the main menu, push the Navigation button up or down to Music as shown in Figure 3. On Music selection, press the Navigation button in to display the Music folders as shown in Figure 4.
8. Push the Navigation button up or down to choose from Random/Repeat/EQ/Playback Status/Song. Each of these items can be adjusted (see the table below).
PHOTO The media player supports viewing JPEG, GIF, BMP, and TIFF file format. Only supported files will be shown from the list and can be viewed on the media player. NOTE: The DMP040 must have an external video unit attached to view photos and file listings. NOTE: TIFF files can be very large. If the file is too large it may not display. ❍ 1. 2. 3. 4. 5. 6. 34 View Photo or Picture Connect the media player to the computer and upload the files from the computer to the media player.
7. 8. 9. 9. Press the Navigation button in to start a Slide Show of the photos. The slide presentation duration, in seconds, can be set from the main menu; go to Setting then Photo then Slide Interval. Press the Navigation button in again to pause the slide show. In slide show mode you can continually repeat all photos saved to the media player by adjusting Setting Menu\Photo\Slide Repeat to On. You can select a picture to be wallpaper.
10. Push the Navigation button to the right or left to select the previous or next photo. Push the Navigation button up or down to select last 9 or next 9 photos. Push the Navigation button in to view the selected photo in full screen. 12. Press the "E" button on the unit or /EXIT button on the remote to exit photo viewing. NOTE: Photos/pictures are best viewed at resolution of 1600x1200 for JPEG, TIFF, and BMP format; 800x600 for GIF format. 12.
NOTE: To avoid battery discharge and subsequent loss of recording, it is suggested that the AC adapter be used to power the media player. NOTE: The record quality is set in the Setting—Record/Voice section of the Setting menu. 3. When the REC z button is pressed, the Record LED will stay illuminated and the Start Recording message will display. 3. To stop recording, press REC z button again. You will see the recorded file being saved to the Music\record folder (see figure above).
AV RECORDING The media player can also record an AV signal from other devices. NOTE: To record an AV file on the DMP040 both the input and output A/V connections will have to used. The input to connect to the record source and the output connected to a TV or monitor to view status. ❍ Record AV 1. Connect the media player AV-In Jack to an AV output device (analog audio and video, not Digital, RGB, or S video), such as TV, Movie camera, VCR, or DVD player with the supplied AV cable.
d 4. If Audio/Video option is selected without AV cable connected, you will see the following message displays momentarily and the display will return to previous screen. 5. If you select the Audio/Video option and press the “R” button or the REC button on the remote control, the message below will display. You can choose a duration, and recording will stop automatically when the selected time has elapsed. Select an option by the Navigation button and press the Navigation button in.
OTE: The maximum length of an AV Recording file depends on hard NO disk free space and can not exceed 3hrs or 2GB. In Continuous mode it will make multiple files until the hard drive is full. ❍ 1. 2. 3. Play a Recorded AV File To play a recorded AV or audio file, go back to main menu and select Video or Music mode by referring to Video or Music section. Find the recorded file name in Video\Recorded folder or Music\Recorded folder.
2. 3. 4. 5. Before inserting a SD/MMC card or Memory Stick, slide the button up to turn off the media player, if power is on. Insert your SD card, MMC card, or Memory Stick into its slot in the correct orientation. Press button to turn on media player. If your SD/MMC card or Memory Stick has video, audio, or photo files in the inserted card, change to appropriate mode, open the Memory Card folder and select the file to play or view.
4. see the display switch to the TV. The remote’s TV/LCD button can also be used to switch the display. On Video menu, select and play a file on the media player. Now you can watch the video file on TV and adjust settings on the media player with its supplied remote. Audio in either video format or MP3 can be played through your home sound system the same way. Setting The media player Setting menu includes Display, Photo, Record, System, and Info tabs. 1. 2.
DISPLAY TAB The Display tab includes Brightness, TV Standard, and Display items. The Brightness and Display are not applicable to the DMP040. NOTE: Brightness settings selected in the settings menu will be recorded and kept. Brightness settings selected while watching a movie will reset to the default selection in the settings menu when the unit is shut off. 1. 2. Enter Setting menu, the Display tab is the default tab (see figure above).
PHOTO TAB The following photo settings, Slide Music, Slide Repeat, and Slide Interval are found under the Photo tab. Under Music there is a folder called Slideshow. MP3s placed in that folder will play in the background when "slide music" is turned on during a slide show of photos. 1. 2. From Setting Menu, push the Navigation button right or left to go to Photo as shown above. Push the Navigation button up or down to select among Slide Music, Slide Repeat, and Slide Interval.
RECORD TAB You can adjust Resolution, AV Quality, and Voice Quality in Record tab. 1. 2. In Setting Menu, push the Navigation button right or left to Record tab. The display will appear as shown above. Push the Navigation button up or down to select a setting item. Refer to the table below for the settings available.
SYSTEM TAB You can adjust various system settings within the System tab. To change system settings: 1. 2. 46 In Setting Menu, push the Navigation button right or left to System tab. The display will be as shown above. Push the Navigation button up or down to select Display Off, Power Off, Language, Date Format, Date Setting, Time Setting, Time Format, Alarm Alarm Time, and Load Defaults. Refer to the table below for the settings available.
Setting Method and Purpose Options Push Navigation right or left to set Off/3 sec/5 sec/10 sec /15 Display Off Display shut down on idling to save sec/30 sec/1 min. battery consuming. Push Navigation right or left to set Off/15 sec/30 sec/1/2/5/10 Power Off power off automatically. min. Push Navigation right or left to Language Version dependent select language. Push Navigation right or left to yy/mm/dd, mm/dd/yy, Date Format select date format on display.
INFO TAB You can display information regarding Storage Free Space, Software Version, MCU Firmware Version, DivX (R) VOD, Update Software, Update MCU Firmware, and Update USB Firmware from Info tab. To change information settings: 1. 2. In Setting Menu, push the Navigation button right or left to select Info tab. The display will appear as shown above. Push the Navigation button up or down to change the selection. Refer to the table below for the information/settings available.
NOTE: Updating Software and Update Firmware are advanced operations! Only advanced users should perform these actions! Refer to the website www.directedmobilemedia.com for additional information. Specifications DMP740 Dimensions Weight—DMP740 DMP040 Operating Temperature Storage Temperature Operating Humidity Audio Spec 7.7 x 6 x 1.1 in. (193.5 x 151.4 x 27.9 mm) About 26.66 oz or 1.66 lb (755.5 g) About 19.84 oz or 1.24 lb (562.
Headphone, Test File: Resolution: 240x180, Video bit-rate: 800Kbps, Audio bitrate: 64Kbps, File size: 1.1GB, MP4+MP3, Power Sources: Battery, Test Duration: 4 hours. NOTE: Specifications are subject to change without notice. Upgrade Software The media player software can be upgraded. It requires a computer and the supplied USB cable for the following procedures: NOTE: The DMP040 must have an external video display connected to view the screens.
8. Push the Navigation button to the right. Message "Confirm? Yes No" will show on the display. 9. Push the Navigation button right or left to select Yes and press the Navigation button in to start to upgrade software. Or, select No to cancel the upgrade. 10. When the software upgrade completes, the system will restart automatically. Upgrade Firmware The media player firmware can be upgraded.
3. 4. 5. 6. 7. 8. Download a media player upgrade file from website and save it into the media player root directory. Double click to run the upgrade file, and select "Replace all" on pop-up message to replace old files. Safely disconnect the media player from your computer. Select Setting from main menu and press X/Enter button to enter. Push the Navigation button left or right to select Info tab. Push the Navigation button up or down to select Update Firmware. Push the Navigation button to the right.
Lock/Unlock Button Insert Player and then slide down until unit locks. Electrical Connector Remote Usage when Docked The remote control provided with the media player will not operate the unit when the media player is docked. The remote control used with the overhead console now controls the media player. The cross reference table below lists the remote control functions that operate the media player when docked. NOTE: The control buttons on the DMP740 function when the unit is docked.
Overhead Remote Media Player Remote Title/Icon z Rec S S Setup Mute Mute W WW Enter X❙❙ X XX T T X❙❙ X❙❙ /Exit TV/AV LCD/TV Menu PCB Menu 54 Comments Record or "R" button on unit Up Setting Menu displays Left Play/Pause Right Down Play/Pause "E" button on unit "M" button on unit © 2005 Directed Electronics—all rights reserved
Dockable Media Player—Removal 1. 2. 3. While holding and supporting the player. Move and hold the lock/unlock button to the right. Slide the player away from the screen and carefully remove. NOTE: Install the rubber protective cover over the electrical connector at the bottom of the media player after removing the unit from the monitor POD mounting area.
© 2005 Directed Electronics—all rights reserved
d © 2005 Directed Electronics—all rights reserved 57
The company behind this system is Directed Electronics. Since its inception, Directed has had one purpose, to provide consumers with the finest vehicle security, car stereo products, rear seat entertainment, and accessories available. The recipient of more than 20 patents in the field of advanced electronic technology, Directed is ISO 9001 registered. Quality Directed Electronics products are sold and serviced throughout North America and around the world.