™ OWNER'S MANUAL C o m p o n e n t Speaker MODEL CO552 CO652
Table of Contents English . . . . . . . . . . . . . . . . . . . . . . . . . . . . . . . . . . . . . . . . . . . . . . . . . . . . . . . . . . . . . . . . . . . . . . . . . 1 Français . . . . . . . . . . . . . . . . . . . . . . . . . . . . . . . . . . . . . . . . . . . . . . . . . . . . . . . . . . . . . . . . 9 Español . . . . . . . . . . . . . . . . . . . .
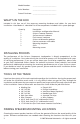
Model Number: Serial Number: _____________________________ _____________________________ Date of Purchase: _____________________________ What’s in the Box Included in this box are all the necessary mounting hardware and cables for your basic installation. Listed below is a detailed list of the components included in this system package.
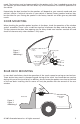
needs. The locations must be large enough for the speakers to fit. Care is needed to ensure that the location you have chosen will not affect any of the mechanical or electrical operations of the vehicle. Determining the best location for the speakers will depend on your cosmetic needs and your vehicle's interior. If minimal intrusion in your vehicle is desired, factory speaker locations may be the ticket for you. Placing the speaker in the factory location can often give very desirable results.
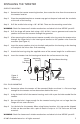
Installing the Mid/Woofers Step 1: Determine where the speakers will be mounted. Make sure there is a flat area large enough for the speakers to fit properly. An uneven mounting surface can damage the driver. Step 2: Check to make sure the space you have chosen for the speakers will not interfere with the operation of the vehicle. Step 3: Using the supplied template guide, mark the mounting hole and mounting screw hole locations with a pen for each speaker. Step 4: Cut the holes for the speaker.
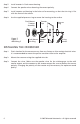
Installing the Tweeter SURFACE MOUNTING Step 1: Determine the tweeter mounting location, then route the wires from the crossover to the tweeter location. Step 2: Place the provided template or tweeter cup against the panel and mark the two holes at the rear of the housing. Step 3: Drill the smaller holes using a 1/8" drill bit. These are the mounting screw holes. WARNING: Check for clearance of window mechanisms and electrical wires BEFORE you drill.
Step 5: Install tweeter in flush mount housing. Step 6: Connect the speaker wires observing the correct polarity. Step 7: Install tweeter and housing in the hole cut for mounting, so that the trim ring is flat with the front of the surface. Step 8: Use the supplied pressure ring to secure the housing to the surface.
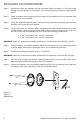
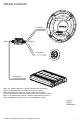
Wiring Diagram To woofer + _ Input Output To tweeter + _ To Amplifier + _ Note: The tweeter positive is the wire marked with the stripe. Note: Le câble positif du haut-parleur d'aigus est rayé. Nota. El positivo del tweeter es el cable que tiene la franja. Hinweis: Der positive Hochtönerdraht ist mit dem Streifen markiert. Nota: il filo positivo del tweeter è contrassegnato da una striscia. Nota: O cabo positivo do tweeter está marcado com a listra.
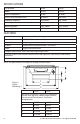
Specifications Part Number 22130 22135 Model CO552 CO652 Nominal Impedance 4 ohm 4 ohm Power Continuous/Maximum 40 /100 w 50 /120 w Frequency Response 120 -20kHz 60 - 20kHz Sensitivity 87dB 85dB Mounting Depth 1.97"/50mm 2.36"/60mm Mounting Diameter 4.72"/120mm 5.
FRANÇAIS OÙ MONTER LES HAUT-PARLEURS Le choix du bon emplacement des haut-parleurs aura un effet majeur sur la qualité du son du système. Plusieurs choses doivent être prises en considération pour faire le meilleur choix. Les emplacements doivent être assez grands pour accueillir les haut-parleurs. Faites attention que l'emplacement choisi n'affecte en aucune façon le fonctionnement mécanique et électrique du véhicule.
ATTENTION: Vérifiez l'espace libre du mécanisme et des fils électriques des fenêtres AVANT de percer. Étape 5: Amenez les câbles à leurs haut-parleurs. Assurez-vous de les garder loin de tout bord métallique ou autre aiguisé. Pour passer à travers le métal, utilisez une rondelle isolante. Étape 6: Pré-percez les trous de vis de montage avec une mèche 1/8". ATTENTION: Vérifiez l'espace libre du mécanisme et des fils électriques des fenêtres AVANT de percer.
Étape 7: Installez le haut-parleur et le logement dans le trou découpé pour le montage, afin que la garniture soit au niveau de l'avant de la surface. Étape 8: Utilisez l'anneau de pression inclus pour fixer le logement à la surface. INSTALLATION DU RÉPARTITEUR Étape 1: Décidez où fixer le répartiteur, loin de tout fil électrique, d'origine ou installé après coup. Le répartiteur passif devrait être monté à proximité de l'amplificateur. Étape 2: Montez le répartiteur avec les fils d'attache métalliques.
ESPAÑOL UBICACIONES DE MONTAJE DE LOS ALTAVOCES Escoger la ubicación correcta de los altavoces tendrá el mayor efecto en la calidad del sonido del sistema. Es necesario que usted tenga en cuenta varias consideraciones cuando escoja el lugar que mejor se adapte a sus necesidades. Los lugares escogidos deben ser lo suficientemente grandes como para que quepan los altavoces. Es necesario que en la ubicación escogida no se afecte ninguna operación mecánica o eléctrica del vehículo.
* Sierra circular de 4 3/4 plg. (woofer de 5 1/4 plg.) * Sierra circular de 5 5/8 plg. (woofer de 6 1/2 plg.) ADVERTENCIA: Verifique que haya espacio para los mecanismos de ventana y los cables eléctricos ANTES de taladrar. Paso 5: Encamine el cable de altavoz hasta los altavoces. Mantenga los cables de altavoz lejos de los bordes afilados de metal u otro material. Cuando pase los cables a través de metal, ponga en el agujero una arandela de goma protectora.
Paso 4. Haga el agujero para el tweeter. Cuando instale el tweeter en ubicaciones de fábrica, este paso se puede omitir. Se puede hacer el agujero con unas tijeras de metal o una sierra circular de 1 7/8 plg. para materiales duros. ADVERTENCIA: Verifique que haya espacio para los mecanismos de ventana y los cables eléctricos ANTES de taladrar. Paso 5. Instale el tweeter en el alojamiento de montaje al ras. Paso 6. Conecte los cables de altavoz con la polaridad correcta. Paso 7.
DEUTSCHE SO PLATZIEREN SIE DIE LAUTSPRECHER Die Wahl der korrekten Lautsprecherposition hat große Auswirkungen auf die Soundqualität des Systems. Bei der Wahl der Lautsprecherposition, die Ihren Ansprüchen am besten entspricht, sind mehrere Faktoren zu beachten. Es muss an der Stelle genügend Platz für den Lautsprecher vorhanden sein. Sie müssen sicherstellen, dass die gewählte Stelle die mechanischen oder elektrischen Funktionen des Fahrzeugs nicht beeinträchtigt.
WARNUNG: Prüfen Sie VOR dem Bohren, dass Sie keine Fenstermechanismen oder Stromkabel anbohren. 5. Schritt: Verlegen Sie die Lautsprecherkabel zu den Lautsprechern. Dabei müssen Sie die Kabel von scharfen Metallkanten oder anderen Kanten entfernt halten. Bei der Verlegung durch Metall ist eine Schutztülle zu verwenden. 6. Schritt: Bohren Sie die Befestigungsschraubenlöcher mit einem 1/8-Zoll-Bohrer vor. WARNUNG: Prüfen Sie VOR dem Bohren, dass Sie keine Fenstermechanismen oder Stromkabel anbohren. 7.
ausschneiden. WARNUNG: Prüfen Sie VOR dem Bohren, dass Sie keine Fenstermechanismen oder Stromkabel anbohren. 5. Schritt: Installieren Sie den Hochtöner im bündig eingebauten Gehäuse. 6. Schritt: Schließen Sie die Lautsprecherkabel an, wobei Sie auf die korrekte Polung achten müssen. 7. Schritt: Installieren Sie den Hochtöner und das Gehäuse im Einbauloch, wobei die Blende bündig mit der Oberfläche sein muss. 8.
ITALIANO INDIVIDUAZIONE DELLA POSIZIONE DI MONTAGGIO DEGLI ALTOPARLANTI La scelta della posizione degli altoparlanti ha la massima influenza sulla qualità del suono dell'impianto. Nella scelta delle posizioni di montaggio che soddisfano meglio le proprie esigenze, occorre considerare diversi fattori. Le posizioni devono offrire uno spazio sufficiente per l'altoparlante. Accertarsi con cura che la posizione scelta non interferisca con il funzionamento dei componenti meccanici o elettrici del veicolo.
o una sega a tazza della misura dell'altoparlante indicata di seguito. o sega a tazza da 4-3/4" (per installare un woofer da 5-1/4") o sega a tazza da 5-5/8" (per installare un woofer da 6-1/2") ATTENZIONE: controllare la distanza dai meccanismi e dai fili elettrici dei finestrini PRIMA di eseguire i fori. Fase 5: Fase 6: passare il filo fino all'altoparlante. Accertarsi di tenere i fili lontani da bordi od oggetti di metallo taglienti.
Fase 4: praticare il foro per il tweeter. Quando si inserisce l'altoparlante nelle sedi predisposte in fabbrica, è possibile tralasciare queste operazioni. Eseguire il foro con un paio di forbici da lattoniere o con una sega a tazza da 47,6 mm (1-7/8") per materiali duri. ATTENZIONE: controllare la distanza dai meccanismi e dai fili elettrici dei finestrini PRIMA di eseguire i fori.. Fase 5: Fase 6: Fase 7: Fase 8: installare il tweeter montandolo a filo sul supporto.
PORTUGUÊS DETERMINAÇÃO DOS LOCAIS PARA INSTALAÇÃO DOS ALTOS-FALANTES A seleção dos locais corretos para instalação dos alto-falantes é o fator que mais influenciará a qualidade do som produzido pelo sistema. É necessário considerar vários aspectos ao escolher os locais mais adequados às suas necessidades.
ser cortado com uma tesoura para metal fina, uma serra tico-tico ou a ar, ou uma serra copo correspondente ao tamanho do alto-falante de graves médios descrito abaixo. • Serra copo de 120 mm (4-3/4") para instalação do woofer de 133 mm (5-14”) • Serra copo de 143 mm (5-5/8") para instalação do woofer de 165 mm (6-1/2") ATENÇÃO: Verifique se há espaço suficiente até os mecanismos e fios elétricos de operação do vidro da janela ANTES de perfurar. Etapa 5: Passe o cabo para caixa acústica até os alto-falantes.
metal ou uma serra copo de 476 mm (1-7/8”) para materiais duros. ATENÇÃO: Verifique se há espaço suficiente até os mecanismos e fios elétricos de operação do vidro da janela ANTES de perfurar. Etapa 5: Instale o tweeter na carcaça para instalação embutida. Etapa 6: Conecte os cabos para caixa acústica observando a polaridade correta. Etapa 7: Instale o tweeter e a carcaça no orifício cortado para a instalação de modo que o anel de acabamento fique alinhado com a superfície frontal.
™ WARRANTY LIMITED ONE-YEAR CONSUMER WARRANTY/*LIMITED TWO-YEAR CONSUMER WARRANTY FOR AUTHORIZED DIRECTED DEALER PURCHASE & INSTALLATION Directed Electronics (herein “Directed”) promises to the original purchaser of the subwoofer or amplifier, as applicable (herein “Unit” or “Product”), to repair or replace with a new or refurbished Unit (at Directed’s sole and absolute discretion) should the Unit prove to be defective in workmanship or material under normal use, for a period of *two-years from the date o