User guide CANMAX400 Standalone Revision: 16-Nov-09 Thank you for purchasing a Directed Electronics, Inc. CANMAX400 solution. CANMAX400 supports multiple data bus architectures including: CAN High speed, CAN Single Wire, CAN Fault Tolerant, GM-LAN, J1850, ISO, BEAN, FLEXRAY and more. CANMAX400 includes 2 additional "XPANSION" ports. The XKEY port securely docks XKEYS for RF transponder bypass when a data override is not possible.
User guide CANMAX400 Standalone Revision: 16-Nov-09 Table of contents Important information ........................................................................................................................................................... 3 Your warranty ................................................................................................................................................................... 3 Replacement remotes............................................................
User guide CANMAX400 Standalone Revision: 16-Nov-09 Important information Congratulations on the purchase of your state-of-the-art remote start and alarm system. Due to the complexity of this system, it must be installed by an authorized dealer only. Installation of this product by anyone other than an authorized dealer voids the warranty. All dealers are provided with a preprinted dealer certificate to verify authorization.
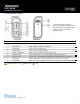
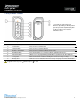
User guide CANMAX400 Standalone Revision: 16-Nov-09 2-way remote control * Your remote control may look different, depending on which product you have purchased (Clifford, Python or Viper); however, the features remain the same. Function Description 1 Transmit indicator 2 LED indicators Blink to indicate function confirmation. 3 Lock button Press for one second to arm. 4 Unlock button Press for one second to disarm. 5 Remote start button Press for one second to activate remote start.
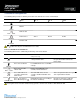
User guide CANMAX400 Standalone Revision: 16-Nov-09 1-way remote control * Your remote control may look different, depending on which product you have purchased (Clifford, Python or Viper); however, the features remain the same. Function Description 1 Transmit indicator 2 Lock button Press for one second to arm. 3 Unlock button Press for one second to disarm. 4 Remote start button Press for one second to activate remote start. 5 Auxiliary button Press and hold for 1.
User guide CANMAX400 Standalone Revision: 16-Nov-09 Transmitter configuration The following table provides a summary of function levels linked to the remote control button: Button x0 x1 x2 x3 AUX 1 AUX 2 AUX 3 Arm Lock Disarm Unlock Remote start Remote start Trunk release Auxiliary Function shift Function The button must be pressed and held to access state.
User guide CANMAX400 Standalone Revision: 16-Nov-09 Out of range notification If a command is issued from the remote, but the remote is beyond the range of the vehicle to receive the command, the remote will respond with an Out of Range notification. If this occurs, the remote will Blink rapidly the transmit indicator, turn on the F indicator and play the error tone. Since conditions will vary in different areas (i.e.
User guide CANMAX400 Standalone Revision: 16-Nov-09 To configure the remote control features press and release the command button. The LED next to the button will turn ON then OFF. The remote beeps to indicate the feature configuration. Button Command Confirmation Auto-button lock • • When Arm LED is OFF, buttons will not lock. LED ON: The buttons automatically lock 60 seconds after the last button operation to avoid accidental Command operations.
User guide CANMAX400 Standalone Revision: 16-Nov-09 Before remote starting a manual transmission vehicle, be sure to: • • • Leave the vehicle in neutral and be sure no one is standing in front or behind the vehicle. Only remote start on a flat surface Have the parking brake fully engaged Use of this product in a manner contrary to its intended mode of operation may result in property damage, personal injury, or death.
User guide CANMAX400 Standalone Revision: 16-Nov-09 Manual transmission If the vehicle has manual transmission the proper steps must be followed before leaving the parked vehicle or the remote start feature is disabled. 1. Put the transmission in neutral. 2. Press on the vehicle’s foot brake. 3. Apply the emergency brake. 4. Release the vehicle’s foot brake. Pressing the brake again after this step will disable the remote start feature. 5. Within 15 seconds activate the remote start from the remote. 6.
User guide CANMAX400 Standalone Revision: 16-Nov-09 Limited one-year consumer warranty For a period of ONE YEAR from the date of purchase of a Directed Electronics remote start or security product, Directed Electronics.
User guide CANMAX400 Standalone Revision: 16-Nov-09 Glossary 2-Way Remote: A hand-held, remote control which operates the various functions of your system and receives feedback and pages from the alarm system. Control Center: The control center contains the system’s radio-frequency antenna and override switch, and the Status LED. For maximum remote-control range, the Control Center is usually located at the top of the windshield, centered near the rear-view mirror.