s550 models s650
CONGRATULATIONS Congratulations for choosing a Directed Studio neodymium component speaker system from Directed Electronics. Directed Electronics has been the industry leader in high-quality automotive security and audio equipment since 1990, and with the introduction of the Directed Studio line of high-quality loudspeakers for the automobile, Directed continues to set new standards of performance, reliability, and affordability in the mobile electronics industry.
LIMITED TWO-YEAR CONSUMER WARRANTY Directed Electronics, Inc. (DEI) promises to the original purchaser, to replace this product should it prove to be defective in workmanship or material under normal use, for a period of two years from the date of purchase from the dealer as indicated by the date code marking of the product PROVIDED the product was installed by an authorized Directed dealer.
FEATURES Woofer Retuned neodymium design supplies enhanced midbass performance. Lightweight injection-molded fiberglass-reinforced low-profile basket. Basket incorporates break-away sections for universal domestic and import applications. Vented spider area for higher power handling. Injection-molded woofer cone. Swiveling flush and surface mount tweeter housings provided.
SOUND QUALITY Obtaining the highest quality sound reproduction in the mobile environment requires installation techniques and knowledge of vehicle interiors that go far beyond simple replacement of stock speakers. Speaker location, orientation, phasing, and the vehicles interior materials are important considerations when designing and installing an auto sound system.
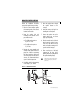
WOOFER INSTALLATION Review the Installation Precautions section of this guide before proceeding. 1. Place the cutout template against the mounting surface in the desired location for the woofer. 2. Draw the speaker hole and mounting screw locations on the panel with a marker. The s550 woofer requires a 4-3/4" to 5” hole The s650 woofer requires a 5-1/2" hole. 3. Remove the cutout template and carefully cut the speaker hole to the proper size.
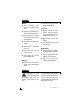
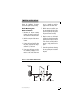
TWEETER INSTALLATION Review the Installation Precautions section of this guide before proceeding. Flush Mounting into Removed Panels 1. Determine the tweeter mounting location, then route the wires from the crossover to the tweeter location. 2. Mark the center point of the tweeter location. 3. If using a hole saw, first drill a pilot hole, then cut out the hole using a standard 2-1/8" hole saw. 4.
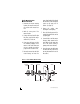
proper length machine bolt through the center hole of the housing and connect to the spring steel Xbracket. (See Figure 3.) Flush Mounting into Mounted Panels 1. Determine the tweeter mounting location, then route the wires from the crossover to the tweeter location. 6. Connect the speaker wires observing the correct polarity. 2. Mark the center point of the tweeter location. 7. Press the X-bracket portion of the assembly through the hole until its legs spring open. 3.
Tweeter Surface Mounting 1. Determine the tweeter mounting location, then route the wires from the crossover to the tweeter location. 2. Place the surface mount housing against the panel and mark the two holes at the rear of the housing. 3. Drill the smaller center hole using a 1/8" drill bit. This is the mounting screw hole. 4. Drill the larger off-center hole using a 3/8" drill bit, insert a grommet and route the speaker wire from the crossover through the grommet. 5.
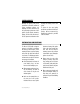
housing with the Viper logo at the bottom and turn in a counter clockwise direction until the trim ring clicks into place. Removing Trim Rings Hold the tweeter housing while gently turning the trim ring in a clockwise direction until it releases. The trim ring can then be easily lifted away from the tweeter housing.
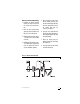
SPECIFICATIONS Directed model Frequency response Power handling RMS Power handling peak Impedance Magnet weight Vas Fs Qts Efficiency (1W/1M) Mounting Depth Mounting hole diameter Common Driver Specifications: Magnet type Magnet diameter Voice coil former Voice coil diameter Voice coil layers Tweeter: Fs Efficiency (1W/1M) Crossover © 2003 Directed Electronics, Inc s550 s650 45Hz-21kHz 40Hz-21kHz 50 60 100 120 3.764 3.435 52.82 g 5282 g 3.25L 9.28L 88.63 Hz 65.44 Hz 0.42 0.33 89.209 89.718 2.12 2.45 4.
The company behind this system is Directed Electronics, Inc. Since its inception, Directed has had one purpose, to provide customers with the finest vehicle security, car stereo products, rear seat entertainment, and accessories available. The recipient of more than 20 patents in the field of advanced electronic Directed Electronics, Inc. Vista, California 92083 www.directed.com technology, Directed is ISO 9001 registered.