OWNER ’S GUIDE INSTALLATION GUIDE 1 DIN DVD Player MODEL DV2600
Table of Contents Warranty . . . . . . . . . . . . . . . . . . . . . . . . . . . . . . . . . . . . . . . . . . . . . . . . .4 Safety Instructions . . . . . . . . . . . . . . . . . . . . . . . . . . . . . . . . . . . . . . . . . .5 Region Management Information ................................................................................................5 Important Safeguards . . . . . . . . . . . . . . . . . . . . . . . . . . . . . . . . . . . . . . . .5 When Driving .....................................
Limited One-Year Warranty For a period of ONE YEAR from the date of purchase, Directed Electronics, Inc.
Safety Instructions CAUTION: MOBILE DVD PLAYER IS A CLASS I LASER PRODUCT. HOWEVER THIS MOBILE DVD PLAYER USES A VISIBLE/INVISIBLE LASER BEAM THAT COULD CAUSE HAZARDOUS RADIATION IF EXPOSED DIRECTLY. BE SURE TO OPERATE THE MOBILE DVD PLAYER AS INSTRUCTED. USE OF CONTROLS, ADJUSTMENTS OR PERFORMANCE OF PROCEDURES OTHER THAN THOSE SPECIFIED HEREIN MAY RESULT IN HAZARDOUS RADIATION EXPOSURE. DO NOT OPEN COVERS AND DO NOT REPAIR YOURSELF. REFER SERVICING TO QUALIFIED PERSONNEL.
PROTECT THE DISC MECHANISM FOR INSTALLATION Avoid inserting any foreign objects into the slot tion with the front end up at a convenient of this player. Failure to observe this may cause angle, but not more than 30 degrees. The unit should be installed in a horizontal posi- malfunction due to the precise mechanism of this unit. 30 USE AUTHORIZED SERVICE CENTERS Do not attempt to disassemble or adjust this precision product. Please consult your authorized dealer for service assistance.
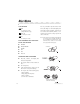
Features FEATURES ACCESSORIES ■ Compatible with PAL DVD (Video CD) and NTSC DVD (Video CD). ■ IR Remote control. ■ Mounting Sleave. A single LSI chip now integrates all major DVD playback circuit functions including MPEG2 decoder, video D/A converter, and audio decoders. ■ Trim Ring. ■ IR Eye. ■ Hardware Pack. ■ AV RCA Cables. ■ ■ L/R stereo analog audio outputs (RCA) for connection to existing head unit aux inputs. Video output is composite video (RCA).
Disc Notes DISC FORMATS SUPPORTED BY THIS PLAYER VI D EO DIGITAL VIDEO DISC CLEANING Use a dry soft cloth to wipe the surface.
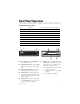
Front Panel Operation FRONT PANEL FEATURES 2 1 IR Receiver 2 Open Button Opens the front panel. 3 Power Button Turns the unit on/off. 4 Display Displays unit status. 5 Disk Slot Insert the disk here. 6 Security LED LED blinks when the front panel is removed. 7 Reset Button Resets the unit’s microprossesor 8 Eject Ejects the disk. 9 Release button Releases front panel. 3 4 Receives the signal from the remote control.
TO DETACH THE FRONT PANEL TO RE-INSTALL THE FRONT PANEL 1. Press OPEN; the front panel will fold down. 1. Place the front panel into its opening and firmly press on both ends until a click is heard. 2. Press the RELEASE button (9) on the backside of the front panel and pull outward. 2. If the front panel fails to lock in position properly, the display panel and buttons may not operate properly. Press OPEN, then re-install the front panel again. PRECAUTIONS WHEN HANDLING 3. 4.
Remote Control 1 10 2 11 3 12 4 6 13 14 5 15 7 16 8 17 9 BUTTON 1. POWER 2. 0-9 3. ILL Press POWER to turn the unit ON or OFF. Numeric Key buttons. Choose the VFD Display brightness level. 4. Press to stop playback. 5. 6. DESCRIPTION / / Press to start forward rapidly & to reverse rapidly. Press to skip to the next track & press to skip back one track. In MENU mode, these buttons serve as cursor buttons. 7.
Remote Operation TURNING THE PLAYER ON/OFF REPEAT Press on the remote control to turn the player on or off. DVD/AUDIO CD Press the REPEAT button to select Repeat Mode. PLAY/PAUSE/STOP Repeat 1 (Chapter Repeat) will repeat the track/chapter currently playing. Repeat (Title DVD DISC Repeat) will repeat the entire CD. 1. Press to play or pause the disc. 2. Press once to stop playback; press twice to stop and return to the beginning of the disc. VCD The repeat function does not apply to VCD discs.
PLAYBACK TIME 1. Press TITLE during playback; playback stops and the title menu is displayed. 2. Using the cursor button shown on-screen, select the preferred title with the cursor button and confirm by pressing ENTER. This displays how much time has elapsed or how much time is remaining on the chapter or the disc (Title). NOTE: Some functions are not available on all discs. If the function requested is not available on the disc that is playing, a , will appear in the upper left corner of the screen.
Initial Setup SETUP --- MAIN PAGE 3. 4. Select the preferred item by using the buttons. Press ENTER. ■ ■ ■ 1. 2. Press SETUP in the stop mode. (Press STOP twice to ensure the player is in STOP mode.) The initial SETUP menu is displayed. / ■ General setup - This setup page includes all the items of the TV display & Audio output feature. Please refer to General setup menu. Speaker setup - This is to activate the audio output from DOLBY AC3 5.1 DOWNMIX to 2 channel mode.
SETUP --- GENERAL SETUP SETUP --- GENERAL SETUP TV TYPE SETUP ANGLE TYPE SETUP This player can play discs recorded in either PAL If it is set to ON, it is possible to select the pre- or NTSC format. Select NTSC format when con- ferred angle from the multi-angle DVD disc. nected to NTSC TV. Select PAL format when connected to PAL TV. Select MULTI format; the play- SETUP --- GENERAL SETUP er TV output format will adjust according to the DVD disc format.
SETUP --- GENERAL SETUP PREFERENCE PAGE* CAPTION AUDIO LANGUAGE SETUP Activate the CAPTIONS feature by selecting ON. Select the preferred AUDIO soundtrack by using Release these feature by selecting OFF. the cursor buttons. SPEAKER SETUP PREFERENCE PAGE* This is to activate the audio output from DOLBY AC3 5.1 DOWNMIX to two-channel mode. Select the preferred SPEAKER connection by SUBTITLE LANGUAGE SETUP Select the preferred SUBTITLE language by using the cursor buttons. using the cursor buttons.
PREFERENCE PAGE* PREFERENCE PAGE* DISC MENU LANGUAGE SETUP PARENTAL Select the preferred DISC MENU language by Select suitable parental guidance by using the using the cursor buttons. cursor buttons and confirm by pressing ENTER. Set the Parental Level for the youngest potential PREFERENCE PAGE* viewer. No DVD rated above that level will play unless the correct password is entered during playback.
PREFERENCE PAGE* Select RESET to return to the initial, factory settings. *Note: To enter the Preference Page the DVD must be in STOP mode or ejected. DEFAULT SETTINGS GENERAL SET UP 18 PREFERENCE PAGE TV display Normal/PS TV display Normal/PS TV type Multi Audio English PIC mode AUTO Subtitle English Angle mark ON DISC menu English OSD Language English Locale USA Caption ON Parental NONE Password 3308 © 2001 Directed Electronics, Inc.
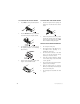
Installation ■ ■ ■ Before installing the unit, connect the wiring temporarily and test the system for proper operation. DIN FRONT-MOUNT (METHOD A) INSTALLING THE UNIT Use only the parts included with the unit to ensure proper installation. The use of unauthorized parts can cause malfunctions. Consult with your nearest dealer if installation requires the drilling of holes or other modifications of the vehicle.
To fasten the unit to the factory radio mounting REMOVING THE UNIT bracket: 1 1. Select a position where the screw holes of the bracket and the screw holes of the main unit become aligned (are fitted) and tighten the screws at two places on each side. Use either truss screws (5x6mm) or flush surface screws (4x6mm) depending on the shape of the screw holes in the bracket. 2 3 1. Trim ring. 2. Screw 2. Remove the trim ring by first detaching the face plate.
Wiring Guide DVD MAIN UNIT BLACK YELLOW RED (R) YELLOW (L) TO TV RED WHITE (VIEW FROM REAR) GROUND (B-) AV signal IN MEMORY BACK-UP YELLOW (R) IGNITION SWITCH (B+) (L) Video IN RED WHITE TO AMPLIFIER TO POWER SUPPLY WIRING CONNECTIONS 4. Power wire: a. 1. Audio/video outputs for the amplifier and monitor. 2. Inputs for a second audio/video source (i.e., headunit, VCP, or video game). b. 3. Port for an external IR sensor.
Specifications Supply voltage: 12V DC (11V-16V), test voltage 14.4V, negative ground Current consumption: Less than 2.0A while operating Signal system: Composite video 1.0Vp-p 75 RCA pin jack Discs played: (1) DVD-VIDEO disc 5” (12 cm) single-sided, single-layer ■ 5” (12 cm) single-sided, double-layer ■ 3” (8 cm) single-sided, single-layer ■ 3” (8 cm) single-sided, double-layer ■ (2) Compact disc (CD-DA, VIDEO CD) ■ 5” (12 cm) disc ■ 3” (8 cm) disc Audio output level: 2 ch 2.
The company behind this system is Directed Electronics, Inc. Since its inception, DEI® has had one purpose, to provide consumers with the finest vehicle security, car stereo products, rear seat entertainment, and accessories available. The recipient of more than 20 patents in the field of advanced electronic technology, DEI is ISO 9001 registered. Quality Directed Electronics products are sold and serviced throughout North America and around the world.