D10-200_Cover_01 8/9/04 10:00 AM Page 1 ................................................................................................................ D10-200 DIRECTV, Inc. 2230E Imperial Hwy El Segundo, CA 90245 Telephone: 1 800 DIRECTV (347-3288) .............
D10-200 CHAPTER 0-ENG_01 8/9/04 10:00 AM Page 2 Warning! Important Safety Instructions CAUTION RISK OF ELECTRIC SHOCK DO NOT OPEN CAUTION: TO REDUCE THE RISK OF ELEC TRIC SHOCK, DO NOT REMOVE COVER (OR BACK). NO USER SERVICEABLE PARTS INSIDE. REFER SERVICING TO QUALIFIED SERVICE PERSONNEL. This symbol indicates high voltage is present inside. It is dangerous to make any kind of contact with any inside part of this product.
D10-200 CHAPTER 0-ENG_01 8/9/04 10:00 AM Page 4 Notices Attention Telephone Line Interruption A continuous land-based phone line connection is required for DIRECTV® Pay Per View functionality and DIRECTV subscriptions. Any calls generated by the DIRECTV® Receiver are toll free. These calls are typically made in the middle of the night; your phone is in use for approximately 30 seconds.
D10-200 CHAPTER 0-ENG_01 8/9/04 10:00 AM Page 6 Limited 90 Day Warranty DIRECTV warrants your DIRECTV® Receiver (Model Number: D10-200) and any included accessories against defects in material or workmanship for a period of ninety (90) days after the date of purchase. WHO IS COVERED? You must have proof of purchase to receive warranty service. A sales receipt or other document showing that you purchased the product is considered proof of purchase.
D10-200 CHAPTER 0-ENG_01 8/9/04 10:00 AM Page 8 ALL WARRANTIES IMPLIED BY LAW, INCLUDING ANY IMPLIED WARRANTIES OF MERCHANTABILITY AND FITNESS FOR A PARTICULAR PURPOSE ARE EXPRESSLY LIMITED TO THE DURATION OF THIS EXPRESS LIMITED WARRANTY. WITH THE EXCEPTION OF ANY WARRANTIES IMPLIED BY THE LAW OF ANY STATE OF THE U.S.A., THIS EXPRESS LIMITED WARRANTY IS EXCLUSIVE AND IN LIEU OF ALL OTHER WARRANTIES, GUARANTEES, AGREEMENTS AND SIMILAR OBLIGATIONS OF DIRECTV.
D10-200 CHAPTER 0-ENG_01 8/9/04 10:00 AM Page 10 DIRECTV PROTECTION PLAN Protect your DIRECTV® System with the DIRECTV PROTECTION PLAN. For a low monthly fee, the DIRECTV PROTECTION PLAN covers all the components of your DIRECTV System, giving you peace of mind and comprehensive support to ensure that you and your family enjoy nonstop DIRECTV® entertainment. If you have standard DIRECTV Receiver(s), visit DIRECTV.com and SIGN IN using the simple steps below or call 1-800-DIRECTV. 1.
D10-200 CHAPTER 0-ENG_01 TA B L E OF 8/9/04 10:00 AM Page 12 CONTENTS TA B L E OF CONTENTS Chapter 1: Getting started . . . . . . . . . . . . . . . . . . . . . . . . . . . . . . . . . . . . . . . . . . . . . . . . . . . 14 Chapter 5: User profiles . . . . . . . . . . . . . . . . . . . . . . . . . . . . . . . . . . . . . . . . . . . . . . . . . . . . . 58 Box contents . . . . . . . . . . . . . . . . . . . . . . . . . . . . . . . . . . . . . . . . .14 Front panel controls and lights . . . . . . .
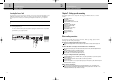
D10-200 CHAPTER 1-ENG_01 1 8/9/04 10:41 AM Page 14 1 CHAPTER 1 Getting started CHAPTER 1 Getting started Front panel controls and lights Chapter 1: Getting started This chapter tells you everything you need to know before you start setting up and using your DIRECTV® Receiver.
D10-200 CHAPTER 1-ENG_01 1 8/23/04 2:19 PM Page 16 1 CHAPTER 1 Getting started CHAPTER 1 Getting started Installing the batteries in the remote control Back of the DIRECTV® Receiver You’ve unpacked the receiver and reviewed its front and back panels. Now it’s time to start setting up. The first step is to install the batteries in your remote control. Œ ´ ˇ ¨ ˆ Ø ∏ ” ’ 1 Unlatch the battery compartment cover on the back of remote control.
D10-200 CHAPTER 1-ENG_01 1 8/9/04 10:01 AM Page 18 2 CHAPTER 1 Getting started CHAPTER 2 Setting up and connecting Inserting the Access Card Chapter 2: Setting up and connecting The next step is to insert your Access Card into your receiver. (You will not be able to view DIRECTV® programming unless the Access Card is properly inserted into the DIRECTV® Receiver.) For some receivers, the card may already be inserted when you unpack the box.
D10-200 CHAPTER 2-ENG_01 2 8/9/04 10:02 AM Page 20 CHAPTER 2 Setting up and connecting 2 CHAPTER 2 Setting up and connecting Jacks and cables The illustrations in this section show the various types of jacks and cables used to connect your DIRECTV® Receiver. ANTENNA terminals (cable not included) Telephone jack and cord Use OFF-AIR IN terminals to receive a signal from VHF/UHF antennas or your cable system using an RG-6 coaxial cable.
D10-200 CHAPTER 2-ENG_01 2 8/23/04 2:19 PM Page 22 CHAPTER 2 Setting up and connecting 2 CHAPTER 2 Setting up and connecting Connecting your DIRECTV® Receiver Connection option A: Your DIRECTV Receiver supports a variety of connection possibilities to ensure that it is compatible with whatever type of TV, VCR, or A/V receiver you might have. If connection option A best matches your needs, follow these steps: This manual describes five different setup possibilities in detail.
D10-200 CHAPTER 2-ENG_01 2 8/23/04 2:19 PM Page 24 CHAPTER 2 Setting up and connecting Connection option B: DIRECTV Receiver to TV with A/V cables 2 CHAPTER 2 Setting up and connecting To watch DIRECTV® programming Set your TV to the appropriate input mode. This is a setting on your TV usually controlled by a Video, Input, or Mode button. See the manual for your TV for instructions.
D10-200 CHAPTER 2-ENG_01 2 8/23/04 2:19 PM Page 26 CHAPTER 2 Setting up and connecting Connection option C: DIRECTV Receiver to TV and VCR with RF cables only If connection option C best matches your needs, follow these steps: 1 2 3 4 5 6 7 Make sure your TV, VCR, and DIRECTV Receiver are turned off and unplugged.
D10-200 CHAPTER 2-ENG_01 2 8/23/04 2:19 PM Page 28 CHAPTER 2 Setting up and connecting Connection option D: DIRECTV Receiver to TV and VCR with A/V cables If connection option D best matches your needs, follow these steps: 1 2 3 4 5 Make sure your TV, VCR, and DIRECTV Receiver are turned off and unplugged. 6 Matching like colors, connect another set of A/V cables (not included) to the other set of audio and video output jacks on the back of the DIRECTV Receiver.
D10-200 CHAPTER 2-ENG_01 2 8/23/04 2:19 PM Page 30 CHAPTER 2 Setting up and connecting Connection option E: DIRECTV Receiver to TV and A/V receiver 2 CHAPTER 2 Setting up and connecting To watch DIRECTV® programming Set your A/V receiver and TV to the appropriate input mode. See the manuals for your A/V receiver and TV for instructions.
D10-200 CHAPTER 2-ENG_01 2 8/9/04 10:02 AM Page 32 CHAPTER 2 Setting up and connecting 2 CHAPTER 2 Setting up and connecting Turning on the DIRECTV® Receiver for the first time Acquiring the correct dish pointing angles You have completed the connection steps and are ready to start using your DIRECTV® Receiver. The first step is to turn on the DIRECTV® Receiver.
D10-200 CHAPTER 2-ENG_01 2 8/9/04 10:02 AM Page 34 CHAPTER 2 Setting up and connecting 2 CHAPTER 2 Setting up and connecting Checking the satellite signal strength Setting the dish type The Signal Meter allows you to check the strength of the signal from the satellite to your satellite dish. This is useful while setting up your satellite dish, and while troubleshooting any reception problems you may encounter.
D10-200 CHAPTER 2-ENG_01 2 8/9/04 10:02 AM Page 36 CHAPTER 2 Setting up and connecting 2 CHAPTER 2 Setting up and connecting Using Auto Detection to set the dish type Testing the DIRECTV® Receiver To function properly, your DIRECTV® Receiver needs to know what type of satellite dish you are using. You can specify the dish type using the instructions on page 35, or you can follow the steps below to use the Auto Detection menu item to automatically set the dish type.
D10-200 CHAPTER 2-ENG_01 2 8/9/04 10:02 AM Page 38 CHAPTER 2 Setting up and connecting CHAPTER 2 Setting up and connecting Testing the Signal Strength Activating your DIRECTV account The DIRECTV Receiver shall have a matrix that shows the signal strength of all transponders per orbital position in one table. This matrix is in addition to showing the signal strength of each active transponder individually in the system setup menu.
D10-200 CHAPTER 3-ENG_01 3 8/9/04 10:03 AM Page 40 CHAPTER 3 Watching TV Chapter 3: Watching TV This chapter covers all of the things you can do with the Program Guides and other features that let you control the way you watch TV.
D10-200 CHAPTER 3-ENG_01 3 8/9/04 10:03 AM Page 42 3 CHAPTER 3 Watching TV CHAPTER 3 Watching TV Changing channels The Full Channel Banner All available channels from any of these sources will appear in the Guide, and can be tuned in using the CHAN …/† buttons and the 0 - 9 number buttons on your remote control. The Channel Banners that appear on the screen as you change channels (or when you press the INFO button) indicate the signal type for the program you are watching.
D10-200 CHAPTER 3-ENG_01 3 8/9/04 10:03 AM Page 44 3 CHAPTER 3 Watching TV CHAPTER 3 Watching TV The Program Detail Screen Program Detail Screen actions If you want to see more information than is presented in either the Channel Banner or the Full Channel Banner, you can press the INFO button three times to display the Program Detail Screen.
D10-200 CHAPTER 3-ENG_01 3 8/9/04 10:03 AM Page 46 3 CHAPTER 3 Watching TV Using the Guide Getting around in the Guide The Guide displays a Channel Banner and a channel list. It provides access to the complete set of Guide features including the ability to search for programs, schedule reminders and recordings, etc. You can use the Guide to get detailed information about the channels and programs it contains.
D10-200 CHAPTER 3-ENG_01 3 8/9/04 10:03 AM Page 48 CHAPTER 3 Watching TV 3 CHAPTER 3 Watching TV Tuning to a channel with the Guide Searching by Credits, Title, or Text To tune to a program or channel listed in the Guide: Highlight the program or channel you want to watch. To find programs that star a certain actor, share a director, have a particular character, have won a specific award, or were created in a certain year, search By Credits.
D10-200 CHAPTER 3-ENG_01 3 8/9/04 10:03 AM Page 50 CHAPTER 3 Watching TV Searching by Category CHAPTER 3 Watching TV To change the audio format for a program you are watching, follow these steps: While viewing a program, press the INFO button on your remote control. The Brief or Full Channel Banner appears. Highlight By Category, then press the SELECT button. 1 2 3 The Search By Category screen appears. Categories that contain subcategories have a page icon to the right of the category name.
D10-200 CHAPTER 3-ENG_01 3 8/9/04 10:03 AM Page 52 CHAPTER 3 Watching TV 3 CHAPTER 3 Watching TV Ordering pay per view programs Reviewing your pay per view purchases To order a pay per view program: Locate and highlight the program you wish to purchase in the Guide. You can purchase current programs (as long as the program is less than half over) or future programs.
D10-200 CHAPTER 3-ENG_01 3 8/9/04 10:03 AM Page 54 CHAPTER 3 Watching TV 3 CHAPTER 3 Watching TV Viewing your Future Purchase list Canceling a pay per view purchase To see a list of pay per view programs that you purchased but have not yet watched, follow these steps: Press the MENU button on your remote control. To cancel the purchase of a pay per view program that you purchased but have not yet watched, follow these steps: Press the MENU button on your remote control.
D10-200 CHAPTER 4-ENG_01 4 8/9/04 10:04 AM Page 56 CHAPTER 4 Program reminders 4 CHAPTER 4 Program reminders Chapter 4: Program reminders Reviewing and modifying reminders This chapter tells you how to use your DIRECTV Receiver to set timers that can remind you when a program is about to begin. The sections of this chapter include: The Timers item in the Setup menu allows you to review, modify, or create new program reminders. Here’s how: Press the MENU button on your remote control.
D10-200 CHAPTER 5-ENG_01 5 8/9/04 10:04 AM Page 58 CHAPTER 5 User profiles 5 Chapter 5: User profiles Editing user profile names This chapter tells you how to modify and select user profiles. Its contents include: The four profiles named User 1 - 4 can be renamed for members of your household. The Family and All Channels profiles cannot be renamed. You can change the names of User 1 - 4 profiles to anything you wish, using up to eight letters and numbers.
D10-200 CHAPTER 5-ENG_01 5 8/9/04 10:04 AM Page 60 CHAPTER 5 User profiles Editing channel lists You can edit channel lists to simplify your channel surfing by removing channels that you never watch from your channel list. Editing a channel list for a user profile has two effects : 5 5 When that user profile is the active profile, it sets which channels are skipped as you change channels with the CHAN … and CHAN † buttons on your remote control.
D10-200 CHAPTER 5-ENG_01 5 8/9/04 10:04 AM Page 62 CHAPTER 5 User profiles Setting the ratings limits for TV programs 5 Here are descriptions of the ratings and abbreviations used on the Entire Audience rating screen: To set the maximum viewable TV program rating for the TV programs, follow these steps: 1 2 3 4 5 6 Press the MENU button on your remote control. Highlight the PROFILES menu item, then press the SELECT button. The PROFILES menu appears. The FAMILY profile is highlighted.
D10-200 CHAPTER 5-ENG_01 5 4 5 6 7 8 8/9/04 10:04 AM Page 64 CHAPTER 5 User profiles Highlight the Rating Limit menu item, then press the SELECT button. The Rating Limit menu appears. Movies is highlighted. Press the SELECT button to display the Movies screen. The Movies screen appears. Use the arrow and SELECT buttons on your remote control to select the ratings you wish to block your family from viewing.
D10-200 CHAPTER 5-ENG_01 5 10:04 AM Page 66 CHAPTER 5 User profiles 5 CHAPTER 5 User profiles Setting a pay per view spending limit Setting the screen color and translucency To limit the dollar amount that can be spent for each pay per view program, use the Spending Limit option in the FAMILY profile menu. Spending Limit sets in the Family profile apply any time the system is locked, regardless of which user profile is active.
D10-200 CHAPTER 5-ENG_01 5 8/9/04 10:04 AM Page 68 6 CHAPTER 5 User profiles Locking and unlocking your DIRECTV® System Chapter 6: Settings, preferences, and upgrades If you have set ratings limits, spending limits, or channel lists for your DIRECTV® System, you need to lock the system to make those settings take effect. To later change those settings, you will need to unlock the system to access the controls for those settings. Locking the system involves entering a four-digit password.
D10-200 CHAPTER 6-ENG_01 6 8/9/04 10:05 AM Page 70 CHAPTER 6 Settings, preferences, and upgrades CHAPTER 6 Settings, preferences, and upgrades Setting system preferences Setting the default screen color and translucency The Setup menu in your DIRECTV® Receiver’s Menu system allows you to control many of the functions of the DIRECTV® Receiver. The first set of items you can control are system preferences.
D10-200 CHAPTER 6-ENG_01 6 8/9/04 10:05 AM Page 72 CHAPTER 6 Settings, preferences, and upgrades 6 CHAPTER 6 Settings, preferences, and upgrades Setting the Default Audio preference Reviewing and controlling Caller ID Programs broadcast with digital audio often provide a number of language choices. This preference setting tells your DIRECTV® Receiver which language to use for digital audio broadcasts offering a choice of formats.
D10-200 CHAPTER 6-ENG_01 6 8/9/04 10:05 AM Page 74 CHAPTER 6 Settings, preferences, and upgrades CHAPTER 6 Settings, preferences, and upgrades Identifying callers Setting the Local Time options With Caller ID turned on, when a call is made to the phone line connected to your DIRECTV® Receiver, a message appears on your TV screen telling you the number of the caller. To clear the message from your screen, press the SELECT button.
D10-200 CHAPTER 6-ENG_01 6 7 8/9/04 10:05 AM Page 76 CHAPTER 6 Settings, preferences, and upgrades Highlight Time Zone menu item, then press the SELECT button. A list appears from which you can choose your local time zone.
D10-200 CHAPTER 7-ENG_01 7 8/9/04 10:06 AM Page 78 CHAPTER 7 Programming the remote control 7 CHAPTER 7 Programming the remote control Chapter 7: Programming the remote control TV INPUT Select setup This chapter explains how to program your remote control so that you can use it to operate your TV, VCR, or other A/V equipment. Chapter sections include: Once you’ve set up your TV Power, VOL and MUTE, you can program the TV INPUT button if you’d like.
D10-200 CHAPTER 7-ENG_01 7 8/9/04 10:06 AM Page 80 CHAPTER 7 Programming the remote control 7 CHAPTER 7 Programming the remote control Volume Lock Perform a Code Search If you programmed your remote to control your TV, then the VOL and MUTE key will automatically control the volume on your TV, regardless of the slide switch position. If you want the VOL/MUTE keys to control a different component, such as your stereo, you can.
D10-200 CHAPTER 7-ENG_01 7 8/9/04 10:06 AM Page 82 7 CHAPTER 7 Programming the remote control Code lists Use these lists to find the codes you need to program your DIRECTV Receiver’s remote control to operate your other A/V devices. For brands with multiple codes listed, try the codes in order until you find one that works for your device.
D10-200 CHAPTER 7-ENG_01 7 10:06 AM Page 84 7 CHAPTER 7 Programming the remote control CHAPTER 7 Programming the remote control TELEVISION (continued) TELEVISION (continued) TELEVISION (continued) VCR (continued) Brand names Code numbers Brand names Code numbers Brand names Code numbers Brand names Code numbers Luxman LXI 10056 10047, 10054, 10154, 10156, 10178 10054, 10030, 10706, 10179 10016 10054, 10030 10250, 10650 10178, 10145 10154, 10250, 10463, 10150, 10178, 10179, 10016 10150, 1
D10-200 CHAPTER 7-ENG_01 7 8/9/04 10:06 AM 7 CHAPTER 7 Programming the remote control VCR (continued) VCR (continued) CHAPTER 7 Programming the remote control VCR (continued) DIGITAL VIDEO DISC (DVD) (continued) Brand names Code numbers Brand names Code numbers Brand names Code numbers Brand names Code numbers Matsushita MEI Memorex 20035, 20162 20035 20035, 20162, 20037, 20048, 20039, 20047, 20240, 20000, 20104, 20209, 20479, 21237 20240, 20043 20240 20042 20067, 20043, 20807 20035, 200
D10-200 CHAPTER 7-ENG_01 A 8/9/04 10:06 AM Page 88 A APPENDIX Troubleshooting and specifications APPENDIX Troubleshooting and specifications Appendix: Troubleshooting and specifications Use the tips below to help solve any problems you have with the DIRECTV® Receiver: Troubleshooting Q A I have no picture and no sound and the POWER light does not light. Make sure your DIRECTV Receiver is plugged into a working power outlet. If the outlet is connected, make sure it turned on.
D10-200 CHAPTER 7-ENG_01 A 8/9/04 10:06 AM Page 90 APPENDIX Troubleshooting and specifications A APPENDIX Troubleshooting and specifications Specifications Here are the technical specifications for the DIRECTV® Receiver. Input/Output Interface Power supply Input Voltage Power Consumption AC 120V, 60Hz (SMPS type) LNB 1 input (SATELLITE IN) 24W max ANT input 1 input (AIR IN) TV output TV out Video output Physical Specification Size (W X H X D) 12.2 in.(W) X 2.24 in.(H) X 8.11 in.