DIRECTV Receiver User's Guide ®
Important Information Cautions Do not stack electronic components or other objects on top of the DIRECTV® Receiver. The slots on top of the receiver must be left uncovered to allow proper airflow to the unit. Blocking the airflow to the unit could impair performance or damage your receiver and other components. Remove any sales or promotional materials attached to the product. Do not stack the DIRECTV Receiver on top of a “hot component” such as an audio power amplifier.
Table of Contents Chapter 1: Connections & Setup Chapter 4: Using On-Screen Menus Things To Consider Before You Connect Components .. 2 Jacks and Cables............................................................... 2 Choose Your Connection ................................................. 3 Insert Your Access Card ................................................... 3 Excellent Connection ....................................................... 4 Very Good Connection........................................
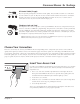
Chapter 1: Connections & Setup Things To Consider Before You Connect Components Protect Your Components from Power Surges • Connect all components before plugging any power cords into the wall outlet. • Always turn off the DIRECTV® Receiver, TV and other components before you connect or disconnect any cables. Position Cables Correctly to Avoid Audio Hum or Interference • Insert all cable plugs firmly into their jacks.
Connections & Setup RF Coaxial Cable (F-type) ������������ ��������� ���������� RF jacks provide good picture and mono sound quality. They should be used if A/V connections are not available on your TV. RF jacks are also used for off-air antenna and cable TV connections. The RF jacks on the receiver are labeled OFF AIR IN and OUT TO TV. Use a coaxial cable to connect the receiver to your TV/VCR’s antenna input jack.
Connections & Setup ����� �������� ���������� ��������� �������� ������� ����������� ������������ 1 5 4 ������ ® V ECT DIR eiver Rec ������������ ���������� ���� ��������� ����� ����� � � � � � ����� � � ����� � ���������� ������� ����� ���������� ������� DIRECTV Receiver 2 ���� ���� VCR 7 6 ��� ����� ��� ���� ��� �� VCR 3 � � TV �� ���� ��� ������� ����� ����� TV Note: Your VCR and TV back panels may not look exactly like the ones illustrated.
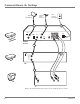
Connections & Setup Excellent Connection Using S-Video and A/V jacks and cables to connect to the TV, RF coaxial cables to connect the VCR This connection provides the best picture quality, surpassing that of A/V cables. The S-Video cable, which carries video information only, requires that audio cables also be used for sound.
Connections & Setup ����� �������� ���������� ��������� �������� ������� ����������� ������������ 1 5 4 ������ ������������ ���������� ���� ��������� ® V ECT DIR eiver Rec ������� � � � � ����� � � ����� � ����� ���������� DIRECTV Receiver ���� ���� ����� ����� � ���������� ������� 2 6 ��� ����� ��� ���� ��� �� VCR VCR 3 � � TV �� ���� ��� ����� ����� TV Note: Your VCR and TV back panels may not look exactly like the ones shown.
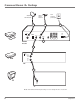
Connections & Setup Very Good Connection Using A/V jacks and cables to connect to the TV, RF coaxial cables to connect the VCR This connection provides better picture quality than RF coaxial cables and is recommended for use with TVs that do not have S-Video input jacks.
Connections & Setup ����� �������� ���������� ��������� �������� ������� ����������� ������������ 1 5 4 ������ ® V ECT DIR eiver Rec ������������ ���������� ���� ��������� � � � � � ����� � � ����� � ����� ����� ���������� ������� ����� ���������� ������� 6 DIRECTV Receiver 2 ���� ���� VCR ��� ����� ��� ���� ��� �� VCR 3 TV �� ���� ��� TV Note: Your VCR and TV back panels may not look exactly like the ones shown.
Connections & Setup Basic Connection Using RF Coaxial cables for all connections This connection provides standard picture quality. This connection is only recommended for use with TVs that do not have S-Video or A/V input jacks.
Connections & Setup DIRECTV® Receiver Back Panel This diagram illustrates each of the back panel jacks found on your DIRECTV Receiver. When working with cables, be sure to connect corresponding outputs and inputs (VIDEO output to VIDEO input, Right AUDIO output to Right AUDIO input, etc.).
Connections & Setup Plug in and Turn on the Receiver Note: The message “Searching for Satellite Signal” might appear briefly at the bottom of your screen when you turn on your DIRECTV ������������ Receiver for the first time. This �� is normal. �� ����� ����� �� for more If this message stays on the screen ��� than one minute, check your receiver’s on-screen signal meter to make��� sure your antenna is receiving the strongest possible satellite signal.
Connections & Setup Wait for the Receiver to Download ADVANCED PROGRAM GUIDE™ Data The first time you connect a receiver to a satellite antenna you’ve already installed and pointed correctly, the receiver starts to gather information for the program guide (the Advanced Program Guide Data acquisition screen appears). After you turn on your receiver and tune your TV to the correct video input channel, a progress bar appears indicating that the receiver is gathering this program guide information.
Connections & Setup DIRECTV News & Info DIRECTV News & Info gives you the most up-to-date information on DIRECTV® programming, including pay per view previews and news on the latest movies, sports and customer information. The DIRECTV News & Info screen also gives you a 30-minute introduction to your remote control and receiver. To access the DIRECTV News & Info screen while you're watching DIRECTV programming, press the ACTIVE button on your remote control.
Chapter 2: Using the Remote Control Remote Control Buttons Mode switch ACTIVE In DIRECTV mode, displays the DIRECTV News & Info menu. Press ACTIVE again to exit the menu. DIRECTV mode Arrows ������������ �� ����� �� ����� �� ��� ��� Transport buttons � �� � ��� ��� BACK In the menu system and guides of the DIRECTV® Receiver, the BACK button retraces your steps, going back through all of the menu and guide screens you've accessed since the last time you entered the menu system or guides.
Using the Remote Control SELECT Selects a highlighted choice if you are in the menu system. Enters channel entry outside of the menu system. Transport Buttons ( , , , , , , ® , and ) When the remote control is programmed, these buttons can control an auxiliary component, such as a VCR or DVD player (when the remote is in the correct mode).
Using the Remote Control Using the Remote Control to Operate Other Components You may have already programmed the remote control to operate your other components in the Guided Setup. If you haven't programmed the remote, or if you need to change your remote control settings, use the following directions along with the on-screen help text.
Using the Remote Control Programming the Remote to Operate Your TV Important: Make sure you start with the remote control's mode switch in the DIRECTV position. Keep the mode switch in that position until the onscreen directions tell you to move it. To program the remote to operate your TV: 1. Press the MENU button on the remote control (the Quick Menu appears). 2. Select Settings from the Quick Menu. 3. Select Setup from the Settings menu. 4. Select Remote from the System Setup screen. 5.
Chapter 3: Features of the DIRECTV® Receiver The Program Guide The diagram below shows you the kind of information you see in the program guides. You can access a Quick Menu in the program guide by pressing the MENU button while in the guide (see Displaying the Quick Menu at the bottom of this page). Note: The design of the Program Guide you see on your TV screen may be different from the one shown here.
Features of the DIRECTV® Receiver Getting Around In the Guide ������������ �� ����� �� ����� This section describes how to change channels and move around a program guide.
Features of the DIRECTV® Receiver The Channel Banner Your DIRECTV Receiver offers two kinds of channel banner: a medium banner and a large banner. Both kinds of channel banner give you information on the date, time, current channel, your receiver's message inbox, your receiver's parental control status, as well as the current program's title and time information (if available). The large channel banner also offers a description of the current program if one is available.
Features of the DIRECTV® Receiver The Quick Menu The Quick Menu appears on screen when you press the MENU button on your remote control. There are several different kinds of Quick Menus. The one that appears when you press MENU depends on what you're doing right now. If you're watching regular satellite programming, the Quick Menu shown on the left appears. See page 24 for more information about this kind of Quick Menu.
Features of the DIRECTV® Receiver Date & Time The Date & Time menu lets you move in the program guide to another day or time, up to three and a half days in the future. To move to a different time in the program guide: 1. In the program guide, press the remote control's MENU button to display the Quick Menu. 2. Press the remote control's down arrow to highlight Date & Time. Press SELECT to choose it. 3.
Features of the DIRECTV® Receiver 6. Use the up, down, left and right arrows to highlight letters on the on-screen keyboard. Press SELECT to enter them. You'll notice that the list on the right changes as you enter more letters. 7. Use the right arrow to leave the on-screen keyboard and highlight one of the programs or channels if you find what you're looking for. Press SELECT to get more information about the highlighted program.
Chapter 4: Using On-Screen Menus Using the Menu System To display the Quick Menu, press MENU on the remote control. To use the menu system, you need to use the remote control’s arrow buttons to highlight your on-screen choice, then use the SELECT button to select it. Exiting Quick Menus and Menu Screens Tip: No Menus? If the Quick Menu doesn’t appear when you press MENU, the remote control might not be in DIRECTV mode.
Using On-Screen Menus Caller ID & Msgs This button is used to access the Caller ID information from your telephone company and messages from DIRECTV. Note: You must subscribe to Caller ID service from your telephone service provider in order for the on-screen Caller ID information to be displayed. Parental Controls The Parental Controls menu lets you set rating and spending limits for your DIRECTV® Receiver.
Using On-Screen Menus Satellite The Satellite screen gives you access to information and settings for your satellite system's antenna. Test Signal Strength This feature allows you to determine the strength of all available signals, one at a time. There is a separate test for each satellite from which your antenna receives information. If you'd like more information about the signal test, use the arrow buttons to highlight More Info, then press SELECT.
Using On-Screen Menus Remote You may have already programmed the remote control to operate your other components in the Guided Setup. If you haven't programmed the remote, or if you need to change your remote control settings, see the section on Using the Remote Control to Operate Other Components, starting on page 16. Audio The Audio Options screen lets you set your preferred language for audio. See the description of this menu on page 29 for more information.
Using On-Screen Menus Access Card If DIRECTV sends you a new access card, use this menu to replace your old one. IMPORTANT: Once you start the access card replacement process, your old card will lose its validity. Make sure you have a valid new access card before you start the process. Reset The Reset screen offers several ways to restart or reset your DIRECTV® Receiver: • Restart Receiver turns the receiver off and back on again.
Using On-Screen Menus Manual The Manual Auto-tune screen lets you set up an Autotune timer manually.
Using On-Screen Menus Find By... The Find By... Quick Menu lets you search for your favorite programs by title, person or keyword. Find By... also lets you search for a specific channel by its name or abbreviation. See page 22 for more information about how to perform a search. Favorites The Favorites Quick Menu lets you set the current channel list and set up or edit up to two custom channel lists.
Using On-Screen Menus 5. 6. 7. Press the arrow up button to highlight a tab at the top of the screen. Use the left and right arrow buttons to move the highlight from tab to tab. Highlight the Name List tab and press SELECT to select it. Use the up, down, left and right arrows to highlight letters on the on-screen keyboard. Press SELECT to enter them. Press the right arrow button several times to leave the on-screen keyboard and highlight Update Name.
Using On-Screen Menus Setting Up Caller ID To set up your Caller ID, display the Quick Menu and select Caller ID & Msgs, then select Caller ID and Edit Settings. Use the up and down arrow buttons to highlight the setting you want to change, then press SELECT to view the options for that setting. Notification Lets you turn Caller ID notification on or off. Setting this to On displays the on-screen Caller ID alert when a call is received.
Using On-Screen Menus Turning Notification On or Off There are three ways you can turn Caller ID notification on or off: • Select Turn Off Notices (or Turn On Notices if Notices have been turned off) from the Caller ID Quick Menu • Select Off from the choice list for Notices in the Caller ID menu under the Service tab • Select Disable Notification when a Caller ID alert appears The Call Log The DIRECTV® Receiver can store up to 10 call entries in the Call Log screen.
Using On-Screen Menus Messages When you have new (unread) messages, the messages icon in the channel banner turns white (like the one shown on the left). The channel banner is displayed when you tune to a channel or press INFO while watching TV. Checking Your Messages Select Caller ID & Msgs from the Quick Menu, then Messages from the next menu and Messages Inbox from the Messages Quick Menu. 1. Point to a message and press SELECT. The message is displayed for you to read. 2.
Using On-Screen Menus Lock Now Locking the system puts the ratings, spending, viewing, and channel limits you have set up for your DIRECTV® Receiver into effect. When you lock the system, no one can modify any of these settings without first entering the four-digit system passcode. 1. In the Parental Controls settings menu, select Lock Now. 2. Use digit buttons to enter a four-digit system passcode. 3. Enter the passcode a second time to confirm it. The lock icon should be displayed in the channel banner.
Using On-Screen Menus Movies The Movies tab lets you set rating limits based on the MPAA rating system. Use the up and down arrows to highlight the highest rating you want to be able to view. Press SELECT to set that rating as the highest allowable on the DIRECTV® Receiver.
Using On-Screen Menus You can block programs based on their content. When you block a content theme for a particular rating, you automatically block that content theme for higher rated programs as well. For example, if you do not want your child to watch programs that have adult language (L) rated TV-PG or higher, then you could block out all programming TV-PG and above containing adult language.
Using On-Screen Menus Channel Blocks 1. 2. Select Chan Blocks from the Parental Controls screen. Use the up and down arrow buttons to highlight a channel, and press SELECT to change its status. Channels with the green dot next to them are not blocked. Channels with the slashed white circle next to them are blocked.
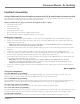
Chapter 5: Other Information Troubleshooting Many problems can be corrected by performing a simple reset of the DIRECTV® Receiver. If you experience the following: • Image freezes • Audio freezes • Blank screen • Won’t respond to front panel or remote press the red RESET button behind the door on the front panel. If the problems persist, try unplugging the DIRECTV Receiver for 15 seconds, and then plug it in again.
Other Information Turns off while playing • Electronic protection circuit may have been activated because of a power surge. Wait 30 seconds and then turn on again. If this happens frequently, the voltage in your house may be abnormally high or low. Channels are missing from the guide • The channels might be excluded from the current Favorites list. Press MENU on the remote control, then highlight Favorites and press SELECT. In the Favorites menu, highlight All Channels and press SELECT.
Other Information Running the System Test The System Test allows you to run a basic diagnostics check on your DIRECTV® Receiver. If you are experiencing any trouble with your receiver, run the system test. It will also allow you to get your access card and receiver ID numbers or to initiate diagnostic procedures on your DIRECTV Receiver. First make sure that: • all connections—jacks, cables, etc.—are correctly in place.
Other Information LIMITED 90 DAY WARRANTY DIRECTV warrants your DIRECTV® Receiver (Model Number: D10) and any included accessories against defects in material or workmanship for a period of ninety (90) days after the date of purchase. WHO IS COVERED? You must have proof of purchase to receive warranty service. A sales receipt or other document showing that you purchased the product is considered proof of purchase.
Other Information ALL WARRANTIES IMPLIED BY LAW, INCLUDING ANY IMPLIED WARRANTIES OF MERCHANTABILITY AND FITNESS FOR A PARTICULAR PURPOSE ARE EXPRESSLY LIMITED TO THE DURATION OF THIS EXPRESS LIMITED WARRANTY. WITH THE EXCEPTION OF ANY WARRANTIES IMPLIED BY THE LAW OF ANY STATE OF THE U.S.A., THIS EXPRESS LIMITED WARRANTY IS EXCLUSIVE AND IN LIEU OF ALL OTHER WARRANTIES, GUARANTEES, AGREEMENTS AND SIMILAR OBLIGATIONS OF DIRECTV.
Other Information FCC Customer Information This equipment complies with Part 68 of the FCC rules and the requirements adopted by the ACTA. On the back or bottom side of this equipment is a label that contains, among other information, a product identifier in the format US:G95XXXXXXXXX. If requested, this number must be provided to the telephone company.
Index A F O S Access card 3, 12, 15, 28 Alternate audio 20 Arrows on remote 14 Aspect ratio 27 Audio hum 2 Audio options 20, 29 Autotune 19, 29, 40 Favorite channels 30 FCC information 44 Find by...
DIRECTV, the Cyclone Design logo and ADVANCED PROGRAM GUIDE are trademarks of DIRECTV, Inc. and are used with permission. Printed in the USA TOCOM 16329110 The software used to display images in this product is based in part on the work of the Independent JPEG Group.