Safety & Care Safety & Care WARNING Your DIRECTV Receiver has been designed and manufactured to stringent quality and safety To reduce the risk of fire or electric shock, do not expose this product to rain or moisture. The apparatus shall not be exposed to dripping or splashing and that no objects filled with liquids, such as vases, shall be placed on the apparatus standards.
Safety & Care 9) Do not defeat the safety purpose of the polarized or grounding-type plug. A polarized plug has two blades with one wider than the other. A grounding type plug has two blades and a third grounding prong. The wide blade or the third prong are provided for your safety. If the provided plug does not fit into your outlet, consult an electrician for replacement of the obsolete outlet.
Safety & Care • Ensure proper ventilation — the vent slots on the DIRECTV Receiver must be left uncovered to allow proper airflow to the unit. Blocking the airflow to the unit could impair performance or IMPORTANT: Be sure not to place your DIRECTV Receiver near anything WET or HOT! damage your receiver and other components. • Do not stack electronic components or other objects on top of the DIRECTV Receiver. Also, do not stack the receiver on top of a “hot component” such as an audio power amplifier.
Safety & Care • Always unplug the DIRECTV Receiver, TV and other equipment before you connect or disconnect any cables. • Leave the main power connector accessible the mains connector at the back of the unit in case of emergency shutdown • CAUTION: Electric Shock — never attempt to disassemble the DIRECTV Receiver yourself; always take it to a qualified service person when repair is required.
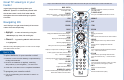
MODE SWITCH Turns other equipment on and off, as selected with MODE switch TV INPUT Changes the “source” — the piece of equipment whose signal is displayed on your TV AV1 REPLAY You’ll find you can get around nearly all onscreen menus the same simple way. REWIND TV POWER OFF PLAY FFWD RECORD PAUSE EX IT ACTIVE Note: Don’t worry about getting stuck in a menu. You can always press EXIT to return to video. Takes you to the screen you visited previously 2.
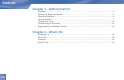
Contents Chapter 1 – Getting Started Welcome ..................................................................................................................................... 2 Making the Right Connections .................................................................................................. 3 Hardware Reference .................................................................................................................... 4 Getting Familiar ..............................................
Section Contents Title Chapter 3 – The Quick Menu Using the Quick Menu ............................................................................................................. 32 Settings ..................................................................................................................................... 32 Audio Options .......................................................................................................................... 34 Category Sort ...........................
x
Chapter 1 2 Welcome 3 Making the Right Connections 4 Hardware Reference 7 Getting Familiar 10 Choose Your Setup 18 Guided Setup & Activation 20 Programming Your Remote Control
Getting Started Welcome TIP With its astounding variety of channels and choices, crisp digital-quality picture and sound and one-of-a-kind sports and events… DIRECTV ® service offers everything you’d want in your television You can find additional experience. With the DIRECTV Receiver you can expect more than ever before, with access to over information and the latest 225 channels, including over 30 premium movie channels, with all the convenience of DIRECTV service.
Safety & Care Making the Right Connections When you are ready to connect your DIRECTV® Receiver and your other components, whether you’re having your system professionally installed or handling it yourself, be sure to read over the following few pages to familiarize yourself with some important tips for safety and care. Before you begin Your satellite dish antenna must be installed before you can begin following the procedures in this User Guide. (Professional installation is highly recommended.
Getting Started Hardware Reference General Satellite Dish Antenna This is your “dish” and related hardware, affi xed to your roof or other surface, which picks up the broadcast signals from our satellites. DIRECTV Receiver (or Satellite Receiver) Your DIRECTV Receiver picks up the signal from your satellite dish antenna and translates it into viewable TV programming. Access Card Contains information about your DIRECTV® service.
Hardware Reference Cables & Connections Best Video: S-Video Jack and Cable S-Video jacks and cables provide the best picture quality. You will still need to connect the left and right audio cables to the TV, or optical audio cable to your stereo, because the S-Video cable only carries the picture signal, not sound. S-Video Jack Audio/Video (A/V) Jack and Cable Audio/Video (A/V) cables provide very good picture quality and stereo sound, and should be used if your TV does not have S-Video jacks.
Getting Started Telephone Jack and Cord The telephone line cord is required to connect your DIRECTV Receiver to a land-based telephone line if you choose to subscribe to DIRECTV programming. The phone line connection is used to periodically call DIRECTV. You will need an RJ11-type modulator jack (the most common type Phone Jack of phone jack). Note: Do not connect your receiver to a digital PBX phone system — doing so may permanently damage your equipment and void your warranty.
Helpful Hardware Getting Reference Familiar Getting Familiar DIRECTV Receiver Front Panel 1 1) 2 3 4 5 6 5 7 8 9 POWER – Turns your DIRECTV Receiver on or off. Your DIRECTV Receiver still tunes and receives messages when powered off. 2) REMOTE SENSOR – The infrared sensor picks up commands from the remote control. 3) GUIDE – Displays the onscreen program guide. 4) MENU – Brings up the Quick Menu to access settings and services.
Getting Started Insert your DIRECTV Access Card Locate the access card that came packed with your DIRECTV Receiver materials and insert the card, SELECT Acti ve In fo facing upward, fully into the slot. DIRECTV Receiver Rear Panel 1 2 3 4 5 6 7 8 9 10 Your equipment may not look exactly like the model illustrated. 1) SATELLITE IN – Use to connect the DIRECTV Receiver to the satellite dish antenna. 2) OUT TO TV – Connects the DIRECTV Receiver to your TV or VCR using RF coaxial cable.
Getting Familiar 5) S-VIDEO – Provides the best picture quality, better than VIDEO RCA-type or RF coaxial cable jacks. If your TV has an S-Video jack, use it along with the audio jacks (S-Video only carries picture information, not sound) to connect to your TV. 6) VIDEO (Yellow) – Provides better picture quality than the OUT TO TV jack. Connect the second RCA-type composite VIDEO jack to another device, such as a VCR. You must also connect the AUDIO cables when using the VIDEO connection.
Getting Started Choose Your Setup TIP There are several ways to connect your receiver to match your particular equipment setup and to gain When working with optimum signal quality. The basic steps are as follows: cables, be sure to connect corresponding outputs and inputs (Video • Connect the satellite dish cable to your receiver. • Connect the receiver audio and video to your TV or VCR. OUT to Video IN, Right • If you connected the receiver to a VCR, connect the VCR to your TV.
Choose Your Setup Connecting Your DIRECTV Receiver to your TV or VCR Depending on the connections on the back of your TV or VCR, you have the following options: • S-Video & A/V Audio Connection (Best Quality) • A/V Connection (Better Quality) • RF Coaxial Connection (Good Quality) These connections are described on the following pages. Note NOTE: To obtain optimum picture quality, make sure the receiver is connected directly to the TV.
Getting Started S-Video & A/V Audio Connection (Best Quality) Using the S-Video cable, connect one end to the S-VIDEO output jack on the DIRECTV Receiver and the other end to the S-Video input jack on the TV. Using the A/V cable, connect the white and red plugs from one end of the A/V cable to the AUDIO L (white) and R (red) jacks on the back of the DIRECTV Receiver. Connect the plugs from other end of the A/V cable to the corresponding audio input jacks on your TV or VCR.
Choose Your Setup BEST QUALITY Television CONNECTION – S-Video & A/V Audio The back panels of your equipment may not look exactly like those illustrated.
Getting Started A/V Connection (Better Quality) Using the A/V cable, connect the white, red and yellow plugs from one end of the A/V cable to the AUDIO L (white) and R (red) and VIDEO (yellow) output jacks on the back of the DIRECTV TIP To switch between watching your VCR and watching video from your receiver, you may need to program the INPUT key on your DIRECTV Receiver. Connect the other end of the A/V cable to the corresponding A/V input jacks on your TV.
Choose Your Setup VERY GOOD QUALITY Television CONNECTION – A/V The back panels of your equipment may not look exactly like those illustrated.
Getting Started RF Coaxial Connection (Good Quality) TIP To switch between watching your VCR and watching video from your receiver, you may need to program Using an RF coaxial cable, connect one end to the OUT TO TV jack on the DIRECTV Receiver and the other end to the antenna in jack on the TV or VCR. If hooking up a VCR, use another RF coaxial cable to connect one end to the out to TV jack on the VCR and the other end to the antenna in jack on the TV. the INPUT key on your DIRECTV remote.
Choose Your Setup GOOD QUALITY Television CONNECTION – RF Coaxial The back panels of your equipment may not look exactly like those illustrated.
Getting Started Guided Setup & Activation Now that your receiver and equipment are all hooked up and plugged in, you’re ready to finish all the details to begin receiving your DIRECTV service. 1) Make sure the MODE SWITCH on the remote control is set to DIRECTV. TIP 2) Press TV POWER ON. The DIRECTV Receiver will turn on. 3) The first screen will allow you to select a language. Using the arrow keys on the remote control, You may decide to set up, move to the language you prefer and press SELECT.
Guided Setup & Activation After these setup procedures are complete, you’ll see the Satellite Data Acquisition screen, as the receiver gathers information from the satellite for the onscreen program guide. Next, you’ll be given the opportunity to set up your phone connection, as well as program your remote to control other equipment such as your TV and/or DVD player.
Getting Started Programming Your Remote Control You can program the DIRECTV remote control to operate your TV power, volume and mute, additional equipment such as a DVD, VCR, stereo, or second TV or DIRECTV Receiver. 1) Press MENU to display the Quick Menu. 2) Highlight Settings and press SELECT. 3) Highlight Setup and press SELECT. 4) Press SELECT on Remote in the left menu. 5) Follow the onscreen instructions to program your remote for your TV or additional equipment (AV1 and AV2).
Programming Your Remote Section Control Title Factory Defaults To reset all the functions of the remote control to the factory defaults, follow these steps: 1) Point the remote away from your DIRECTV Receiver and components. Press and hold MUTE and SELECT until the light above the slide switch on the remote flashes twice (about 5 seconds). 2) Enter 9-8-1. The light on the remote will flash twice, indicating you have cleared AV1, AV2 and TV modes.
Getting Started 22 Chapter 1
Chapter 2 24 Watching TV 26 The Guide 28 Autotune 30 Pay Per View
What’s On Watching TV TIP Use the Channel Lineup (included in your Welcome package) to get Now that everything’s set up, you’re ready to grab your remote and start surfing! familiar with our channel numbers. With the MODE switch to the left (under the DIRECTV logo), press TV POWER ON. To access the channel of your choice, simply key in its numbers on your remote (the channel will appear in a few seconds, or press ENTER after the numbers and it will appear right away).
Watching TV The Channel Banner Any time you tune to a channel, you’ll see the channel banner appear across the top of 1 2 3 the screen. This banner displays the following useful information: 4 5 6 7 The channel banner gives you info on the channel and show you are currently watching. 1) Current date & time 2) DIRECTV Channel – Channel logo, number and call letters of the station you’re currently viewing. 3) Program – Program title, stop and start time and rating of the current program.
What’s On The Guide Overview of the DIRECTV Advanced Program Guide® The Guide displays listings of current and upcoming programs for up to 3.5 days in advance. Find out what’s on (now or later), change the channel, find and purchase a pay per view movie or event, or search for a program you’re interested in. Icons you may see in the Guide: TIP GU the Category Sort screen.
The Guide Getting Around in the Guide E LIST IT GU ID EX Press the GUIDE key on your remote, then choose how you want to fi lter the Guide. Select All E ACTIV Channels, or channels in a specific category. SELECT Moving through the Guide is simple: 4 The UP, DOWN, LEFT and RIGHT arrow keys move you through listings and time slots. Highlight a program or channel cell to view its description. 4 Use the CHAN key up or down to scroll a full page.
What’s On Autotune An even better way to catch all your favorites Autotune is a great way to see your favorite programs on your schedule. You won’t miss your favorite series because it moved to a different day or time, or miss your team’s playoff game because you had to work late. Just set a program to autotune and your DIRECTV® Receiver will tune to it automatically when it starts. To schedule a program for autotuning with specific options: 1) Highlight a program that interests you and press INFO.
Autotune Changing Autotune Options/Canceling an Autotune Once you have scheduled a program to autotune, you can change the autotune options or cancel the autotune by selecting the program in the Guide or the To Do List (press LIST); then, select the Autotune item in the left menu, and follow the onscreen instructions to change the program’s options or cancel the Autotune completely.
What’s On Pay Per View The Latest Movies, 24 Hours a Day You don’t have to go out for the best and biggest movies and special events! Recent hits and events like sports, comedy and more are available 24 hours a day on DIRECTV® Pay Per View. You’ll find them listed in the Guide in the 100s, with previews on channel 100. Tune to a pay per view program or press INFO on a highlighted pay per view program. Select a Buy TIP option and follow the onscreen instructions.
Chapter 3 32 Using the Quick Menu 32 Settings 35 Audio Options 36 Category Sort 36 Pay Per View 37 Find By 38 Date & Time 38 Favorites 39 Caller ID & Messages 40 Parental Controls
The Quick Menu Using the Quick Menu Press MENU on your remote to easily access DIRECTV features. Once the Quick Menu is displayed, use the UP and DOWN arrows to highlight a desired menu item, then press SELECT to access that item. Some menu items will display a submenu, others will take you directly to a new screen. To remove the Quick Menu at any time, press MENU again.
Settings Info & Test The System Info option lets you view the current system information. The System Test option lets you run a test on the tuner, access card, receiver ID and phone line. Satellite This option is useful if your DIRECTV® Receiver has lost signal strength, or you need to realign your satellite dish. Access Card Follow the onscreen directions to replace your access card. You will need your old and new access cards to complete this process.
The Quick Menu Favorites Check the current status of your Favorites list(s) by clicking here, and make changes if you like. See page 38 for more details. Parental Controls Check the current restrictions of your Parental Controls by clicking here, and make any adjustments. See page 40 for more details.
Audio Options Audio Options Some programs have alternate audio available (such as other language tracks or Dolby Digital). This option only appears in the Quick Menu over Live TV when the current program has alternate audio. You can set the default so that whenever a program has alternate audio available, it automatically plays this audio, or you can change the alternate audio temporarily for the program you are watching.
The Quick Menu Category Sort This feature lets you temporarily arrange the Guide to list only programs in a particular category such as Movies, Sports or News. While in the Guide, from the Quick Menu, select Category Sort. To further narrow your search, select the category you want, then select a subcategory if you wish. To quickly move through the Category Search results, use the RED or GREEN key on your remote to advance or reverse in 90minute increments.
Find By Find By Would you like to locate a particular program, movie or sports event you want to see — even shows starring a favorite actor, or games with your favorite team? Find by offers some easy ways to spot just what you want to watch. Press MENU, then select Find by. You can find a program by Title, Person, Keyword or Channel. Your search will be quicker if you narrow your search by selecting subcategories; just follow the onscreen instructions.
The Quick Menu Date & Time This option gives you a convenient way to look several days ahead in the Guide, without having to scroll through pages of programs. Favorites Favorites allows you to set up special, customized Guide that shows only those channels you choose. So you can have easy access to the channels you like best, or perhaps a grouping of family channels just for the kids.
Caller ID & Messages Caller ID & Messages This feature lets you get messages from DIRECTV. If you have Caller ID service*, you can also view phone calls you’ve received or turn call notification on or off. Press MENU to display the Quick Menu, select Caller ID & Msgs, then select Edit Settings. Select either Caller ID or Messages from the left menu, as desired. Caller ID The Call Log tab displays up to 25 recent incoming calls. Highlight and select a name to delete that listing from your log.
The Quick Menu DIRECTV Messages This feature lets you view a listing of current DIRECTV messages waiting for you. Simply highlight and select a message in the list to read, then you’ll have the choice to keep or delete it. The messages icon will appear brightly on your channel banner whenever there’s any new or unread message in your Inbox. Parental Controls Parental Controls enables parents to place certain restrictions on just who’s watching what, and require a passcode to view restricted programming.
Parental Controls Ratings Here you can set rating limits for Movies and TV: 1) SELECT Ratings. 2) Move to the right to SELECT the another tab. Note: You can use RED or GREEN to cycle tabs. Movies Highlight and select the Movies tab, then set the overall rating limit you wish to impose Brief descriptions of the ratings appear for your guidance. TIP TV Programs SELECT the TV tab, then highlight and select the TV rating you desire.
The Quick Menu Channel Blocks You can block viewing of a certain channel or channels from this menu. SELECT Chan Blocks in the left menu, then scroll down the channel list to SELECT those you wish to block, or key in channel numbers for quicker access. Use Block All or Allow All to save time if you wish to affect a large number of channels. Spending From the left menu, SELECT Spending, then set your preferred spending limit for any single pay per view purchase.
Parental Controls Now, lock it Once you’ve set the restrictions you want, choose Lock Now from the left menu. You’ll be directed to create a passcode (which you’ll want to make easy enough to remember, but hard enough that the little ones won’t guess it!). This passcode will be your entry to unlocking and adjusting limitations in the future. An onscreen message will appear whenever anyone tries to tune to a channel or program that has been restricted, or attempts to spend or watch beyond limitations set.
The Quick Menu 2) Various options for removing restrictions temporarily or permanently will appear. Select one and enter your password. Also note: If you have Parental Controls set and temporarily unlocked, turning the receiver power off will relock the box. If anyone tries to unlock restrictions using an invalid passcode, there’s a time delay that’s added with each additional attempt to discourage them. To change your passcode at any time: 1) Press MENU, SELECT Parental Controls, then Edit Settings.
Chapter 4 46 Troubleshooting 55 Limited 90-Day Warranty 60 Product Information 61 DIRECTV PROTECTION PLAN 63 FCC Customer Information 67 Index
Other Information TIP Troubleshooting You can find additional Many problems can be corrected by performing a simple reset of the DIRECTV® Receiver. If you troubleshooting help at DIRECTV. experience the image freezes, audio freezes or blank screen, or the system won’t respond to front panel button or remote control, try one of these: com. 4 Press the red RESET button behind the access card panel door on the front of the DIRECTV Receiver, then wait for program guide information to be acquired.
Troubleshooting upgrades. Do not unplug your receiver while an upgrade is in progress. Please consult the Upgrade Menu to find a schedule of upgrades or modifications planned by DIRECTV. DIRECTV Receiver or TV Problems Progress bar freezes during Satellite Data Acquisition This is normal. The progress bar times out after two minutes.
Other Information Problems with Caller ID 4 You must subscribe to Caller ID service through your local phone company. Also, check to be sure your Caller ID feature is turned on (see page 39). 4 If you are plugging your receiver to a wireless phone jack, note that it typically does not transmit Caller ID information and you may need a special wireless phone jack to use with Caller ID service. See the user’s manual that came with the wireless phone jack to see if it transmits Caller ID information.
Troubleshooting Turns off while playing 4 Electronic protection circuit may have been activated because of a power surge. Wait 30 seconds, then turn on again. 4 Unplug DIRECTV Receiver for a few minutes, then plug back in. If this happens frequently, the voltage in your house may be abnormally high or low. 4 Consider using a surge protector or line conditioner.
Other Information 4 Your DIRECTV Receiver may be hooked up incorrectly to the TV. Press the INFO button on the front panel of the DIRECTV Receiver to see if the channel banner appears. If it does not, check the Setup and Connections section for instructions about connecting your satellite receiver. 4 If the DIRECTV Receiver is connected to the RF input of your TV, makes sure that the TV channel matches the 3/4 RF switch on the back panel.
Troubleshooting Partial programming loss/channels missing from the Guide/channel is in the Guide but can’t tune to 4 Your satellite dish antenna may be incorrectly configured. Check the dish type set in your receiver’s preferences and change if necessary. Press the MENU key on the remote control, then select Settings, then Setup. In the next menu, select Satellite, then Repeat Satellite Dish Setup. Follow the steps.
Other Information Remote Control Problems Problems with the remote control 4 Check that nothing is between the remote control and the remote sensor. 4 Make sure the remote control is in DIRECTV mode. Slide the mode switch to the DIRECTV position so the remote will control the DIRECTV Receiver. 4 Check the batteries in the remote control. They may be weak, dead or installed incorrectly. Try replacing batteries.
Troubleshooting Fine-Tuning the Signal If you self-installed your satellite dish antenna, you may have already used Guided Setup to find the dish-pointing coordinates, acquire and fine-tune the signal and run a system test. If you need to run Guided Setup again, select Settings from the Quick Menu, then select Guided Setup. Next, press SELECT on Satellite, then select Repeat Satellite Setup. Running the System Test The System Test allows you to run a basic diagnostics check on your DIRECTV Receiver.
Other Information 3) Select Settings. 4) Select Setup, then Info & Test. 5) Use arrow keys to highlight the System Test tab, then press SELECT on Run Test. 6) If your system does not pass the system test, check any of these potential trouble areas: cabling, pointing the satellite dish, phone connection and access card. 7) If you continue to have problems, call DIRECTV Customer Service at 1-800-DIRECTV. You should run a system test several times before concluding that there is a problem.
Limited 90-Day Warranty Limited 90-Day Warranty DIRECTV warrants your DIRECTV Receiver (Model Number: D11) and any included accessories against defects in material or workmanship for a period of ninety (90) days after the date of purchase. Who is Covered? You must have proof of purchase to receive warranty service. A sales receipt or other document showing that you purchased the product is considered proof of purchase.
Other Information All products, including replacement products, are covered only for the original warranty period. When the warranty on the original product expires, the warranty on the replacement product also expires. After ninety (90) days from the date of purchase, you pay for the replacement of all parts, and for all labor charges. SOME STATES DO NOT ALLOW LIMITATIONS ON HOW LONG AN IMPLIED WARRANTY LASTS, SO THE ABOVE LIMITATION MAY NOT APPLY TO YOU.
Limited 90-Day Warranty hardware or software provided by DIRECTV, installing software modifications, “hacks” or utilizing service access or “back doors” will void this limited warranty. 4 Reception transmission problems caused by signal conditions, telephone line, or cable or antenna systems outside the unit.
Other Information To Get Warranty Service... Warranty service will be provided by DIRECTV. If you believe you need service for your Receiver, contact DIRECTV at 1-800-DIRECTV. A representative will go through a diagnostic checklist with you. If it is determined that the product needs to be returned for service or exchanged, you will receive a return authorization number. The representative will give you complete shipping details. To Get Out-of-Warranty Service...
Limited 90-Day Warranty RETAIL PRICE OF THE DIRECTV RECEIVER. DIRECTV SHALL NOT BE LIABLE FOR ANY INCIDENTAL OR CONSEQUENTIAL DAMAGES FOR BREACH OF ANY EXPRESS OR IMPLIED WARRANTY ON THE DIRECTV RECEIVER. SOME STATES DO NOT ALLOW LIMITATIONS ON WARRANTIES, SO THE ABOVE LIMITATIONS MAY NOT APPLY TO YOU. THIS WARRANTY GIVES YOU SPECIFIC LEGAL RIGHTS. YOU MAY HAVE OTHER RIGHTS WHICH VARY FROM STATE TO STATE. DIRECTV, Inc. 2230 E.
Other Information Product Information Keep your sales receipt to obtain warranty parts and service and for proof of purchase. Attach it here and record the serial and model numbers in case you need them. These numbers are located on the product. Model No. ___________________________________________________________________ Serial No.
DIRECTV PROTECTION PLAN DIRECTV PROTECTION PLAN Protect your DIRECTV® System with the DIRECTV PROTECTION PLAN. For a low monthly fee, the DIRECTV PROTECTION PLAN covers the components of your DIRECTV System, giving you peace of mind and comprehensive support to ensure that you and your family enjoy nonstop DIRECTV® entertainment. DIRECTV PROTECTION PLAN Benefits Your DIRECTV Limited Warranty provides certain remedies for this receiver during the stated coverage term.
Other Information Sign up for the DIRECTV PROTECTION PLAN Today If you have standard DIRECTV Receiver(s), visit DIRECTV.com and SIGN IN using the simple steps below or call 1-800-DIRECTV. 1. SIGN IN with your user name and password, or click on the “Register Now” link and go through the easy steps, then continue with Step 2. 2. SELECT Option B, and then click the “Next” button at the bottom of the page. 3.
DIRECTV PROTECTION PLAN FCC Customer Information This device complies with Part 15 of the FCC Rules. Operation is subject to the following two conditions: (1) this device may not cause harmful interference, and (2) this device must accept any interference received, including interference that may cause undesired operation. Responsible Party: DIRECTV, Inc. 2230 E.
Other Information This equipment generates, uses, and can radiate radio frequency energy and, if not installed and used in accordance with the instructions, may cause harmful interference to radio communications. However there is no guarantee that interference will not occur in a particular installation.
FCC CustomerSection Information Title This equipment complies with Part 68 of the FCC Rules and the requirements adopted by ACTA. On the back of this equipment is a label that contains a product identifier in the format US:AAAEQ##TXXXX. If requested, this information must be provided to your telephone company. This equipment uses the following USOC Jack: RJ11C.
Other Information The telephone company may make changes in its facilities, equipment, operations or procedures that could affect the proper functioning of your equipment. If they do, you will be notified in advance in order for you to make necessary modifications to maintain uninterrupted service. Connection to party line service is subject to state tariffs. Contact the state public utility commission, public service commission or corporation commission for information.
Index Index A D I Access card 7, 8, 19, 53, 54 ARROW keys 7 Audio options 25, 35 Language 35 Autotune 28 Date & Time 31 DIRECTV mode 48, 52 DIRECTV PROTECTION PLAN 61 DIRECTV Receiver Problems 47 Dish-pointing coordinates 53 INFO 25, 27, 30, 50 INFO button 27, 50 B Back panel 50 Batteries 48, 52, 53 Buttons 47 C Cables 5, 9, 10, 12, 14, 16, 49, 53 Caller ID Problems 31, 48 Category sort 36 Channel banner 7, 25, 40, 50 Channel blocks 41 Channel list 42 Connections 1, 5, 50, 53 E EXIT key 36 F Favor
Other Information N Notification 39 P Parental Controls 25, 31, 34, 40, 43, 44 channel blocks 25, 31, 34, 40, 43, 44 ratings 25, 31, 34, 40, 43, 44 spending limits 25, 31, 34, 40, 43, 44 unlocking 25, 31, 34, 40, 43, 44 unrated programs 25, 31, 34, 40, 43, 44 viewing hours 25, 31, 34, 40, 43, 44 Passcode 43, 44 Pay Per View 2, 23, 26, 30, 31, 36, 42 Power surge 49 Previous channel 24 Previous channels 49 68 Index Programming 2, 4, 6, 7, 16, 19, 24, 37, 41, 51, 57 ordering 2, 4, 6, 7, 16, 19, 20, 24, 37,
Index S U Satellite Data Acquisition 19, 47 Satellite Setup 53 Scheduler 33 Search 26, 37 Settings 18, 44, 54 Setup 1, 10, 12, 14, 15, 16, 17, 18, 19, 50, 51, 53, 54 Showings 26 Spending limit 42 System Test 46, 53, 54 Unlock a particular program 43 User profile spending limit 2 viewing hours 2 W Warranty 6, 45, 55, 56, 57, 58, 60 T Temporarily unlock 43 Timer 49 To Do List 29, 30 Troubleshooting 45, 46 Tuning to 52 Tuning to a program 52 TV ratings 41 Chapter 4 69
Notes 70
Notes 71
Other Information DIRECTV programming sold separately. ACTIVATION OF PROGRAMMING MAY BE SUBJECT TO CREDIT APPROVAL AND REQUIRES VALID SERVICE ADDRESS, SOCIAL SECURITY NUMBER AND/OR MAJOR CREDIT CARD. DEPOSIT OR PREPAYMENT MAY BE REQUIRED. Programming subject to change. DIRECTV services not available outside the U.S. DIRECTV programming is sold separately and independently of DIRECTV System hardware. A valid programming subscription is required to operate DIRECTV System hardware.
Icon Reference Arrow Icons Indicate that a show’s start or end time is earlier or later than is visible in the Guide program cell. LEFT and RIGHT arrows on the remote offer special functionality. Objects are scrollable above or below the visible window. UP and DOWN arrows on the receiver front panel offer special functionality. Scheduler Icons Other Icons Denotes one or more alternate audio tracks available for a program. Denotes that no alternate audio tracks available.