DIRECTV Receiver Owners Manual ® POWER MENU SELECT POWER MENU SELECT Models HAH-SA HBH-SA SD-HBH HUGHES WARRANTY REGISTRATION You may REGISTER ONLINE at: www.hns-usa.com/warranty or complete the registration form on the back of this manual. 1034354-0001 Rev.
Copyright 2001, 2002, 2003 Hughes Network Systems, Inc., a wholly owned subsidiary of Hughes Electronics Corporation. All rights reserved. This publication and its contents are proprietary to Hughes Network Systems, Inc., a wholly owned subsidiary of Hughes Electronics Corporation. No part of this publication may be reproduced in any form or by any means without the written permission of Hughes Network Systems, Inc., 11717 Exploration Lane, Germantown, Maryland 20876. Hughes Network Systems, Inc.
Important Safety Instructions For your safety and protection, read this entire Owner's Manual before you attempt to install or use your satellite system. In particular, read this safety section carefully. Keep this safety information where you can refer to it if necessary. Heed Cautions–All cautions on the product and in the operating instructions should be adhered to. Follow Instructions–All operating and use instructions should be followed.
INSTALLATION Polarization – This DIRECTV® Receiver is equipped with a plug that will fit into the power outlet only one way. Do not modify the plug defeating this feature. If the plug does not fit, contact your electrician to replace your outlet. To prevent electric shock, do not use this plug with an extension cord or outlet unless you can fully insert the blades without blade exposure Power Sources – Operate this DIRECTV Receiver only from the type of power source indicated on the marking label.
SERVICE Servicing–Do not attempt to service this DIRECTV® Receiver yourself as opening or removing covers may expose you to dangerous voltage or other hazards. There are no user serviceable parts inside. Refer all servicing to qualified service personnel. Safety Check–Upon completion of any service or repairs to this DIRECTV Receiver, ask the service technician to perform safety checks recommended by the manufacturer to determine that the DIRECTV Receiver is in safe operating condition.
Federal Communications Commission (FCC) Regulatory Information Declaration of Conformity– Standards to which Conformity is declared: FCC Part 15 This device complies with Part 15 of the FCC Rules. Operation is subject to the following two conditions: (1) this device may not cause harmful interference, and (2) this device must accept any interference received, including interference that may cause undesired operation. • Responsible Party’s Name: Hughes Network Systems, Inc.
Contents Getting Started . . . . . . . . . . . . . . . . . . . . . . . 1 Setup overview . . . . . . . . . . . . . . . . . . . . . . . . . . . . 1 Attach the satellite antenna cable . . . . . . . . . . . . 2 Connect your TV . . . . . . . . . . . . . . . . . . . . . . . . . 3 Determine antenna angles . . . . . . . . . . . . . . . . . . 4 Testing your system . . . . . . . . . . . . . . . . . . . . . . 5 To perform the Transponder test: . . . . . . . . . . 5 Adding system components . . . . . . . . . . . . .
viii Contents
Getting Started 1 This chapter explains how to: You may connect a second DIRECTV Receiver to the unused LNB output. These instructions also apply to an additional receiver. • Connect the DIRECTV® Satellite Dish Antenna to your DIRECTV Receiver (this page). • Connect your DIRECTV Receiver to your TV (see page 3). • Find antenna azimuth and elevation settings for your location (see page 4). • Test the DIRECTV System operation (see page 5).
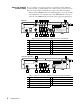
Attach the satellite You can configure your system several ways, depending on what additional antenna cable components (such as a VCR, DVD player, or A/V receiver) you select. For now, however, use the simplest configuration to check your antenna and cabling. • Ensure that the DIRECTV® Receiver is not plugged into an electrical outlet. • Attach the RG-6 coaxial antenna cable to the SATELLITE IN connector on the back of the DIRECTV Receiver. Refer to the appropriate figure below.
Connect your TV Depending on your TV, you can connect it to the receiver in one of four ways: • • • • Component (Y,Pb,Pr,-HAH-SA only) video cable (best picture quality) or S-Video cable (excellent picture quality) or Video cable (very good picture quality) or Coaxial cable (good picture quality) You will also want to use a pair of audio cables (L/R) to provide stereo sound. If your TV does not have standard A/V jacks, you will hear monophonic audio.
Determine antenna This section explains how to determine the proper antenna position, expressed angles in degrees of azimuth (horizontal) and elevation (vertical). Use the receiver front panel controls shown below to complete this procedure. Power Power On/Standby Indicator Main Menu Direction SELECT Button Buttons Button MENU POWER MENU POWER SELECT SELECT 1. Press the front panel MENU button to display the MAIN MENU below. 2. Use the button to highlight the System Setup tab.
Testing your system When you have aligned your dish antenna to the azimuth and elevation angles shown on the Install pane, highlight the Signal tab. Signal quality is indicated by a scale at the bottom of the pane and with an audible indication. The frequency and tempo of the tone increase with signal strength. To perform the Transponder Use this procedure to test the signal strength from the satellite transponder: test: 1. Select the System Setup tab from the MAIN MENU 2.
An occasional “0” indication may be considered normal. Results should generally resemble those in the figure, but the actual values will vary somewhat from those shown in the figure depending on your geographic location and specific installation. However, if your results are very different from these examples (i.e, rows of zeros or single-digit numbers) or you receive no signal indication: • Highlight the Install tab on the INSTALLATION menu. Verify your settings.
Adding system components 2 You can configure your DIRECTV® Receiver several ways depending on the additional audio/video components you want to use. This chapter explains how to: • Connect a terrestrial (broadcast) TV antenna (this page). • Connect and set-up a VCR (see page 8). • Integrate a DIRECTV Receiver into your audio or A/V system (see page 9). Connecting additional system components At this point, you should have: Verified that your system is operating properly.
Connect the VCR Control (Model HAH-SA only) The DIRECTV® Receiver can control your VCR for Cable unattended recording, using the VCR Control Cable provided. 1. Plug the VCR control cable into the rear panel VCR CONTROL jack. 2. Temporarily position the other end over the VCR’s remote control sensor (normally a small dark plastic window on the VCR front panel). The remote control sensor may be labeled or identified in your VCR manual.
If either command does not function, try other codes listed for your VCR brand. If you are unsuccessful after trying all available codes, recheck your VCR Control Cable connections and IR emitter placement. 9. Remove the temporary mounting tape. Attach the emitter permanently using the peel-and-stick backing. This will not interfere with normal VCR operation.
10 Adding system components
Using the remote control 3 This chapter explains how to: • Use the HRMC-11, HRMC-12, and HRMC-13 remote control functions. (see page 13) • Program the remote to work with other system components. (see page 14) • Install and replace the remote control batteries. (see page 15) POWER HRMC-13 AUX Power Turns satellite receiver power on/off (standby). Turns selected component power on/off. TV VCR Component controls Selects the component that you want to control.
Power Turns satellite receiver power on/off (standby). Turns selected component power on/off. PWR DVD VCR AUX TV Component controls Selects the component that you want to control. Buttons illuminate to indicate the component that the remote control is set to operate. SAT GUIDE MENU 1-LINE INFO VOL Receiver control group Most frequently used functions are grouped together (see below). FAV TURBO CLEAR SELECT P A G E CH PREV MUTE Navigation PADDLE Moves the oncsreen menu highlght or cursor.
Remote control functions Use the directional paddle or directional arrow buttons to move up, down, left, or right through the on-screen displays. This icon appears throughout this manual to instruct you to use the paddle or directional arrow buttons to navigate through on-screen menus and guides. Pressing the paddle or directional arrow buttons left or right while watching a program displays the Alternate Audio selection popup menu.
Programming the remote control You can operate your TV, VCR, SAT, AUX device, or DVD (HRMC-11 and HRMC-12 only) devices using your remote control. Use the Code Entry or Code Scanning method to program the remote control. Using the Code entry method may be quicker, but you’ll need to know the correct manufacturer’s control codes for each component you want to operate. Code scanning may be more time-consuming, but you don’t need to know manufacturer’s control codes. 1.
Code Scanning To use the Code Scanning method: 1. Repeatedly tap the top part of the CHANNEL (CH) button. CH P A G E 2. Continue to step through the codes until the component turns off, indicating you have found the correct component code. If you accidentally pass a code that responds or realize you may not have been aiming the remote control at the component, tap the lower part of the CHANNEL (CH) button to step backward through the codes. 3.
16 Using the remote control
4 Using program guides This chapter describes: • • • • • • Selecting a program guide style The different program guide styles (this page). Common program guide and menu features (see page 19). How to use the OneLine™ Guide (see page 20). How to set-up and use the TurboTune™ Guide (see page 20). Using DIRECTV INTERACTIVE™ (see page 21) Setting program guide preferences (see page 22) Personalize the program guide to show program listings that interest you.
If program information cannot entirely fit in the space provided, an ellipsis (…) indicates that a portion of the title is not shown. Press the remote control INFO button to view complete program information. Logo guide • Use the remote control CHANNEL(CH) button to scroll through a full page of guide entries at a time. • Active ad highlights provide “one-click” access to products and services. Move the highlight to the right to show future programming.
Program guide and menu features The on-screen guides and menus provide a logical and convenient way to access system features and settings.
Using the OneLine™ Guide The OneLine™ Guide appears across the bottom of your screen when you press the 1-LINE button while watching TV. You will see the channel call sign and number, titles, and program start and end times as shown below. 100 10:30 11 am 11:30 12:00pm Watch Pay Per View Previews now! DTV PROGRAM GUIDE All Channels • Pressing the 1-LINE button while the OneLine guide is on-screen adds an additional line to the guide (up to four lines).
3. Choose the desired channel in the setup box shown below using the paddle, directional arrow buttons, or the CHANNEL(CH) button. You can also use the numeric remote control buttons to enter specific channel number.
Setting guide preferences The GUIDE OPTIONS menu shown below allows you to customize the appearance and behavior on-screen guides. To set guide preferences: 1. Highlight and SELECT the Guide Options tab from the MAIN MENU, or press the remote control GUIDE button twice while watching a program. 2. Highlight the Options tab 3. Highlight and SELECT the menu button for the setting you wish to modify.
5 Using the menus This chapter describes: • • • • How to find the menus you need to perform common tasks (this page). How to purchase pay per view events (see page 24). Using the Program Director (see page 28). How to set and modify preferences (see page 25). The table below lists the MAIN MENU tabs, their submenus, and what they do. Main Menu tab Screens (see page) If you want to: Program Guide Program Guide • View, and modify the program guide.
Onscreen menu icons These icons appear in onscreen menus and are used throughout this manual: Toggle or Step Press SELECT to toggle (switch) a setting from ON to OFF or step through the available choices each time you press SELECT. List of Options Menu button will display a list of choices in a pop-up menu when you press SELECT. Series of Boxes Multiple screens will appear in a series requesting you to enter numbers and/or letters for the particular feature when you press SELECT.
Listing unviewed The UPCOMING PURCHASES pane displays PPV events you have purchased purchases but not yet viewed. Events ordered by calling DIRECTV do not appear on this list. For additional information about a specific event, highlight the event and press the INFO key. Adjusting audio settings Press the AUDIO button on your remote control or highlight and SELECT the Audio & Video tab from the MAIN MENU.
Using TruSurround TruSurround technology lets you take advantage of any multichannel format without having to add extra speakers or equipment. Using two speakers, TruSurround “virtually” places the individual audio channels where they are supposed to be, as though you had speakers all around you. To enable TruSurround, set the SRS TruSurround menu button “On”. Note: TruSurround and Dolby Digital are mutually exclusive features.
Using WatchWizard™ WatchWizard™ allows you to search for programs using criteria such as rating, showtime, language, and category. You can search for a specific word used in program titles or descriptions. WatchWizard can perform up to eight separate searches using any combination of criteria and text. To access WatchWizard, press the SEARCH button on the remote control or SELECT the WatchWizard tab from the MAIN MENU.
You can highlight and SELECT the toggle icon on the default button board to change it to a standard keyboard layout if you desire. Highlight the desired letter using the paddle or directional arrow buttons. WATCHWIZARD SETUP WWSetup WWResult ~ ! 1 Q A Z @ 2 W S X : # 3 E D C ; $ 4 R F V -% 5 T G B + ^ 6 Y H N < & 7 U J M > / = * 8 I K . ( ) 9 0 O P L Ñ , ? ~ ! 1 A K T 9:23AM WatchWizard Entry Search for words in the Program Titles and Descriptions within Guide.
Scheduling or editing an There are three ways to schedule a program: event From the program guide: You can schedule events up to eleven months in advance. 1. Highlight an upcoming program in the program guide and press SELECT. A 9 will appear next to your selection. Press SELECT again to cycle through the next available option ( if available). 2. If you choose a scheduling option, the DIRECTV® Receiver will turn on (if necessary) and tune to the specified channel at the chosen date and time. 3.
Adjusting system settings Select the System tab from the MAIN MENU to access the system functions described in this section. Use the PREFERENCES menu pane (shown in the figure below) to change the appearance of the on-screen menus and select how your DIRECTV® Receiver operates with other devices. The PREFERENCES pane also allows you to: • • • • • • • Set the receiver output channel to channel 3 or 4 Enable or disable the INPUT button on your remote control. Select English or Spanish language menus.
Viewing Mail DIRECTV uses the MAIL feature to send you important information, inform you of special events, and tell you about special offers.When you receive a new message, a New Mail icon appears at the top of all menus until you read the message. Highlight and SELECT the View Mail tab from the MAIN MENU. VIEW MAIL Mail Watch TV Main Menu Fri, Jul 6 5:24AM Read Message Erase Message 1 of 3 Page 2 Second page of message text... Message – SELECT the Messages button.
32 Using the menus
6 Setting favorites and filters This chapter explains: • • • • • Using favorite channel lists Creating a channel list How to create a channel list (this page). Renaming a channel list (see page 34). Using Auto Set, Add All, and Del All functions (see page 34). How to filter the program guide (see page 35). How to change guide times (see page 36). Channel Lists are provided to help you organize the hundreds of available channels into groupings suitable for your household.
7. Scroll up or down to view channels and descriptions. Press SELECT to add channels to your list. 8. When you have added all of the channels you want to your list, use the paddle or directional arrow buttons to highlight and SELECT the Watch TV tab to resume viewing. Once you have created your lists, use the remote control FAV button to cycle through them quickly and easily. Each press cycles to next channel list. You can also select a list by highlighting the Fav List tab from the Guide Options menu..
press SELECT. A checkmark (9) appears in the box if the channel has been selected or the checkmark disappears to indicate the channel is not selected. Finding new channels Occasionally, new channels are added to the available programming selections. The number of channels that have been added since you created your channel list appear in the New Channels window on the FAVORITE LIST SETUP pane. These channels appear in their own guide when you select New Channels in the FAVORITE LIST menu pane.
CATEGORY FILTER Wed, Sep 18 4:20PM Theme Times Fav List Select a Category to filter Guide All Movies Fav Setup Options Sports Interests Lifestyles Set Turbo Watch TV Main Menu Movies PREV LEVEL News Themes All Action/Adventure Animation The material is a movie, either theatrical or made-for-TV. Biography Comedy Current Affairs Content Advisories A description of the selected category appears here.
7 Using access controls This chapter explains: • How to lock and unlock the system. • How to set maximum rating, spending, and time limits. Locks & Limits provides settings to help you control the viewing restrictions of DIRECTV® programming. When accompanied by the channel lists, these limits provide a great degree of control. The DIRECTV® Receiver must be locked for the TV Timer, Rating and Spending limits to be enforced.
particular audience. To select the maximum ratings limits allowed to be viewed, highlight the Ratings tab, then SELECT the type programming you wish to restrict. For example, if you select the Violence menu button, a ratings pop-up submenu appears as shown in the figure below.
Questions & Answers A Questions? Did we forget to tell you something? We have compiled some the most common questions and their answers here. We hope they help! Q I had a signal but now I am getting a message “Searching for satellite signal. To access related utilities, press SELECT.” What happened? A Rain clouds and snow can affect the satellite signal reception. This loss of signal is temporary. Also check for new growth on trees and bushes that could be blocking the signal.
Q Can I receive my local TV programs through my digital satellite receiver? A There are three ways to receive local programming: •If you are in an area where local programming is available via satellite and have the proper satellite dish antenna, contact DIRECTV to arrange for the necessary subscription package. •Install a traditional antenna (i.e., roof mounted, attic mounted, rabbit ears). •Arrange for basic or “lifeline” cable TV service from your local cable company.
Manufacturers device control codes B Use these codes to program your remote control to operate your components.
Table 3: VCR brands and remote control codes BRAND CODE NUMBER BRAND CODE NUMBER BRAND CODE NUMBER Sears 001 003 008 009 010 014 017 031 034 081 101 Tatung 023 039 043 Video Concepts 012 034 046 Sharp 031 054 053 143 Teac 023 034 039 043 Videosonic 040 Shintom 024 Technics 031 070 Wards 001 003 017 024 031 034 040 053 054 131 Shogun 040 Teknica 031 019 034 101 Westinghouse 024 025 Signature 034 Thomas 034 XR-1000 024 031 034 Singer 024 TMK 040 Yamaha 012 034 039 043
Table 4: Television brands and remote control codes BRAND CODE NUMBER BRAND CODE NUMBER BRAND CODE NUMBER LXI 007 015 052 081 160 164 Philips 164 093 038 005 059 127 070 003 004 213 SSS 004 043 Magnavox 003 004 022 059 060 061 063 064 070 094 127 160 164 Pioneer 025 070 004 018 023 190 Starlight 043 Majestic 072 Portland 004 143 065 103 Supre Macy 002 Marantz 070 164 Prism 034 Supreme 001 Matsui 164 Proscan 160 161 167 145 065 Sylvania 003 044 059 060 063 064 070 127 160 1
Table 5: AUX audio brands and remote control codes AUX CODE NUMBER AUX CODE NUMBER AUX CODE NUMBER Kenwood 096 104 119 125 148 151 163 171 173 242 Niles 236 Scott 180 190 Krell 223 Onkyo 094 115 116 209 211 255 Sharp 096 125 151 161 169 182 193 Lexicon 215 250 Optimus 121 125 140 181 Sherwood 089 127 Luxman 066 120 205 229 Panasonic 131 144 187 200 Sony 097 117 147 183 188 192 200 237 238 253 LXI 123 177 Parasound 085 086 090 Soundstrea 197 Magnavox 126 162 185 186 224 2
A A/V receiver, connecting 9 Advance select 28 Aligning the antenna 4 Alternate audio 25 Antenna alignment values 4 cable, connecting 2 pointing 4 terrestrial 7 Audio balance 25 AUX audio brands and control codes 43 Azimuth angle, determining 4 B Batteries, installiing 15 C Caller ID service 31 Caller ID, disable 30 Can’t Tape message 9 Cancel purchase 24 CATV brands and remote control codes 44 Changing menu language 30 Channel banner location 19 removing from screen 19 CLEAR button 13 Codes, device contr
Limited Warranty Hughes Network Systems (HNS) provides the following limited equipment warranty on this equipment. This limited warranty is in lieu of all other warranties, whether express, implied, or statutory, including, without limitation, the implied warranties of merchantability and fitness for a particular purpose.
HUGHES WARRANTY REGISTRATION FORM HUGHES WARRANTY REGISTRATION A Few Minutes of Your Time Can Help Shape Our Next Generation of Products You may REGISTER ONLINE at: www.hns-usa.com/warranty or complete this form and mail it. WHICH DIRECTV® SYSTEM DID YOU PURCHASE? Place a check ( ) for your system. Check all that apply.
1034354-0001 Rev.