
Technical data

14
5 Maintenance
5 Maintenance
5.1 Emptying and cleaning the dust container
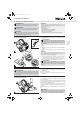
It is best to empty the dust container after each vacuuming session.
However, empty the dust container at the latest when the ‘MAX’ mark
(Fig. 9/B1) has been reached, if storing it for a long period, or when sending
it.
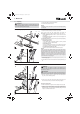
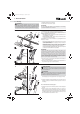
1. Switch off the appliance, Zchapter 4.3, „Switching off“.
2. Push the release button for the dust container (Fig. 9/A).
3. Remove the dust container by pulling it upwards out of its receptacle.
4. Empty the dust container by holding it low over a dustbin and only then
press the release button (Fig. 9/B).
5. Twist off baffle by turning anticlockwise (Fig. 9/C) to empty and clean
the dust container better.
6. Remove any residual dust from the dust container using a dry cloth or
a soft brush, e.g. the supplied furniture brush.
7. Twist baffle back on by turning clockwise until you feel and hear it click
into place.
8. Close the dust compartment bottom plate.
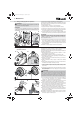
5.2 Cleaning central lamellae filter and motor protection filter
It is best to clean the central lamellae filter and the motor protection filter
each time you empty the dust container.
Though clean both filters at the latest when the cleaning indicator
(Fig. 1/25) lights up.
1. Switch off the appliance and empty the dust container, Zchapter 5.1,
„Emptying and cleaning the dust container“.
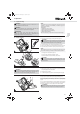
2. Remove the motor protection filter from its holder (Fig. 10/A).
3. Unlock the cover by twisting it in the ‘UNLOCK’ direction (Fig. 10/B).
4. Hold the cover with the filter elements attached low over a dustbin.
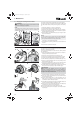
5. Pull the filter fleece (optional) off the central lamellae filter (Fig. 11/A).
6. Remove the central lamellae filter from the cover by twisting it in the
‘UNLOCK’ direction (Fig. 11/B).
7. Remove larger agglomerations of dirt by hand and brush the central
lamellae filter clean with the supplied furniture brush (Fig. 12/A).
8. If the filter elements are still dirty after this procedure, thoroughly rinse
them by hand in running water (Fig. 12/B) until all dirt is gone.
9. If a filter element is damaged or too dirty, replace it with a new one
(ordering information Zchapter 5.4, „Spare parts and accessories“).
10. Put the new / cleaned and completely dry motor protection filter back
into its receptacle (Fig. 10/A).
11. Refit the central lamellae filter to the dust compartment cover by
twisting it in the ‘Lock’ direction until it is securely fastened (Fig. 11/B).
You will feel and hear the filter snap into place.
12. Put the filter fleece (optional) back onto the central lamellae filter so that
it exactly encloses the lamellae of the filter (Fig. 11/A).
13. Fit the cover in such a way that the fitting mark on the cover (T) exactly
corresponds to the arrow on the dust compartment.
14. Fix the cover by twisting it in the "LOCK" direction (Fig. 10/B).
15. Put the dust container back into its receptacle. You will feel and hear it
snap into place.
ATTENTION:
Switch off the appliance before emptying the dust container. This will
prevent dust from damaging the appliance.
NOTE:
You can dispose of the contents of the dust container with your regular
domestic waste as long as it does not contain any substances not
permitted in domestic waste.
A
1
B C
9
NOTE:
The dust container cannot be cleaned with the central lamellae filter
fitted. So clean the central lamellae filter on this occasion, Zchapter 5.2,
„Cleaning central lamellae filter and motor protection filter“.
A B
LOCKUNLOCK
10
B
LOCK
UNLOCK
A
11
B
A
12
ATTENTION:
The filter elements are washable, but may not be cleaned in
dishwashers or washing-machines. Also, do not use detergents or
brushes with hard bristles to clean them. Let the filters dry for approx.
24 hours at room temperature after cleaning. Only put them back into
the appliance when they are completely dry.
Centec.book Seite 14 Donnerstag, 21. April 2011 6:06 18