
Operation Manual


Preparatory work
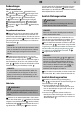
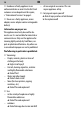
Getting to know the appliance
Fig.
1
:
1
ON/OFF button;
2
MAX/MIN button;
3
Floor nozzle;
4
Brush roller;
5
Upright vacu-
um cleaner handle;
6
Accessory bracket;
7
Hand-
held vacuum cleaner release;
8
Hand-held vacu-
um cleaner;
9
Charging indicator light;
10
Charging
socket;
11
Hand-held vacuum cleaner handle;
12
ON/
OFF button of hand-held vacuum cleaner;
13
Charg-
ing contacts;
14
Dust bin release;
15
Dust bin;
16
Suc-
tion inlet;
17
2-in-1 combo nozzle;
18
Mains adapter;
19
Screw
Unpacking and assembling
1
Check that the unpackaged contents are com-
plete. If you notice any transport damage or if an-
ything is missing, contact your dealer immediate-
ly.
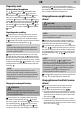
2
Connect the upright vacuum cleaner handle to
the appliance body and tighten (Fig.
2
).
NOTE:
To dismantle handle again, loosen and remove
the screw and pull upright vacuum cleaner han-
dle from appliance body.
3
Align hand-held vacuum cleaner in such a way
that the dust bin release (Fig.
1
/
14
) points towards
the appliance body. Connect the hand-held vacuum
cleaner to the appliance body until you hear and feel
it click into place (Fig.
3
).
4
Attach the 2-in-1 combi
nozzle onto the accessory bracket on the appliance
body (Fig.
4
).
NOTE:
To set the assembled appliance down, set it
down on the oor nozzle and tilt the appliance
body forwards so that the stop catch on the oor
nozzle clicks into place. Now the appliance is in
parked position.
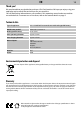
Charging the rechargeable battery
WARNING!
Risk of re or explosion! Only use the mains
adapter included in the scope of supply to charge
the rechargeable battery.
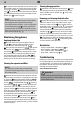
1
Connect the mains adapter cable to the charg-
ing socket on the appliance (Fig.
5
).
2
Connect
the mains adapter to a socket (Fig.
6
). ➔ The charg-
ing indicator light (Fig.
1
/
9
) lights up constant-
ly in red to indicate the charging process.
3
After
a maximum of 5 hours, the charging indicator light
switches to green. ➔ The rechargeable battery is
then charged.
4
Disconnect the mains adapter from
the socket (to save electricity) and disconnect the
mains adapter cable from the appliance.
Using appliance as upright vacuum
cleaner
CAUTION!
Make sure that the surface can withstand the
rotating brush without becoming damaged.
NOTE:
When the appliance is in parked position, the
brush roller does not rotate.
1
Unfasten the stop catch on the oor nozzle by
placing your foot on the oor nozzle and tilting the
appliance backwards with the handle (Fig.
8
).
2
To switch on the appliance, press the ON/OFF but-
ton (Fig.
7
/
1
). ➔ The appliance vacuums at full suc-
tion power and the brush on the oor nozzle rotates.
To switch between full and low suction power, press
the MAX/MIN button (Fig.
7
/
2
).
3
Vacuum-clean
the oor.
NOTE:
If the brush roller (Fig.
1
/
4
, Fig.
18
) becomes
blocked as a result of soiling, the appliance switches
o and the charging indicator light ashes red.
To be able to use the appliance again, press the ON/
OFF button (Fig.
1
/
1
) to switch o the appliance
and clean the brush roller > “Removing and
cleaning the brush roller” on page 18.
4
To switch o the appliance, press the ON/OFF but-
ton (Fig.
7
/l). ➔ The appliance switches o.
Using appliance as hand-held vacuum
cleaner
1
Press the hand-held vacuum cleaner release
(g
9
/
1
) and remove the hand-held vacuum
cleaner from the appliance body (Fig.
9
/
2
).
▶
Use with furniture brush: Attach the 2-in-1 combi
nozzle to the hand-held vacuum cleaner and slide
the furniture brush all the way down until it clicks
into place (Fig.
10
).
▶
Use with crevice nozzle: Attach the 2-in-1 combi
nozzle to the hand-held vacuum cleaner and slide
the furniture brush all the way down until it until it
stops on its own (Fig.
11
).
!
EN
17