M668.book Seite 1 Donnerstag, 22. März 2012 10:57 10 Bedienungsanleitung DE Doppelbürstkehrer Operating Manual GB Double-brush sweeper Mode d'emploi FR Balai électrique double brosse Bedieningshandleiding NL Dubbele borstelveger Manual de instrucciones ES Escoba eléctrica doble Istruzioni per l'uso Scopa elettrica doppia IT Kullanim Klavuzu TR Çift f rçal süpürge Roya-15528 • A5 (ohne AS) • 22.03.
M668.book Seite 2 Donnerstag, 22.
Bedieningshandleiding ........................................................ 58 - 75 Manual de instrucciones ..................................................... 76 - 93 Istruzioni per l'uso ............................................................... 94 - 111 GB 40 - 57 FR Mode d‘emploi ...................................................................... NL 22 - 39 ES Operating Manual ................................................................
M668.book Seite 4 Donnerstag, 22. März 2012 10:57 10 Inhaltsverzeichnis Inhaltsverzeichnis Technische Daten ............................................................................................. 5 Kennzeichnungen ............................................................................................. 5 1 Übersicht ................................................................................ 6 2 Sicherheitshinweise .............................................................. 8 2.1 2.2 2.
M668.book Seite 5 Donnerstag, 22. März 2012 10:57 10 Vielen Dank! Vielen Dank! Technische Daten DE Es freut uns, dass Sie sich für den Doppelbürstkehrer Duplex entschieden haben! Wir danken Ihnen für den Kauf und das entgegengebrachte Vertrauen. Geräteart : Doppelbürstkehrer Modell : Duplex Modellnummer : M668 (-0/-1/.../-8/-9) Netzteil Eingang : 100...240 V~, 50/60 Hz Netzteil Ausgang : 10 V DC, 200 mA Akkupack : Ni-MH, 6 V DC, 1300 mAh Ladezeit : ca. 16 Stunden Betriebsdauer : ca. 20..
M668.book Seite 6 Donnerstag, 22.
M668.book Seite 7 Donnerstag, 22.
M668.book Seite 8 Donnerstag, 22. März 2012 10:57 10 2 Sicherheitshinweise 2.1 2 zur Bedienungsanleitung Sicherheitshinweise WARNUNG: Warnt vor Gefahren für Ihre Gesundheit und zeigt mögliche Verletzungsrisiken auf. ACHTUNG: Weist auf mögliche Gefährdungen für das Gerät oder andere Gegenstände hin. HINWEIS: Hebt Tipps und Informationen hervor. 2.2 Bewahren Sie die Anleitung gut auf. Falls Sie das Gerät an Dritte weitergeben, geben Sie auch die Bedienungsanleitung mit.
M668.book Seite 9 Donnerstag, 22. März 2012 10:57 10 2.4 zum mitgelieferten Akkupack Bei falschem Umgang mit Akkus besteht Verletzungs- und Explosionsgefahr. Verwenden Sie ausschließlich das mitgelieferte Netzteil zum Aufladen des Akkupacks. Laden Sie den Akkupack keinesfalls mit einem anderen Netzteil. Nutzen Sie das mitgelieferte Netzteil wiederum ausschließlich zum Aufladen des Akkupacks dieses Geräts.
M668.book Seite 10 Donnerstag, 22. März 2012 10:57 10 3 Vor dem ersten Gebrauch 3.1 3 Auspacken Vor dem ersten Gebrauch 1. Packen Sie das Gerät samt Zubehör aus. ACHTUNG: Heben Sie die Verpackung für die Lagerung des Geräts oder für einen sicheren Versand des Gerätes auf. Versenden Sie das Gerät stets in der Originalverpackung, damit es keinen Schaden nimmt. 3.2 2. Überprüfen Sie den Inhalt auf Unversehrtheit und Vollständigkeit (Abb. 1).
M668.book Seite 11 Donnerstag, 22. März 2012 10:57 10 3 Vor dem ersten Gebrauch Akkupack einsetzen DE 3.3 ACHTUNG: Setzen Sie lediglich den mitgelieferten oder durch Nachbestellung erworbenen OriginalAkkupack in das Gerät ein. HINWEIS: Solange Sie den Akkupack mit dem Kontakt voran in das Gerät einsetzen, ist die weitere Einlegerichtung egal. 1. Stecken Sie den Akkupack mit dem Kontakt voran in das Akkufach (Abb. 5). 5 2. Drücken Sie den Akkupack in das Akkufach (Abb. 6).
M668.book Seite 12 Donnerstag, 22. März 2012 10:57 10 3 Vor dem ersten Gebrauch 3.4 Akkupack laden WARNUNG: Verletzungsgefahr durch unsachgemäßes Aufladen! Verwenden Sie ausschließlich das mitgelieferte Netzteil zum Aufladen. ACHTUNG: Achten Sie auf einen vollständigen ersten Lade- und Entladezyklus. Anderenfalls verkürzt sich die Lebensdauer des Akkupacks. HINWEIS: Der Akkupack wird ungeladen geliefert. Bevor Sie mit dem Gerät arbeiten können, muss der Akkupack geladen werden.
M668.book Seite 13 Donnerstag, 22. März 2012 10:57 10 4 Gebrauch Gebrauch ACHTUNG: Informieren Sie sich beim Hersteller Ihres Bodenbelags, ob sich dieser für die Reinigung mit einem elektrischen Bürstkehrer eignet. 4.1 Gerät einschalten 1. Stellen Sie das Gerät auf den zu kehrenden Boden ab. 0 2. Ziehen Sie den Stiel zu sich und winkeln Sie so den Bürstfuß ab. Der Bürstfuß muss nun unabhängig davon, wie Sie den Stiel halten, auf dem Boden aufliegen. 3.
M668.book Seite 14 Donnerstag, 22. März 2012 10:57 10 5 Nach dem Gebrauch 5.1 5 Ausschalten Nach dem Gebrauch 1. Bringen Sie den Schiebeschalter in Stellung „0“ (Abb. 12). 2. Stellen Sie den Stiel rechtwinklig zum Bürstfuß an, bis dieser einrastet und das Gerät von allein stehen bleibt. 0 3. Bei Bedarf leeren Sie den Staubbehälter, ZKapitel 5.3, „Staubbehälter leeren“. I 12 5.2 Transportieren und Verstauen Tragen Sie den Bürstkehrer stets am Handgriff (Abb. 13).
M668.book Seite 15 Donnerstag, 22. März 2012 10:57 10 5.3 Staubbehälter leeren Leeren Sie den Staubbehälter für beste Reinigungsergebnisse regelmäßig, am besten nach jedem Reinigungsgang, wie folgt: 1. Stellen Sie sicher, dass das Gerät ausgeschaltet ist. 2. Drücken Sie die Staubbehälter-Entriegelungstaste (Abb. 14) und halten Sie diese gedrückt. HINWEIS: Halten Sie die Entriegelungstaste so lange gedrückt, bis Sie den Staubbehälter tief in einen Mülleimer entleeren können.
M668.book Seite 16 Donnerstag, 22. März 2012 10:57 10 5 Nach dem Gebrauch 5.4 Bürstwalzen reinigen WARNUNG: Verletzungsgefahr durch anlaufende Bürstwalzen! Bevor Sie beginnen, die Bürstwalzen auszubauen, schalten Sie das Gerät aus und bauen Sie den Akkupack aus. HINWEIS: Die Vorgehensweise für die Reinigung der breiten, vorderen Bürstwalze und der schmalen vorderen Bürstwalze ist identisch. Wir beschreiben das Vorgehen exemplarisch am Beispiel der breiten Bürstwalze. 17 1.
M668.book Seite 17 Donnerstag, 22. März 2012 10:57 10 7. Führen Sie die Bürstwalze wieder in ihren Schacht (Abb. 20). 20 8. Drehen Sie die Bürstwalze nach dem Einsetzen so lange, bis sich das Büschel frei bewegen kann (Abb. 21). HINWEIS: Anderenfalls wäre die komplette vordere Bürstwalze blockiert. 21 9. Falls sich das letzte Büschel frei bewegen lässt (Abb. 21), verriegeln Sie die Entriegelung der Bürstwalze, indem Sie sie in Richtung (Abb. 22) drehen.
M668.book Seite 18 Donnerstag, 22. März 2012 10:57 10 5 Nach dem Gebrauch Gehen Sie zum Reinigen der hinteren Bürstwalze wie folgt vor: 1. Falls noch nicht geschehen: - Schalten Sie das Gerät aus, ZKapitel 5.1, „Ausschalten“. - Bauen Sie den Akkupack aus, ZKapitel 3.3, „Akkupack einsetzen“. - Legen Sie das Gerät so ab, dass die Unterseite des Bürstfußes nach oben zeigt und die Bürstwalzen sichtbar sind. 2. Entriegeln Sie die Keilriemenabdeckung (Abb. 23) und nehmen Sie diese ab. 23 3.
M668.book Seite 19 Donnerstag, 22. März 2012 10:57 10 6 Problembehebung falls das Gerät nicht arbeitet, wie es soll Problembehebung DE 6.1 6 Überprüfen Sie anhand nachfolgender Tabelle, ob Sie das Problem selbst beseitigen können. Problem Das Gerät lässt sich nicht einschalten. mögliche Ursache / Lösung Der Stiel und/oder der Handgriff sind nicht korrekt montiert. Drücken Sie den Stiel bzw. den Handgriff wie beschrieben kräftig in seine Aufnahme, ZKapitel 3.2, „Stiel und Handgriff montieren“.
M668.book Seite 20 Donnerstag, 22. März 2012 10:57 10 6 Problembehebung 6.2 Zubehör- und Ersatzteile nachbestellen Folgende Zubehör- sowie Ersatzteile können nachbestellt werden: Artikelnr. Beschreibung 0668001 2-teiliges Bürstwalzenset (1 schmale, 1 breite, vordere Bürstwalze) 0668002 1 Netzteil 0668003 1 Akkupack 0668004 1 hintere Bürstwalze Um Zubehör- sowie Ersatzteile nachzubestellen, kontaktieren Sie uns: per Telefon unter: 01805 15 85 08* per E-Mail: Ersatzteilshop@dirtdevil.
M668.book Seite 21 Donnerstag, 22. März 2012 10:57 10 7 Garantie Garantiebedingungen Garantie Wir übernehmen für das von uns vertriebene Gerät eine Garantie von 24 Monaten ab Kaufdatum. Innerhalb dieser Garantiezeit beseitigen wir nach unserer Wahl durch Reparatur oder Austausch des Gerätes oder des Zubehörs (Schäden an Zubehörteilen führen nicht automatisch zum Umtausch des kompletten Gerätes) unentgeltlich alle Mängel, die auf Material- oder Herstellungsfehlern beruhen.
M668.book Seite 22 Donnerstag, 22. März 2012 10:57 10 Table of contents Table of contents Technical data ................................................................................................. 23 Labels ............................................................................................................. 23 1 Overview .............................................................................. 24 2 Safety instructions .............................................................. 26 2.
M668.book Seite 23 Donnerstag, 22. März 2012 10:57 10 Thank you! Thank you! Technical data Type of appliance : Double-brush sweeper Model : Duplex Model number : M668 (-0/-1/.../-8/-9) GB We are pleased that you have chosen the double-brush sweeper Duplex! Thanks for your purchase and your confidence in us. Power supply unit : 100...240 V~, input 50/60 Hz Power supply unit : 10 V DC, output 200 mA Battery pack : Ni-MH, 6 V DC, 1300 mAh Charging time : approx. 16 h Operating duration : approx.
M668.book Seite 24 Donnerstag, 22.
M668.book Seite 25 Donnerstag, 22.
M668.book Seite 26 Donnerstag, 22. März 2012 10:57 10 2 Safety instructions 2.1 2 About the operating manual Safety instructions WARNING: Warning concerning health hazards describing possible risks of injury. ATTENTION: Warning concerning possible dangers to the appliance or other objects. NOTE: Highlights tips and information. 2.2 Keep the operating manual in a safe place. If you pass the appliance on to someone else, give them the operating manual as well.
M668.book Seite 27 Donnerstag, 22. März 2012 10:57 10 2 Safety instructions About the battery pack supplied Wrong handling of the batteries can cause injury and explosion. Only use the power supply unit supplied with the appliance to charge the battery pack. Never charge the battery pack with another power supply unit. Use the power supply unit supplied solely to charge the battery pack of this appliance.
M668.book Seite 28 Donnerstag, 22. März 2012 10:57 10 3 Before first use 3.1 3 Unpacking Before first use 1. Unpack the appliance and all its accessories. ATTENTION: Keep the packaging for storing the appliance, or for it to be transported safely. Always transport or ship the appliance in its original packaging to avoid damage. 2. Check the contents for completeness and possible damage (Fig. 1). NOTE: Contact your dealer if you have found damage resulting from transport. 3.
M668.book Seite 29 Donnerstag, 22. März 2012 10:57 10 3 Before first use 3.3 Inserting the battery pack ATTENTION: Only insert into the appliance the battery pack supplied or an original battery pack that you have subsequently ordered. As long as you insert the battery pack with the contact first into the appliance, it is not important which way around you insert it. 1. Insert the battery pack with the contact first into the battery compartment (Fig. 5). 5 2.
M668.book Seite 30 Donnerstag, 22. März 2012 10:57 10 3 Before first use 3.4 Charging the battery pack WARNING: Danger of injury due to incorrect charging! Only use the power supply unit supplied with the appliance for charging. ATTENTION: Make sure you charge the batteries fully and then discharge them fully before using for the first time. Otherwise the battery pack’s service life would be reduced. NOTE: The battery pack is not charged when delivered.
M668.book Seite 31 Donnerstag, 22. März 2012 10:57 10 4 Use 4 Use ATTENTION: Check with the manufacturer of your flooring to see whether it is suited to being cleaned with an electric brush sweeper. 4.1 Switching on the appliance 0 2. Pull the tube towards you, thereby bending down the brush base. The brush base should now be on the floor however you hold the tube. 3. Switch on the brush sweeper by moving the slider switch to the ‘I’ position (Fig. 10).
M668.book Seite 32 Donnerstag, 22. März 2012 10:57 10 5 After use 5.1 5 Switching off After use 1. Put the slide switch to position ‘0’ (Fig. 12). 2. Move the tube until it is at right angles with the brush base and clicks into place and the appliance can stand on its own. 0 3. Empty the dust container if required ZChapter 5.3, ‘Emptying the dust container’. I 12 5.2 Transportation and storage Always carry the brush sweeper by its handle (Fig. 13).
M668.book Seite 33 Donnerstag, 22. März 2012 10:57 10 5 After use 5.3 Emptying the dust container Regularly empty the dust container for the best cleaning results. Even better is after every time you use it. 2. Press the dust container release catch (Fig. 14) and hold it down. NOTE: Hold down the release catch until you can empty the dust container into the bottom of a bin. This prevents dirt from falling out prematurely. 14 3.
M668.book Seite 34 Donnerstag, 22. März 2012 10:57 10 5 After use 5.4 Cleaning the brush rollers WARNING: Danger of injury caused by brush rollers starting up! Before beginning to remove the brush rollers, turn off the appliance and remove the battery pack. NOTE: The procedure for cleaning the wide, front brush roller and the narrow front brush roller is identical. We will describe the procedure using the wide brush roller as an example. 17 1. Switch off the appliance, ZChapter 5.1, ‘Switching off’. 2.
M668.book Seite 35 Donnerstag, 22. März 2012 10:57 10 5 After use GB 7. Guide the brush roller back into its shaft (Fig. 20). 20 8. After inserting the brush roller, rotate it until the bunch can move freely (Fig. 21). NOTE: Otherwise the entire front brush roller would be blocked. 21 9. If the last bunch can move freely (Fig. 21), lock the release catch of the brush roller by rotating it in the (Fig. 22) direction.
M668.book Seite 36 Donnerstag, 22. März 2012 10:57 10 5 After use Proceed as follows to clean the rear brush roller: 1. If you have not done so already: - Switch off the appliance ZChapter 5.1, ‘Switching off’. - Remove the battery pack ZChapter 3.3, ‘Inserting the battery pack’. - Put down the appliance so that the bottom of the brush roller is pointing up and the brush rollers are visible. 2. Unlock the V-belt cover (Fig. 23) and take it off. 23 3. Take the back brush roller out of its holder (Fig.
M668.book Seite 37 Donnerstag, 22. März 2012 10:57 10 6 Troubleshooting 6.1 6 If the appliance does not work as it should Troubleshooting See if you can solve the problem yourself by following the steps in the table below. The appliance will not switch on. Possible cause / solution The tube and/or the handle are not installed correctly. Push the tube or the handle powerfully into the holder as described ZChapter 3.2, ‘Attaching the tube and handle’.
M668.book Seite 38 Donnerstag, 22. März 2012 10:57 10 6 Troubleshooting 6.2 Ordering accessories and spare parts You can order the following accessories and spare parts: Item no. 6.
M668.book Seite 39 Donnerstag, 22. März 2012 10:57 10 7 Warranty Warranty conditions Warranty We offer a warranty of 24 months from the date of purchase for the appliances we sell. Within this warranty period, we will correct all defects free of charge that are due to material or manufacturing faults, either by repair work or replacing the appliance or accessories, at our discretion (damage to accessory parts does not automatically lead to the entire appliance being replaced).
M668.book Seite 40 Donnerstag, 22. März 2012 10:57 10 Sommaire Caractéristiques techniques ............................................................................ 41 Labels ............................................................................................................. 41 Sommaire 1 Vue d’ensemble ................................................................... 42 2 Consignes de sécurité ........................................................ 44 2.1 2.2 2.3 2.4 2.5 2.
M668.book Seite 41 Donnerstag, 22. März 2012 10:57 10 Merci beaucoup ! Merci beaucoup ! Caractéristiques techniques Type d'appareil : Balai électrique double brosse Modèle : Duplex Numéro de modèle: M668 (-0/-1/.../-8/-9) Courant d'entrée du bloc secteur : 100...240 V~, 50/60 Hz Courant de sortie : 10 V c.c., du bloc secteur 200 mA Batterie de piles re-: Ni-MH, 6 V c.c.
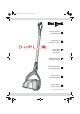
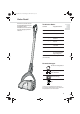
M668.book Seite 42 Donnerstag, 22. März 2012 10:57 10 1 Vue d’ensemble 1 Vue d’ensemble 1 9 10 1 Interrupteur à coulisse à trois positions - Position « 0 » : éteint.
M668.book Seite 43 Donnerstag, 22.
M668.book Seite 44 Donnerstag, 22. März 2012 10:57 10 2 Consignes de sécurité 2.1 2 Mode d'emploi Consignes de sécurité AVERTISSEMENT: Nous vous avertissons des dangers pouvant mettre en péril votre santé et vous informons sur les éventuels risques de blessures. ATTENTION: Nous attirons votre attention sur les risques pour l'appareil ou pour tout autre objet. REMARQUE: Les astuces et les informations sont bien mises en évidence. 2.
M668.book Seite 45 Donnerstag, 22. März 2012 10:57 10 2 Consignes de sécurité Batterie de piles fournie En cas d'utilisation abusive des piles rechargeables, il existe un risque de blessures et d'explosion. Utilisez pour charger la batterie le bloc secteur fourni à la livraison, à l'exclusion de tout autre. Ne rechargez jamais la batterie avec un autre bloc secteur. Utilisez le bloc secteur fourni à la livraison uniquement pour charger la batterie de cet appareil.
M668.book Seite 46 Donnerstag, 22. März 2012 10:57 10 3 Avant la première utilisation 3.1 3 Déballage Avant la première utilisation 1. Déballez l'appareil et les accessoires. ATTENTION: Conservez l'emballage pour ranger l'appareil ou pour expédier celui-ci de manière sûre. Expédiez l'appareil uniquement dans son emballage d'origine afin d'éviter tout dommage. 3.2 2. Vérifiez si le contenu est bien complet et ne présente aucun dommage (Fig. 1).
M668.book Seite 47 Donnerstag, 22. März 2012 10:57 10 3 Avant la première utilisation 3.3 Mettre en place la batterie ATTENTION: Utilisez uniquement la batterie de piles fournie ou une batterie d'origine achetée, à l'exclusion de toute autre. REMARQUE: Le sens de pose de la batterie est indifférent à condition de toujours poser la batterie, les contacts à l'avant. FR 1. Posez la batterie de piles rechargeables dans le compartiment de batterie, contacts à l'avant (Fig. 5). 5 2.
M668.book Seite 48 Donnerstag, 22. März 2012 10:57 10 3 Avant la première utilisation 3.4 Recharger la batterie AVERTISSEMENT: Un rechargement non conforme peut causer des blessures ! Utilisez pour le chargement des piles de la batterie uniquement le bloc secteur fourni à la livraison. ATTENTION: Prenez garde à ce que le cycle initial de recharge et décharge soit complet. Sinon la durée de vie des piles rechargeables sera réduite. REMARQUE: La batterie est fournie, piles rechargeables non chargées.
M668.book Seite 49 Donnerstag, 22. März 2012 10:57 10 4 Utilisation de l'appareil 4 Utilisation de l'appareil ATTENTION: Demandez au fabricant de votre revêtement de sol s'il peut être nettoyé avec un balai électrique. 4.1 Mise en marche de l'appareil 1. Posez l'appareil sur le sol. 0 2. Tirez le manche vers vous de manière à ce qu'il forme un certain angle avec le balai. Le balai doit toujours être à plat sur le sol, peu importe la manière dont vous tenez le manche.
M668.book Seite 50 Donnerstag, 22. März 2012 10:57 10 5 Après utilisation 5.1 5 Éteindre l'appareil Après utilisation 1. Poussez l'interrupteur à coulisse en position « 0 » (Fig. 12). 2. Poussez le manche en position verticale par rapport au pied jusqu'à ce qu'il s'enclenche et l'appareil s'arrête. 0 3. Videz le bac à poussière chaque fois que nécessaire (ZChapitre 5.3, « Vidage du bac à poussières »). I 12 5.
M668.book Seite 51 Donnerstag, 22. März 2012 10:57 10 5 Après utilisation 5.3 Vidage du bac à poussières Pour un nettoyage parfait, videz le bac à poussières régulièrement, au mieux après chaque séance, en procédant de la manière suivante : 1. Assurez-vous que l'appareil est éteint. 2. Appuyez sur la touche de déverrouillage du bac à poussières (Fig. 14) en la gardant enfoncée. REMARQUE: 14 3. Enlevez le bac à poussières du pied du balai par le haut en gardant la touche de déverrouillage enfoncée (Fig.
M668.book Seite 52 Donnerstag, 22. März 2012 10:57 10 5 Après utilisation 5.4 Nettoyage des rouleaux brosses AVERTISSEMENT: Risque de blessures au démarrage des rouleaux brosses ! Avant de procéder à la dépose des rouleaux brosses, éteignez l'appareil et enlevez la batterie de piles. REMARQUE: La procédure à suivre pour nettoyer le rouleau brosse long avant est identique à celle pour le rouleau brosse avant court. La description qui suit prend à titre d'exemple le rouleau brosse long. 17 1.
M668.book Seite 53 Donnerstag, 22. März 2012 10:57 10 5 Après utilisation 7. Reposez le rouleau brosse dans son logement (Fig. 20). 8. Après la pose, faites tourner le rouleau brosse jusqu'à ce qu'il tourne librement (Fig. 21). REMARQUE: Sinon, le rouleau brosse avant complet risque d'être bloqué. 21 9. Une fois que toutes les brosses tournent librement (Fig. 21), verrouillez le rouleau brosse en le tournant dans le sens (Fig. 22).
M668.book Seite 54 Donnerstag, 22. März 2012 10:57 10 5 Après utilisation Pour nettoyer le rouleau brosse arrière, procédez comme suit : 1. Au cas où cela n'aurait pas été fait : - Éteignez l'appareil, ZChapitre 5.1, « Éteindre l'appareil ». - Enlevez la batterie de piles, ZChapitre 3.3, « Mettre en place la batterie ». - Couchez l'appareil de manière à ce que la face inférieure du balai soit tournée vers le haut en montrant les rouleaux brosses. 2.
M668.book Seite 55 Donnerstag, 22. März 2012 10:57 10 6 Dépannage 6.1 6 Si l'appareil ne fonctionne pas comme il devrait Dépannage Vérifiez, en vous aidant du tableau ci-dessous, si vous pouvez remédier vous-même à l'anomalie. Problème Impossible de mettre en marche l'appareil. Cause possible / solutions Le manche et/ou la poignée ne sont pas montés correctement. Poussez le manche ou la poignée fermement dans son logement, comme décrit ZChapitre 3.2, « Monter le manche et la poignée ».
M668.book Seite 56 Donnerstag, 22. März 2012 10:57 10 6 Dépannage 6.2 Commande de pièces de rechange et accessoires Vous pouvez commander ultérieurement les pièces détachées et les accessoires suivants : Numéro d'article Description 0668001 Kit de deux rouleaux-brosses (rouleau brosse avant, 1 court, 1 long) 0668002 1 bloc secteur 0668003 1 batterie de piles 0668004 1 rouleau brosse arrière 6.
M668.book Seite 57 Donnerstag, 22. März 2012 10:57 10 7 Garantie Conditions de garantie Garantie Nous assurons une garantie de 24 mois sur votre appareil à compter de la date d'achat. Pendant la garantie, nous nous réservons le droit de réparer ou de remplacer l'appareil ou ses accessoires gratuitement (des accessoires endommagés n'impliquent pas forcément le remplacement de l'appareil) afin de remédier à tout défaut lié au matériel ou à la fabrication.
M668.book Seite 130 Donnerstag, 22. März 2012 10:57 10 International Service D International Service DE Royal Appliance International GmbH Abt. Kundenservice Jagenbergstraße 19 41468 Neuss DEUTSCHLAND AT Zmugg Elektronik Service und Vertriebges. M.b.H. Fabriksgasse 27 8020 Graz ÖSTERREICH BE Z.E.S. Goes B.V. T.a.v. afd. Service Pearyweg 1 4462 GT Goes NEDERLAND Tel.: +49 (0) 180 - 501 50 50* Tel. +43 - 316 - 77 21 20 Tel: +31 - 113 - 24 07 00 Tel.
M668.book Seite 131 Donnerstag, 22.
M668.book Seite 132 Donnerstag, 22. März 2012 10:57 10 Royal Appliance International GmbH Jagenbergstraße 19 41468 Neuss Germany servicecenter@dirtdevil.de www.dirtdevil.de +49 (0) 1805 - 10 90 19* +49 (0) 2131 - 60 90 60 95 DE * 0,14 €/Minute aus dem deutschen Festnetz, deutscher Mobilfunkhöchstpreis 0,42 €/Minute; Die Gebühren für Telefonate aus dem Ausland (also außerhalb von Deutschland) richten sich nach den Preisen der jeweiligen ausländischen Anbieter und der jeweils aktuellen Tarife. GB * € 0.