AC150, 25 0 , 350 DE Bedienungsanleitung Luftreiniger GB Operating Manual Air cleaner FR Mode d'emploi épurateur d’air NL Bedieningshandleiding Luchtreiniger ES Manual de instrucciones Purificador de aire IT Istruzioni per l'uso Purificatore d'aria TR Kullanim Klavuzu Hava temizleyici Roya-30033 • A5 • 12.02.
Operating Manual ............................................................. 18 - 31 Mode d'emploi ................................................................... 32 - 45 Bedieningshandleiding..................................................... 46 - 59 Manual de instrucciones ................................................... 60 - 73 Istruzioni per l'uso ......................................................... 74 - 87 IT Kullanim Klavuzu...................................................
1 2 3 4 D 1 5 6 5 7 8 9 11 10 12 14 3 13
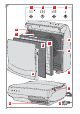
Ihr Luftreiniger Es freut uns, dass Sie sich für unseren Luftreiniger entschieden haben. Wir danken Ihnen für den Kauf und das entgegengebrachte Vertrauen! Bedienpanel und Geräteteile (Abb. 1) 1 Filter wechseln und resetten 4 Power | „Odor Filter“: Karbon-Filter wechseln | Gerät ein-/ausschalten | „HEPA“: HEPA-Filter wechseln Z Kapitel 3.2, „Einschalten“ Z Kapitel 4.2, „Karbon-Filter wechseln“ 5 Tasten zur Entriegelung der Frontblende Z Kapitel 4.
Inhaltsverzeichnis 1 Sicherheitshinweise ................................................................ 6 1.1 1.2 1.3 1.4 1.5 zur Bedienungsanleitung................................................................................................... zu bestimmten Personengruppen ..................................................................................... zur Stromversorgung.........................................................................................................
1 Sicherheitshinweise 1.1 zur Bedienungsanleitung Lesen Sie diese Bedienungsanleitung vollständig durch, bevor Sie mit dem Gerät arbeiten. Bewahren Sie die Anleitung gut auf. Falls Sie das Gerät an Dritte weitergeben, geben Sie auch die Bedienungsanleitung mit. Die Nichtbeachtung dieser Anleitung kann zu schweren Verletzungen oder Schäden am Gerät führen. Für Schäden, die aufgrund der Nichtbeachtung dieser Bedienungsanleitung entstehen, übernehmen wir keine Haftung.
1.3 zur Stromversorgung Das Gerät wird mit elektrischem Strom betrieben, dabei besteht grundsätzlich die Gefahr eines elektrischen Schlags. Deshalb: Tauchen Sie das Gerät niemals in Wasser oder andere Flüssigkeiten. Halten Sie es von Regen und Nässe fern. Betreiben Sie das Gerät nicht im Freien oder in Räumen mit hoher Luftfeuchtigkeit. Fassen Sie den Stecker nie mit nassen Händen an. Wenn Sie den Stecker aus der Steckdose herausziehen wollen, ziehen Sie immer direkt am Stecker.
1.5 zur bestimmungsgemäßen Verwendung Setzen Sie den Luftreiniger ausschließlich im Haushalt ein. Er ist für eine gewerbliche Nutzung nicht geeignet. Setzen Sie den Luftreiniger ausschließlich im Haushalt für das Reinigen von kühler, trockener Raumluft ein. Jede weitere Verwendung gilt als nicht bestimmungsgemäß und ist untersagt. Verboten ist insbesondere: Das Ansaugen von Luft, die mit giftigen Dämpfen oder Gasen sowie Abgasen oder Rauchgasen oder mikrobiologisch belastet ist.
2 Auspacken und Aufstellen 2.1 Auspacken Packen Sie das Gerät und alle Zubehörteile aus und überprüfen Sie den Inhalt auf Unversehrtheit und Vollständigkeit (ZSeite 4, „Ihr Luftreiniger“). ACHTUNG: Versenden Sie das Gerät grundsätzlich in der Originalverpackung, damit es keinen Schaden nimmt. Heben Sie dazu die Verpackung auf. Entsorgen Sie nicht mehr benötigtes Verpackungsmaterial gemäß den in Ihrem Land geltenden Vorschriften.
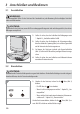
3 Anschließen und Bedienen 3.1 Anschließen WARNUNG: Verletzungsgefahr! Prüfen Sie das Gerät und das Stromkabel vor jeder Benutzung. Ein beschädigtes Gerät darf nicht verwendet werden. ACHTUNG: Verwenden Sie das Gerät nur, wenn alle Filter ordnungsgemäß eingesetzt sind und sichergestellt ist, dass keine Öffnungen verstopft sind. 2 1. Stellen Sie sicher, dass der Aufstellort die Bedingungen unter ZKapitel 2.2, „Aufstellort wählen“ erfüllt. 2.
3.3 Leistung wählen 4 1. Wählen Sie am eingeschalteten Gerät die Leistung über die -Taste (Abb. 4): - „L“: Gerät läuft besonders leise - „M“: mittlere Einstellung - „H“: Gerät läuft mit hoher Drehzahl. Die LED zeigt die jeweils aktuelle Einstellung an. 3.4 Timer einstellen Wenn das Gerät eine bestimmte Zeit laufen und sich danach selbstständig abschalten soll, empfiehlt sich die Verwendung der Timer-Funktion: 5 1.
4 Gerät pflegen WARNUNG: Verletzungsgefahr! Bevor Sie das Gerät reinigen oder warten, schalten Sie das Gerät aus und ziehen Sie den Stecker aus der Steckdose. ACHTUNG: Ein nicht ausreichend gepflegtes Gerät arbeitet weniger effizient. bei Bedarf: Gehäuse reinigen (ZKapitel 4.1, „Gehäuse reinigen“). alle 3 Monate bzw. sobald die LED „Odor Filter“ leuchtet: ZKapitel 4.2, „Karbon-Filter wechseln“ alle 6 Monate bzw. sobald die LED „HEPA“ leuchtet: ZKapitel 4.3, „HEPA-Filter wechseln“ 4.
4.2 7 Karbon-Filter wechseln 1. Stellen Sie sicher, dass der Stecker aus der Steckdose gezogen ist. 2. Drücken Sie die Entriegelungstasten der Frontblende (Abb. 7). Nehmen Sie die Frontblende vorsichtig ab. 8 3. Ziehen Sie den ausgedienten Karbon-Filter vom HEPA-Filter (Abb. 8). ACHTUNG: Der Karbon-Filter kann nicht gereinigt werden. Er kann nur ersetzt werden (Bestelldaten siehe ZKapitel 5.3, „Zubehör- und Ersatzteilliste“). HINWEIS: Den ausgedienten Filter können Sie im Hausmüll entsorgen. 4.
4.3 11 HEPA-Filter wechseln 1. Stellen Sie sicher, dass der Stecker aus der Steckdose gezogen ist. 2. Drücken Sie die Entriegelungstasten der Frontblende (Abb. 11). Nehmen Sie die Frontblende vorsichtig ab (Abb. 11). 3. Ziehen Sie den Karbon-Filter vom HEPA-Filter (Abb. 8). HINWEIS: 12 Wenn Sie den Karbon-Filter nicht auch gleich ersetzen wollen, merken Sie sich, welche Seite dem HEPA-Filter zugewandt war.
4.4 15 Filterwechsel LED zurücksetzen Wenn eine der beiden Filterwechsel-LEDs („Odor Filter“ bzw. „HEPA“) nach dem Filterwechsel noch immer leuchtet, obwohl sie den betreffenden Filter gegen einen neuen getauscht haben: 1. Drücken Sie die LED erlischt.
5 Probleme beheben 5.1 Probleme selbst beheben Bevor Sie die Service-Hotline (+49 (0) 180 - 501 50 50 *) kontaktieren, überprüfen Sie anhand der folgenden Tabelle, ob Sie das Problem selbst beheben können. *0,14 €/Minute aus dem deutschen Festnetz (deutscher Mobilfunkhöchstpreis 0,42 €/Minute) WARNUNG: Verwenden Sie niemals ein defektes Gerät oder ein Gerät mit defektem Stromkabel. Bevor Sie das Problem suchen, schalten Sie das Gerät aus und ziehen Sie den Stecker aus der Steckdose.
5.2 Hotline und Kundenservice Royal Appliance International GmbH Abt. Kundenservice Jagenbergstr. 19 41468 Neuss Deutschland Tel.: +49 (0) 180 - 501 50 50* Fax: +49 (0) 2131 / 60 90 60 95 de@dirtdevil-service.eu www.dirtdevil.de *0,14 €/Minute aus dem deutschen Festnetz (deutscher Mobilfunkhöchstpreis 0,42 €/Minute) Die Kosten für Telefonate aus dem Ausland richten sich nach den Gebühren der jeweiligen ausländischen Anbieter und der jeweiligen aktuellen Tarife.
Your air purifier We are pleased that you have chosen our air purifier. Thank you for your purchase and your confidence in us. Operating panel and parts of the appliance (Fig. 1) 1 Replacing and resetting the filter 4 Power | "Odor Filter": Replacing the carbon filter | Switches the appliance on/off | "HEPA": Replacing the HEPA filter Z chapter 3.2, „Switching on“ Z chapter 4.2, „Replacing the carbon filter“ 5 Buttons to release the front panel Z chapter 4.
Table of contents 1.1 1.2 1.3 1.4 1.5 Re: Operating Manual........................................................................................................ Concerning certain groups of persons................................................................................ Re: Power supply ............................................................................................................... If the appliance is faulty............................................................................
1 Safety instructions 1.1 Re: Operating Manual Read the operating manual completely before working with the appliance. Keep the operating manual in a safe place. If you pass the appliance on to someone else, give them the operating manual as well. Failure to comply with this operating manual can lead to serious injuries or damage to the appliance. We assume no liability for damage that occurs as a result of failure to comply with the instructions in this operating manual.
1.4 If the appliance is faulty Never operate a faulty appliance or an appliance with a faulty cord. If the power cord of this appliance is damaged it must be replaced by the manufacturer, their authorised service representative or a similarly qualified person to avoid danger. Hand over a faulty appliance to an authorised dealer or the Customer Service department for repairs. Address Zpage 102, „International Service“. 21 GB 1.
1.5 Re: Proper use Only ever use the air purifier domestically. It is not suitable for commercial use. Only use the air purifier domestically for purifying cool, dry room air. Any other use is considered improper use and is prohibited. In particular, the following is prohibited: Suctioning air which is contaminated with toxic vapours or gases, exhaust or flue gases or has microbiological contamination.
2 Unpacking and setting up 2.1 Unpacking Unpack the appliance and all accessory parts and check that the contents are undamaged and complete (Zpage 18, „Your air purifier“). NOTE: Contact our service representative immediately if you notice any transport damage Zpage 102, „International Service“. 2.
3 Connecting and operating 3.1 Connecting WARNING: Risk of injury! Check the appliance and its power cord before every use. A damaged appliance must never be used. CAUTION: Only use the appliance if you have made sure that all the filters are properly in place and no openings are blocked. 2 1. Make sure that the location for installation meets all the requirements in Zchapter 2.2, „Selecting the location for installation“. 2.
3.3 Selecting the power 4 1. Select the power on the appliance when it is switched on using the button (Fig. 4): - "L": appliance runs particularly quietly - "M": medium setting - "H": appliance runs at high speed. GB The LED shows the respective current setting. 3.4 Setting the timer If you want the appliance to run for a certain time and then switch off automatically, it is recommendable to use the timer function: 5 1.
4 Caring for the appliance WARNING: Risk of injury! Before you clean or maintain the appliance, switch off the appliance and pull the plug from the mains socket. CAUTION: The appliance will run less efficiently if it is not cared for sufficiently. As required: Clean the housing (Zchapter 4.1, „Cleaning the housing“). Every 3 months or as soon as the "Odor Filter" LED lights up: Zchapter 4.2, „Replacing the carbon filter“ Every 6 months or as soon as the "HEPA" LED lights up: Zchapter 4.
4.2 7 Replacing the carbon filter 1. Make sure that the plug has been disconnected from the mains socket. GB 2. Push the release catches on the front panel (Fig. 7). Carefully remove the front panel. 8 3. Remove the used carbon filter from the HEPA filter (Fig. 8). CAUTION: The carbon filter cannot be cleaned. It can only be replaced (for ordering details see Zchapter 5.3, „Accessories and spare parts“). NOTE: Dispose of the used filter with the domestic waste. 4. Unpack the new carbon filter. 5.
4.3 11 Replacing the HEPA filter 1. Make sure that the plug has been disconnected from the mains socket. 2. Push the release catches on the front panel (Fig. 11). Carefully remove the front panel (Fig. 11). 3. Remove the carbon filter from the HEPA filter (Fig. 8). NOTE: 12 If you do not want to replace the carbon filter at the same time, make a note of which side was facing the HEPA filter. This is important so that no dirt gets into the HEPA filter when re-fitting. 4. Remove the used HEPA filter (Fig.
15 Resetting the filter change LED If one of the two filter change LEDs ("Odor Filter" or "HEPA") is still lit up after replacing the filter although you have replaced the filter in question with a new one: 1. Press and hold the button until the LED goes out. GB 4.
5 Solving problems 5.1 Correcting problems yourself Before contacting the service hotline (Zpage 102, „International Service“), please check if you can solve the problem yourself using the following table. WARNING: Never use a faulty appliance or operate an appliance with a faulty power cord. Before you try to localise the problem, switch off the appliance and pull the plug from the mains socket. Problem Possible cause The appliance will The power cord is not not start plugged in.
5.2 Hotline and customer service Zpage 102, „International Service“ NOTE: 5.3 GB This operating manual is available in electronic form. Simply visit www.dirtdevil.com and look for "OPERATING MANUALS" in the download area. Enter the model number of the appliance and download the corresponding PDF. Accessories and spare parts AC150 AC250 AC350 150012 Front panel (Fig. 1/10) 250012 Front panel (Fig. 1/10) 350012 Front panel (Fig.
Votre épurateur d’air Nous sommes heureux de vous compter parmi les utilisateurs de notre épurateur d’air ! Nous vous remercions de cet achat et de votre confiance ! Tableau de commande et éléments de l'appareil (Ill. 1) 1 Changer les filtres et reset 4 Power | „Odor Filter“ : Changer le filtre en carbone | Marche/Arrêt de l'appareil | „HEPA“ : Changer le filtre HEPA Z chapitre 3.2, „Mise en marche“ Z chapitre 4.
Sommaire 1 Consignes de sécurité .............................................................. 34 1.1 1.2 1.3 1.4 1.5 À propos du mode d'emploi............................................................................................... Indications relatives à certains groupes de personnes ....................................................... À propos de l'alimentation électrique................................................................................ Si l'aspirateur est défectueux.............
1 Consignes de sécurité 1.1 À propos du mode d'emploi Veuillez lire attentivement et intégralement ce mode d'emploi, avant de vous servir de l'appareil. Conservez précieusement ce mode d'emploi. Remettez toujours le mode d'emploi à toute personne se servant de l'appareil. Le non-respect de ce mode d'emploi peut entraîner des blessures graves ou des dommages irréparables à l'appareil. Nous déclinons toute responsabilité pour des dommages résultant du non respect de ce mode d'emploi.
1.3 À propos de l'alimentation électrique L'appareil est alimenté par du courant électrique, ce qui implique par principe un risque d'électrocution. C'est pourquoi : Ne trempez jamais l'appareil dans l'eau ou dans d'autres liquides. Conservez-le à l'abri de la pluie et de l'eau. N'utilisez jamais l'appareil à l'extérieur ou dans des locaux très humides. Ne touchez jamais la prise avec des mains mouillées. Pour débrancher l'appareil, tirez toujours sur la fiche.
1.5 Utilisation conforme à la destination Utilisez l'épurateur d’air uniquement à domicile. Toute utilisation à titre professionnel est strictement interdite. Utilisez l'épurateur d’air uniquement à domicile, pour purifier de l'air ambiant frais et sec. Toute autre utilisation est considérée comme non conforme et est interdite.
2 Déballage et installation 2.1 Déballage Déballez l'appareil et tous ses accessoires, puis vérifiez si le contenu est bien complet et en bon état (Zpage 38, „Votre épurateur d’air“). ATTENTION: Expédiez l'appareil uniquement dans son emballage d'origine afin d'éviter tout dommage. Conservez à cet effet soigneusement l'emballage. Jetez les emballages dont vous n'avez plus besoin conformément aux réglementations nationales et locales en vigueur.
3 Branchement et fonctionnement 3.1 Branchement AVERTISSEMENT: Risque de blessures ! Avant tout emploi, vérifiez l'appareil et le cordon d'alimentation. N'utilisez jamais un appareil qui est endommagé. ATTENTION: Utilisez l'appareil uniquement lorsque tous les filtres sont correctement montés et après vous être assuré qu'aucune ouverture ne soit bouchée. 2 1. Assurez-vous que le lieu d'installation remplit les conditions indiquées au Zchapitre 2.2, „Choix du lieu d'installation“. 2.
3.3 4 Sélection de la puissance 1. Sélectionner la puissance sur l'appareil en marche avec la touche (Ill. 4) : - „L“ : L'appareil est particulièrement silencieux - „M“ : Réglage moyen - „H“ : L'appareil fonctionne à régime élevé. 3.4 FR La LED indique le réglage actuel. Réglage de la minuterie Si l'appareil doit fonctionner pendant un certain temps, et s'arrêter ensuite tout seul, il est recommandé d'utiliser la fonction Minuterie : 5 1.
4 Entretien de l'appareil AVERTISSEMENT: Risque de blessures ! Avant de nettoyer ou d'entretenir l'appareil, éteignez-le et débranchez-le. ATTENTION: Un appareil qui n'est pas assez entretenu, est moins efficace. Si nécessaire : nettoyez le corps de l'appareil (Zchapitre 4.1, „Nettoyage du boîtier de l'aspirateur“). Tous les 3 mois ou dès que la LED „Odor Filter“ s'allume : Zchapitre 4.2, „Changer le filtre en carbone“ Tous les 6 mois ou dès que la LED „HEPA“ s'allume : Zchapitre 4.
4.2 7 Changer le filtre en carbone 1. Assurez-vous que l'appareil est débranché. 2. Appuyez sur les touches de déverrouillage du cache avant (Ill. 7). Enlever avec précaution le cache avant. 3. Enlevez le filtre en carbone usager du filtre HEPA (Ill. 8). FR 8 ATTENTION: Il n'est pas possible de nettoyer le filtre en carbone. Il faut le changer (données pour la commande, cf. Zchapitre 5.3, „Liste des accessoires et des pièces de rechange“).
4.3 11 Changer le filtre HEPA 1. Assurez-vous que l'appareil est débranché. 2. Appuyez sur les touches de déverrouillage du cache avant (Ill. 11). Enlever avec précaution le cache avant (Ill. 11). 3. Enlevez le filtre en carbone du filtre HEPA (Ill. 8). REMARQUE: 12 Si vous ne voulez pas changer en même temps le filtre en carbone, notez le côté qui se trouve contre le filtre HEPA. C'est important pour qu'après la remise en place, il n'y ait toujours pas de saletés qui rentrent dans le filtre HEPA. 4.
15 Réinitialiser la LED du changement Si l'une des deux LED de changement du filtre („Odor Filter“ ou „HEPA“) est encore allumée après le changement du filtre, bien que vous ayez changé le filtre correspondant : 1. Appuyez sur la touche que la LED s'éteigne. , et maintenez-là enfoncée jusqu'à ce FR 4.
5 Solutions en cas de problèmes 5.1 Résoudre vous-même les problèmes Avant de contacter l'assistance téléphonique (Zpage 102, „International Service“), vérifiez si vous pouvez éliminer le problème par vous-même à l'aide du tableau ci-après. AVERTISSEMENT: N'utilisez jamais un appareil défectueux ou ayant un cordon d'alimentation abîmé. Avant de rechercher la cause du problème, éteignez et débranchez l'appareil.
5.2 Assistance téléphonique et service clientèle Zpage 102, „International Service“ REMARQUE: Ce manuel est également disponible sous forme électronique. Il suffit d'aller pour cela sur le site www.dirtdevil.de dans la zone de téléchargement à "MODES D'EMPLOI". Tapez le numéro du modèle de l'appareil, et téléchargez le fichier PDF correspondant. Liste des accessoires et des pièces de rechange AC150 AC250 150012 Cache avant (Ill. 1/10) 250012 Cache avant (Ill. 1/10) AC350 350012 Cache avant (Ill.
International Service DE Royal Appliance International GmbH Abt. Kundenservice Jagenbergstraße 19 41468 Neuss DEUTSCHLAND de@dirtdevil-service.eu * www.dirtdevil.de *0,14 €/min aus dem deutschen Festnetz (deutscher Mobilfunkpreis 0,42 €/min); Die Kosten für Telefonate aus dem Ausland richten sich nach den Gebühren der jeweiligen ausländischen Anbieter und der jeweiligen aktuellen Tarife. 0049 (0) 180 - 501 50 50* 0049 (0) 2131 - 60 90 60 95 ** AT AT at@dirtdevil-service.
International Service BE be@dirtdevil-service.eu 0032 - 2 - 80 85 065** NL nl@dirtdevil-service.eu ** NL BE LU **De kosten voor telefoongesprekken vanuit het buitenland (dus buiten Duitsland) richten zich naar de prijzen van de betreffende buitenlandse aanbieders en de betreffende actuele tarieven. 0031 - 20 - 80 85 408** ** LU lu@dirtdevil-service.
International Service BG bg@dirtdevil-service.eu 00359 - 2 - 49 25 116** GR gr@dirtdevil-service.eu 0030 - 2 - 11 19 81 203** HU hu@dirtdevil-service.eu 0036 - 1 - 84 80 686** PL BG ** ( ) .
DE NUR GÜLTIG MIT RECHNUNGSKOPIE! GB VALID ONLY INCLUDING A COPY OF THE PURCHASE SLIP! FR VALABLE UNIQUEMENT AVEC UNE COPIE DE LA FACTURE! NL ALLEEN GELDIG MET KOPIE VAN DE REKENING! ES ¡VÁLIDO SÓLO CON COPIA DE FACTURA! IT VALIDO SOLO SE CORREDATO DA UNA COPIA DELLA FATTURA! TR SADECE FATURA SURET LE GEÇERLDR! AC150, AC250, AC350 Servicekarte • Service Card • Carte de service • Servicekaart Tarjeta de servicio • Scheda di assistenza • Servis kartı Name • Name • Nom • Naam • Nombres y ape
Royal Appliance International GmbH Jagenbergstraße 19 41468 Neuss Germany de@dirtdevil-service.eu www.dirtdevil.de +49 (0) 180 - 501 50 50* +49 (0) 2131 - 60 90 60 95 DE * 0,14 €/Minute aus dem deutschen Festnetz, deutscher Mobilfunkhöchstpreis 0,42 €/Minute; Die Gebühren für Telefonate aus dem Ausland (also außerhalb von Deutschland) richten sich nach den Preisen der jeweiligen ausländischen Anbieter und der jeweils aktuellen Tarife. GB * € 0.