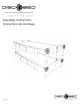
Assembly Instructions Instructions de montage AI30001BO discobed.
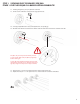
IMPORTANT INFORMATION CONCERNING THIS PRODUCT TO PREVENT SERIOUS OR FATAL INJURIES Keep these instructions for future reference 1. 2. 3. 4. 5. 6. 7. 8. 9. 10. 11. 12. Read carefully and fully understand the manufacturer’s assembly. Care and special attention should be used where a warning is indicated. Never allow a child under 6 years of age on the top bed. Only one person allowed on each level. Use the bunk as it is intended – DO NOT triple stack.
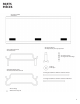
PARTS PIÈCES 2x Sleeping Mats 2x Matelas 2x Straight End Frames 2x Cadres droits 4x Stack Adapters 4x Adaptateurs pour superposition 2x Locking Straps 2x Sangles de vérouillage 8x Discs 8x Disques 2x Rounded End Frames 2x Cadres d’extrémité arrondis 4x Straight Side Rails / 4x Barres latérales droites 8x Swaged Side Rails / 8x Barres latérales embouties 4x Foot Plugs 4x Bouchons de pied 2
3
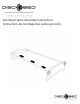
Rounded Frame Assembly Instructions Instructions de montage des cadres arrondis discobed.
STEP 1. SECURING DISC TO SWAGED SIDE RAIL ÉTAPE 1. FIXEZ LE DISQUE À LA BARRE LATÉRALE EMBOUTIE 1.1. Holding swaged rail, press pin (A) down and hold. 1.1. Tenez la barre emboutie et maintenez la tige (A) enfoncée. B A 1.2. Line up pin (B) with hole in disc, insert rail into disc. Let pin (A) go. 1.2. Alignez la tige (B) avec le trou dans le disque, insérez la barre dans le disque et relâchez la tige (A). B B A A Pin (B) is only securely locked in when you hear a ‘click’ sound.
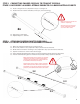
STEP 2. CONNECTING SWAGED SIDE RAIL TO STRAIGHT SIDE RAIL ÉTAPE 2. RACCORDEZ LA BARRE LATÉRALE EMBOUTIE À LA BARRE LATÉRALE DROITE 2.1. Attach a swaged side rail (completed in step 1) to a straight rail. 2.1. Attachez une barre latérale emboutie (voir étape 1) à une barre droite. Make sure they slide into one another completely. Assurez-vous que les barres soient complèment enfoncées l’une dans l’autre. 2x 2.2. Repeat step 2.1 two times. 2.2. Répétez l’étape 2.1. deux fois. STEP 3.
STEP 4. SECURING EACH DISC INTO THE END FRAME ÉTAPE 4. FIXEZ CHAQUE DISQUE DANS LE CADRE DE LIT 4.1. Make sure pin (A) is visible, is not covered by the sleeping mat and is facing inwards. Check all four bed posts (see diag. 4.1). 4.2. Loosely place each disc into the loop of the bed end frame, ensure your fingers are not in the way and firmly push down on the side rail (see diag. 4.2). 4.3. Make sure the disc fits completely into the bed end frame (see diag. 4.3). 4.4. Repeat steps 4.1, 4.2 and 4.
THE ASSEMBLY OF YOUR DISC-O-BED® L/XL ROUND FRAME SINGLE COT IS NOW COMPLETE. LE MONTAGE DE VOTRE DISC-O-BED® L/XL À CADRES ARRONDIS EST MAINTENANT TERMINÉ. STEP 5. STRAIGHT FRAME ASSEMBLY ÉTAPE 5. MONTAGE DES CADRES DROITS 5.1. Follow steps 1 - 4 to complete the assembly of the straight frame single cot. 5.1. Suivez les étapes 1 à 4 pour terminer le montage du lit simple à cadres droits. THE ASSEMBLY OF YOUR DISC-O-BED® L/XL STRAIGHT FRAME SINGLE COT IS NOW COMPLETE.
9
Bunk Assembly Instructions Instructions de montage pour les lits superposés discobed.
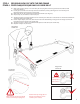
STEP 1. REMOVE FOOT PLUGS ÉTAPE 1. RETIREZ LES BOUCHONS DE PIED. 1.1. Remove the 4 foot plugs from the straight bed end frame. 1.1. Retirez les 4 bouchons de pied du cadre d’extrémité droit. 3 2 4 1 STEP 2. ATTACH STACK ADAPTERS TO STRAIGHT LEG BED END FRAME ÉTAPE 2. ATTACHEZ LES ADAPTATEURS DE SUPERPOSITION AUX JAMBES DROITES DU CADRE D’EXTRÉMITÉ 2.1. Press pin (A) down on stack adapter and hold. 2.1. Enfoncez la tige (A) sur l’adaptateur de superposition et maintenez-la enfoncée. 2.2.
STEP 3. STACK STRAIGHT END FRAME ONTO ROUNDED END FRAME ÉTAPE 3. SUPERPOSEZ LE CADRE D’EXTRÉMITÉ DROIT SUR LE CADRE D’EXTRÉMITÉ ARRONDI 3.1. Place straight end frame (fitted with stack adapters completed in step 2) onto rounded end frame. 3.1. Placez le cadre d’extrémité droit (avec les adaptateurs tel qu’expliqué à l’étape 2) sur le cadre d’extrémité arrondi. 3 4 1 2 STEP 4. CORRECT STACK ADAPTER FITMENT ÉTAPE 4. CORRIGEZ L’AJUSTEMENT DE L’ADAPTATEUR DE SUPERPOSITION 4.1.
STEP 5. ATTACHING LOCKING STRAP ÉTAPE 5. ATTACHEZ LES SANGLES DE VÉROUILLAGE. 5.1. Feed locking strap through bed end frames and lock each buckle (1 and 2) onto the end frames. 5.2. Pull down on strap in order to secure bunk in position and ensure there is no movement. 5.3. Repeat step 5.1 and 5.2 at other bed end. 5.1. Passez la sangle de verrouillage à travers le cadre à l’extrémité et attachez chaque boucle (1 et 2) aux extrémités du cadre. 5.2.
Bench Setup La Conversion du banc discobed.
STEP 1. SETTING UP BACK REST ÉTAPE 1. POSITIONNEMENT DU DOSSIER 1.1. Lift discs 1 and 2 out of bed end frame of top cot. 1.1. Soulevez les disques 1 et 2 du cadre d’extrémité du lit inférieur. 2 1 1.2. Place discs 1 and 2 on bed end rail of bottom cot. 1.2. Placez les disques 1 et 2 sur la barre du cadre d’extrémité du lit inférieur.
1.3 Let disc rest between bed end rail and stack adapter. The disc should not be able to roll forward. 1.3 Les disques doivent être posés entre la barre du cadre d’extrémité et l’adaptateur de superposition. Les disques ne devraient pas rouler vers l’avant. 1 2 YOU HAVE NOW SUCCESSFULLY COMPLETED THE ASSEMBLY OF YOUR DISC-O-BED® L/XL BENCH. VOUS AVEZ MAINTENANT MONTÉ AVEC SUCCÈS VOTRE BANC DISC-O-BED® L/XL.
IMPORTANT TO NOTE WHEN CONVERTING YOUR DISC-O-BED® L/XL BENCH BACK TO A BUNK CONFIGURATION Make sure pin (A) is facing inwards and not covered by sleeping mat. NOTEZ BIEN LORS DE LA RECONVERSION DE VOTRE BANC DISC-O-BED® L/XL EN LITS SUPERPOSÉS Assurez-vous que la tige (A) soit tournée vers l’intérieur et non couverte par le matelas.
Side Organizer Assembly Instructions (Optional accessory - may not come standard with your Disc-O-Bed® L/XL) Instructions de montage de l’accessoire du rangement latéral (Accessoire en option - ne vient pas de norme avec votre Disc-O-Bed® L/XL) discobed.
STEP 1. SETTING UP SIDE-ORGANIZER ÉTAPE 1.
Package Instructions Instructions pour le rangement L Rounded and straight frame / Cadre large arrondi et cadre droit XL Rounded and straight frame / Cadre extra-large arrondi et cadre droit 20
5 POINT CHECK LIST Make sure that these simple checks are followed PRIOR TO EACH use of your Disc-O-Bed® L/XL. 1. 2. 3. 4. 5. The pin (B) is securely locked in to the disc. STEP 1 page 5. Side rails fit into one another completely. Should feel smooth to the touch. STEP 3 page 6. The pin (A) is facing inwards before fitting the disc into bed end frame. STEP 4 page 7. The disc is snug and completely fitted into the loop of the bed end frame. STEP 4 page 7. The locking strap is tight and secure.
LIMITED WARRANTY DISC-O-BED® (“MANUFACTURER”) warrants only that this product shall be free from defects in materials and workmanship for a period of one year after the date of delivery.
IMPORTANT SAFETY WARNING 1. Refer to the assembly instructions and ensure that the 5 point check list is followed prior to each use. Give special care and attention where a warning is indicated. 2. Never allow a child under 6 years of age on the top bed. Only one person allowed on each bed level. 3. DO NOT allow horseplay on or under the product. NO jumping on the product. This product is not a toy. 4. DO NOT use substitute parts. Contact the manufacturer or dealer for replacement parts.