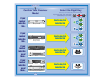
Quick Setup 1 Confirm Your Receiver Model If your receiver looks like this... Select the Right Key Remote keys are included in this replacement remote kit. Keys have two sides. Look on both sides to find right key for your remote. Use the key that looks like this DISH Player-DVR 942 UHF UHF PRO 1 1 or 2 If your receiver looks like this... If your receiver looks like one of these... If your receiver looks like one of these...
Quick Setup 2 Install Your Selected Key Note: If you will be using the blue TV2 key that comes already installed in your remote, skip this step and proceed with the next step (Insert the Batteries).
Quick Setup 4 Making the Remote Work With Your Receiver If you installed one of these keys, continue with step 2. 2 1 1 If you installed this key, go to page 10. 1 UHF PRO UHF Pro Symbol 1 UHF UHF PRO UHF PRO Green (not black) UHF PRO 2 3 Make sure the UHF antenna is installed on the back of the receiver.
Quick Setup Program the Remote to Control Your TV 1 2 TV Turn your TV on. Press & hold the TV Mode button until all Mode buttons light up. 4 3 POWER TV Press POWER. Press the UP ARROW repeatedly until your TV turns off (about 1 press per second). 5 6 # Press POUND. Press the POWER button to turn the TV on and try other buttons to make sure the code works. If you want to try another code, start over from step 1.
Quick Setup Programming the Recover Button for TV2 Operation For TV2 Remote Controls on 942, 625, & 522 Receivers Programming your Recover button allows you to easily regain satellite programming if you accidentally change TV channels or inputs. R 2 1 PRO 2 TV Press & hold the TV Mode button until all Mode buttons light up. UHF Press STAR. 3 1 2 3 4 5 6 7 8 9 0 Enter the channel number you tune your TV to when you watch satellite programming. 4 # Press POUND.
Quick Setup/Operation Placing Your Remote in Limited Mode Limited Mode locks out all the TV mode operations except for TV power, Mute, and Volume. This prevents you from accidentally tuning away from satellite programming. 1 2 3 PAGE TV Press & hold the TV Mode button until all Mode buttons light up. # Press the PAGE UP button. Press POUND. To take the remote out of Limited Mode, use the PAGE DOWN button instead of the PAGE UP button in step 2.
Operation Remote Operation TV Mode To use the features described in this section, make sure you are in TV mode by pressing the TV Mode button. Remote programming is required. See C-4 for instructions.
Operation Remote Operation VCR Mode To use the features described in this section, make VCR sure you are in VCR mode by pressing the VCR Mode button. You can use this mode to operate your DVD player instead of a VCR. Remote programming is required. See page 2 for instructions.
Table of Contents COLOR PAGES... Quick Setup Confirm Your Receiver Model and Select the Right Key .. C-1 Install Your Selected Key .....................................................C-2 Insert the Batteries ...............................................................C-2 Making the Remote Work with Your Receiver ................... C-3 Program the Remote to Control Your TV ........................... C-4 Programming the Recover Button for TV2 Operation ...... C-5 Placing Your Remote in Limited Mode ....
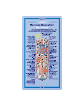
62book.book Page 1 Tuesday, April 4, 2006 1:45 PM REMOTE CONTROL OVERVIEW Use this full-function remote to control a variety of DISH Network receivers, such as Standard Definition, High Definition, and Digital Video Recorder receivers. Also, you can program the remote to control most of the popular brands of audio/video equipment like a TV, VCR, DVD player, or a second DISH Network satellite receiver. See Programming for Other Equipment on page 2.
62book.book Page 2 Tuesday, April 4, 2006 1:45 PM If you program the remote to control equipment in AUX mode, refer to the following for remote control operation instructions: • TVs, page C-7. • VCRs and DVD players, page C-8. • DISH Network satellite receivers, page C-9. • Stereo equipment use only these buttons: SELECT (change inputs), MUTE, VOLUME, and POWER.
62book.book Page 3 Tuesday, April 4, 2006 1:45 PM LIMITED MODE You can program your remote control in Limited Mode to keep from accidentally changing the channel on your TV or VCR. When you use the remote to control your TV in Limited Mode, you will only be able to use the POWER, MUTE, and VOLUME buttons to control your TV. Also, when you use the remote to control your VCR in Limited Mode, you will only be able to use the POWER and VCR function buttons.
62book.book Page 4 Tuesday, April 4, 2006 1:45 PM Instructions Additional Information 6 If you want to program Limited Mode, press 1. If not, skip to step 7. See Limited Mode on page 3 for more information. 7 Press POUND (#). If you entered the code correctly, the mode button flashes three times. 8 Press POWER to turn off the equipment. If the equipment does not turn off, go to step 10. If the code works, the equipment should turn off.
62book.book Page 5 Tuesday, April 4, 2006 1:45 PM Instructions Additional Information 3 For AUX mode only. Press 0 for a second TV, or 1 for a second VCR, or 2 for a tuner, or amplifier. Then press the STAR (*) button. This step is for programming which kind of equipment that should be programmed in AUX mode. If you’re not programming in AUX mode, skip to step 4. 4 Press POWER. This puts your remote in the scan mode. 5 Press the UP or DOWN ARROW repeatedly until the equipment turns off.
62book.book Page 6 Tuesday, April 4, 2006 1:45 PM SWITCHING BETWEEN TV AND AMPLIFIER VOLUME CONTROL When you set up the remote to control a TV, the MUTE and VOLUME buttons control the TV volume, even if your remote control is in SAT mode. However, if you want to use the AUX mode to control a tuner or amplifier that has a volume setting, you can set up the remote to control the equipment’s volume instead of the TV volume while your remote control is in SAT mode. Follow the instructions in the left column.
62book.book Page 7 Tuesday, April 4, 2006 1:45 PM PROGRAMMING THE REMOTE TO CONTROL A SECOND RECEIVER IN AUX MODE If you have another DISH Network satellite receiver installed, you can use this remote in AUX mode to control it along with your new receiver. When you program the remote to control the other receiver, the remote will send out IR and UHF (not UHF Pro) signals to the receiver.
62book.book Page 8 Tuesday, April 4, 2006 1:45 PM Instructions 2 Additional Information Press the POUND (#) button twice. The mode button flashes the number for each digit of the equipment code, with a pause between the groups of flashes. A quick flash is for zero. For example, if the code is 570, the mode button flashes five times, pauses, flashes seven times, pauses, and flashes once quickly. For AUX mode, the first group of flashes tells you what the AUX mode controls.
62book.book Page 9 Tuesday, April 4, 2006 1:45 PM 3. Use the NUMBER PAD to enter any number between 1 and 16, but not the one you wrote in step 1. 4. Press POUND (#). If you entered the address correctly, SAT will flash three times. Write down the number you entered in Your Remote Control Codes on page 24. 5. Press RECORD. Make sure the Remote Address you see on the System Information screen is the same as the one you entered in step 3. If it isn't, the remote cannot control the receiver. 6.
62book.book Page 10 Tuesday, April 4, 2006 1:45 PM SETTING UP A TV1 UHF PRO REMOTE FOR THE DISH PLAYER-DVR 522 AND 625 ONLY Use these special instructions only if you are going to use the green 1 UHF Pro key to control the TV1 side of your DISH Player-DVR 522 or 625. When you are finished setting up the remote control, you’ll be able to operate the TV1 side of your DISH Player-DVR 522 or 625 from long distances. 1. Make sure the key is installed as described on pages C-1 and C-2. 2.
62book.book Page 11 Tuesday, April 4, 2006 1:45 PM 6. Move the highlight to the address for the Remote Address as shown below. This is important - if you do not move the highlight, your remote will change the receiver's Remote Address and cause your Remote Control 1 to control the TV2 side of your receiver. i 1 UHF Remote Addrs. TV Out 5 3 Note: Highlight the Remote Address (the shaded area in the graphic above). 7. Press the RECORD button on the green TV1 remote control you are setting up.
62book.book Page 12 Tuesday, April 4, 2006 1:45 PM EQUIPMENT CODES These tables contain the manufacturer codes for programming the remote to control your TV, a VCR, DVD player, or audio amplifier. Every attempt has been made to include all codes. If your equipment brand is not listed or if the codes do not work, the remote may not control your equipment. In some cases codes may operate some but not all buttons shown in this guide.
62book.
62book.
62book.
62book.book Page 16 Tuesday, April 4, 2006 1:45 PM TUNER/AMPLIFIER CODES Programming in AUX mode: Press 2 before entering the tuner/ amplifier code.
62book.book Page 17 Tuesday, April 4, 2006 1:45 PM TV/DVD COMBO CODES Programming for combination equipment: Program the remote control in TV mode and then in VCR (or AUX - press 1 before entering the DVD code) mode. Aiwa 751 Apex 757 Broksonic 752 Konka 753 Panasonic 734 765 RCA 749 Sansui 754 Sylvania 764 Toshiba 750 TV/VCR COMBO CODES Programming for combination equipment: Program the remote control in TV mode and then in VCR mode.
62book.book Page 18 Tuesday, April 4, 2006 1:45 PM TROUBLESHOOTING What’s Happening What’s Wrong What You Can Do While doing remote control procedure, the remote control stops working. • If you don’t press any button for 20 seconds in a programming sequence, the remote shuts off its programming function. Start over again. You cannot find the key(s) shown on page C-1. • The keys have two sides. Turn the keys over until you find the correct key.
62book.book Page 19 Tuesday, April 4, 2006 1:45 PM What’s Happening What’s Wrong What You Can Do • The remote control is in the wrong mode. • Make sure the remote control is in the correct mode. For example, if you want to use the satellite receiver, put the remote control in SAT mode. (see Remote Control Modes on page 1). • You might be using the wrong remote control (TV1 or TV2). • Make sure you are using the correct remote control (TV1 or TV2) for your locations (multi-room receivers only).
62book.book Page 20 Tuesday, April 4, 2006 1:45 PM LIMITED WARRANTY This Limited Warranty is a legal document. Keep it in a safe place. Remember to keep your Sales Receipt for warranty service. We will consider any items you return without a copy of the Proof of Purchase to be out of warranty. This warranty extends only to the original user (“you,” “your”) of the DISH Network remote control and is limited to the purchase price of the remote control.
62book.book Page 21 Tuesday, April 4, 2006 1:45 PM If your equipment is out of warranty and can be repaired your billing account or credit card will be charged the standard repair fee for the replacement. If damage to the defective equipment is found, which EchoStar in its sole discretion determines has voided the warranty, or makes the equipment unrepairable, your billing account or credit card will be charged the market price of the replacement.
62book.book Page 22 Tuesday, April 4, 2006 1:45 PM REGULATORY FACTORS This device complies with Part 15 of FCC Rules. Operation is subject to the following two conditions: 1. this device may not cause harmful interference, and 2. this device must accept any interference received, including interference that may cause undesired operation. Changes or modifications to this device may void your authority to operate this equipment.
Reference Tables Write down your remote address, channel numbers/inputs, TV, VCR, DVD player, and stereo equipment codes as you program them for future reference. Remote Address Channel or Input for Satellite Programming Channel for Satellite Programming on TV2 (942 receivers only) TV Code 1 TV (Optional) VCR/DVD Player Code 1 VCR (Optional) Auxilary Equipment Code AUX 1 (Optional) If you enter a "1" as the last number of your code, your remote is in Limited Mode (see page 3 for more details).