Remote Control User Guide SAT
Table of Contents Quick Setup Confirm Your Receiver Model ...............................................S-1 Install Your Selected Key .......................................................S-2 Insert the Batteries.................................................................S-2 Making the Remote Work with Your Receiver .......................S-3 Program the Remote to Control Your TV ...............................S-4 Programming the Recover Button for TV2 Operation............
Quick Setup 1 Confirm Your Receiver Model If your receiver looks like one of these... then Select the Right Key Remote keys are included in this replacement remote kit. Keys have two sides. Look on both sides to find the right key for your remote. Duo ViP® 222 & DuoDVR™ ViP® 622 IR DuoDVR™ ViP® 722 Use the key that looks like this If your receiver looks like one of these... DISH JVC IRR DISH 6000 DISH 721 If your receiver looks like this... If your receiver looks like one of these...
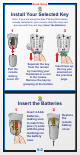
Quick Setup 2 Install Your Selected Key Note: If you are using the blue TV2 key that comes already installed in your remote, skip this step and proceed with the next step (Insert the Batteries). 1 2 3 A B 1 Pull the remote battery cover off. 1 Separate the key Insert face up from the remote the key you by inserting your selected on thumbnail or a coin the previous in the crease. page. Remove the key by grasping at the bottom.
Quick Setup 4 Making the Remote Work With Your Receiver 1 If you installed one of these keys, continue with step 2 on this page. If you installed this key, go to page 14 inside this guide. UHF Pro Symbol Green (not black) 2 3 If you installed a UHF key, make sure the UHF antenna is installed on the back of the receiver. REMOTE Turn your receiver and TV on, and press SYSTEM INFO on the front of the receiver. ANTENNA 4 5 RECORD Confirm that you see the System Information screen.
Quick Setup Program the Remote to Control Your TV 1 2 Turn your TV on. Press & hold the TV Mode button until all Mode buttons light up. 3 4 Press POWER. Press the UP ARROW on the remote repeatedly (about 1 press per second) until your TV turns off. 5 6 Press POUND. Press the POWER button to turn the TV on and try other buttons to make sure the code works. If you want to try another code, start over from step 1. The TV Mode button flashes three times.
Quick Setup Programming the Recover Button for TV2 Operation For TV2 Remote Controls on DuoDVR™ 522, DuoDVR™ 625, Duo ViP® 222, DuoDVR™ ViP® 622 DVR, and DuoDVR™ ViP® 722 DVR Receivers Programming your RECOVER button allows you to easily regain satellite programming if you accidentally change TV channels or inputs. 1 2 Press & hold the TV Mode button until all Mode buttons light up. Press STAR. 3 Enter the channel number you tune your TV to when you watch satellite programming. 4 Press POUND.
Quick Setup/Operation Placing Your Remote in Limited Mode Limited Mode locks out all the TV mode operations except for TV power, Mute, and Volume. This prevents you from accidentally tuning away from satellite programming. 1 2 3 PAGE Press & hold the TV Mode button until all Mode buttons light up. Press the PAGE UP button. Press POUND. To take the remote out of Limited Mode, use the PAGE DOWN button instead of the PAGE UP button in step 2.
Operation Remote Operation SAT Mode To use the features described in this section, make sure you are in SAT mode by pressing the SAT Mode button. SAT Note: Some features may not be available depending on your receiver model.
Operation Remote Operation TV Mode To use the features described in this section, make sure you are in TV mode by pressing the TV Mode button. Remote programming is required. See S-4 for instructions.
Operation Remote Operation VCR Mode VCR To use the features described in this section, make sure you are in VCR mode by pressing the VCR Mode button. You can use this mode to operate your DVD player instead of a VCR. Remote programming is required. See page 2 for instructions.
REMOTE CONTROL OVERVIEW Use this full-function remote to control a variety of DISH Network receivers. Also, you can program the remote to control most of the popular brands of audio/video equipment like a TV, VCR, DVD player, or a second DISH Network satellite receiver. See Programming for Other Equipment on page 2. Note: This remote control may have features not used by your receiver. USING THE GUIDE This guide makes it easy to set up and use your remote control.
If you program the remote to control other equipment, refer to the following for remote control operation instructions: • TVs, page S-8 (at the beginning of this guide). • VCRs and DVD players, page S-9. • DISH Network satellite receivers, page S-7. • Stereo equipment uses only these buttons: SELECT (to change inputs), MUTE, VOLUME, and POWER. HOW THE REMOTE COMMUNICATES Depending on how the remote is set up, the remote control may use UHF radio signals, IR signals, or both to control the receiver.
code 887, and then repeat the instructions for the VCR using code 797. Put the remote in TV mode to use the TV or VCR mode to use the VCR. LIMITED MODE You can program your remote control in Limited Mode to keep from accidentally changing the channel on your TV or VCR. When Limited Mode is enabled, you cannot select TV mode. If you press the TV button while TV mode is programmed in Limited Mode, the TV button flashes and the SAT button lights, telling you cannot switch to TV mode.
REMOVING FIXED CHANNEL MODE FOR TV AND/OR VCR 1 Press and hold the TV or VCR mode button until all four mode lights illuminate. 2 Press the STAR (*) key followed by two zeros (*00). 3 Press the POUND (#) key. The TV or VCR mode button flashes three times. PROGRAMMING USING EQUIPMENT CODE TABLES You can set up the remote to control other equipment using the equipment code tables listed on page 16 and the modes as shown on page 1. To control a receiver in AUX mode, see page 8.
Instructions Additional Information 6 If you want to program Limited Mode, press 1. If not, skip to step 7. See Limited Mode on page 3 for more information. 7 Press POUND (#). If you entered the code correctly, the mode button flashes three times. 8 Press POWER to turn off the equipment. If the equipment does not turn off, go to step 10. If the code works, the equipment should turn off. 9 Turn the equipment back on and try some other buttons to make sure they work.
SCANNING FOR EQUIPMENT CODES 6 Instructions Additional Information 1 Turn the equipment on. Use the equipment’s front panel buttons or its remote control. 2 Press and hold the mode button until all the other mode buttons light up, and then let go of the button. The mode button flashes. For example, hold the TV mode button for a TV until all of the other mode buttons light. When you let go, TV mode button flashes. 3 For AUX mode only.
Instructions Additional Information 7 Turn the equipment back on and try some other buttons to make sure they work. Press POWER to turn the equipment back on. Try some other buttons to make sure they work. Sometimes POWER works when other buttons don’t. 8 If necessary, repeat this procedure until you’ve tried all the codes. You may need to repeat the scan to find the best code for your equipment. 9 Once you find a code that works, consider using Limited Mode.
Control Amplifier Volume Control TV Volume 3 Press the plus (+) side of the VOLUME button. 3 Press the plus (+) side of the VOLUME button. 4 Press the 0 number button. 4 Press the 0 number button. 5 Press the POUND (#) button. 5 Press the POUND (#) button. The AUX mode button flashes three times. MAKE SURE THE REMOTE CONTROLS THE AMPLIFIER ’S The TV mode button flashes three times. MAKE SURE THE REMOTE TV’S VOLUME: CONTROLS THE VOLUME: 6 Press the SAT mode button.
Note: If you aren’t sure how to access the System Info screen or if there isn’t a SYSTEM INFO button on the front panel of your receiver, check your receiver’s User Guide. Write down the address shown: 2 Press and hold the AUX button until all the other mode buttons light up, and then let go of the button. The AUX button flashes. 3 Press the 3 button. 4 Use the NUMBER PAD to enter the address you wrote in step 1. 5 Press POUND (#). The AUX button blinks three times.
Instructions 10 Additional Information For AUX mode, the first group of flashes tells you what type of device the AUX mode controls, then the following flashes tell you each digit of the equipment code. A quick flash (zero) before the three-digit code is for a TV; one regular flash is for a VCR or DVD player; and two flashes is for a tuner or amplifier.
DISCRETE CODES FOR LEARNING REMOTES Note: Discrete codes are only used by IR remotes (either the TV1 remote or a universal remote). Remote control discrete On and Off IR commands are used by installers when programming macro commands into universal remotes. Using an On-only or Off-only command is more effective than a toggle On/Off command when trying to ensure the satellite receiver is reliably in one state or the other.
AVOIDING REMOTE CONFLICTS When your remote control uses UHF, you may experience interference from other nearby remotes. In situations where neighbors are near (apartments, townhouses, etc.), your receiver could be picking up signals from your neighbors’ remotes. The instructions in this section describe how to avoid remote conflicts. CHANGING THE REMOTE AND RECEIVER ADDRESS One quick way to avoid remote conflicts is by changing the address on your remote and receiver.
CHANGING THE UHF FREQUENCY USING THE A/B SWITCH—DISH PLAYER-DVR 942, DUO VIP 222, DUODVR VIP 622 DVR, AND DUODVR VIP 722 DVR ONLY All receiver models, except the DISH Player-DVR 942, ViP 222, ViP 622 DVR, and ViP 722 DVR, must use switch position A or the remote does not control the receiver. Your remote has a switch to change the UHF frequency that your remote control uses.
SETTING UP A TV1 UHF PRO REMOTE FOR THE DUODVR 522 AND DUODVR 625 ONLY Use these special instructions only if you are going to use the green 1 UHF Pro key to control the TV1 side of your DuoDVR 522 or 625 (also known as DISH Player-DVR 522 or 625). When you are finished setting up the remote control, you’ll be able to operate the TV1 side of your DuoDVR 522 or DuoDVR 625 from long distances. 1 Make sure the key is installed as described on pages S-1 and S-2.
6 Use the ARROW buttons to move the highlight to the TV1 remote address (the Rem Addr box as shown below). This is important—if you do not move the highlight, your remote changes the receiver's TV2 remote address (the Rem Addr box) and causes your Remote Control 1 to control the TV2 side of your receiver. h i i Device Rem Addr 5 TV Ch Out 3 UHF T Note: Highlight the Rem Addr (the lighter area in the graphic above) using the ARROW buttons on the remote.
EQUIPMENT CODES These tables contain the manufacturer codes for programming the remote to control your TV, a VCR, DVD player, or audio amplifier. Every attempt has been made to include all codes. If your equipment brand is not listed or if the codes do not work, the remote may not control your equipment. In some cases codes may operate some but not all buttons shown in this guide.
TV CODES (CONTINUED) JC Penney (Continued) 543 546 631 645 646 650 652 653 654 658 676 680 690 691 701 725 726 728 730 Jensen 556 573 652 654 JVC 508 557 559 642 649 655 676 726 735 736 737 812 817 Kawasho 548 561 573 652 654 Kenwood 506 573 652 654 656 Kloss 561 610 Kloss Novabeam 657 698 723 724 KTV 526 541 573 657 658 662 696 LG 653 766 Lloyds 627 Lloytron 526 Loewe 566 Logik 675 Luxman 523 652 654 LXI 563 566 590 595 617 631 635 645 646 650 654 683 691 701 725 Magnasonic 573 Magnavox 506 520 525 536 566
TV CODES (CONTINUED) Sears 523 534 542 563 590 595 601 604 617 627 631 635 645 646 650 652 654 656 682 683 688 691 703 725 726 Seimitsu 627 Sharp 521 526 585 605 607 628 629 652 654 655 658 739 740 741 777 794 803 835 836 898 913 Shogun 652 Signature 675 Silver 573 Simpson 525 Solavox 612 Sony 500 640 690 758 781 783 795 796 797 798 806 807 808 810 837 838 839 840 841 842 843 844 845 Soundesign 525 536 541 627 652 654 657 682 Spectricon 520 620 Squareview 694 SSS 505 541 573 652 657 Starlite 657 Supra 523 S
VCR CODES (CONTINUED) GE 551 552 554 572 591 605 607 675 678 Go Video 557 558 620 Goldstar 592 594 676 Goodmans 585 Gradiente 588 Granada 549 581 Grundig 556 Harley Davidson 588 Harman Kardon 568 592 Headquarter 581 Hitachi 536 538 539 540 588 595 597 682 Instant Replay 678 ITT 518 JC Penney 554 581 591 592 594 595 675 676 678 JCL 678 Jensen 595 682 JVC 561 562 581 592 594 682 Kenwood 562 581 592 594 600 682 Kodak 676 678 LG 676 Luxor 518 Lloyd’s 588 LXI 676 M.
VCR CODES (CONTINUED) Yamaha 581 592 594 682 Zenith 500 501 533 779 DVD PLAYER CODES Programming in AUX mode: Use these codes to program in VCR mode; if programming in AUX mode, press 1 before entering the DVD Player code.
TUNER/AMPLIFIER CODES (CONTINUED) JVC 637 703 725 786 827 Kenwood 676 691 726 728 774 795 828 829 830 831 832 840 842 Magnavox 654 705 Marantz 651 764 845 Nakamichi 671 NEC 716 Onkyo 642 660 662 678 785 788 790 791 792 796 801 846 Optimus 648 664 Panasonic 643 644 652 783 797 798 799 808 810 815 816 817 818 819 820 821 822 824 825 826 833 836 837 838 839 Pioneer 667 668 679 702 767 770 772 779 802 806 844 Proton 654 705 Quasar 652 RCA 635 638 704 727 Sharp 712 713 714 715 Sherwood 646 670 Sony 639 645 687
TV/DVD COMBO CODES Programming for combination equipment: Program the remote control in TV mode using the TV code and then in VCR mode (or AUX—press 1 before entering the DVD code) using the DVD code.
TV/VCR/TUNER COMBO CODES (CONTINUED) TV Code VCR Code Tuner Code 873 783 836 874 784 833 875 785 826 876 786 825 877 787 824 878 788 822 879 789 821 880 790 820 881 791 819 882 792 818 883 793 817 884 794 816 885 795 815 889 809 808 Panasonic VCR/DVD COMBO CODES Programming for combination equipment: Program the remote control in VCR mode using the VCR code and then DVD in AUX mode (press 1 before entering the DVD code) using the DVD code.
TROUBLESHOOTING What’s Happening What’s Wrong What You Can Do While performing a remote control procedure, the remote control stops working. If you don’t press a button for 20 seconds in a programming sequence, the remote shuts off its programming function. Start over again. You cannot find the key(s) shown on page S-1. The keys have two sides. Turn the keys over until you find the correct key. When you press a button on the remote control, the equipment doesn’t do what you expect.
What’s Happening What’s Wrong What You Can Do • The remote control is in the wrong mode. • Make sure the remote control is in the correct mode. For example, if you want to use the satellite receiver, put the remote control in SAT mode (see Remote Control Modes on page 1). • You might be using the wrong remote control (TV1 or TV2). • Make sure you are using the correct remote control (TV1 or TV2) for your locations (multi-room receivers only). • Your batteries are worn out.
LIMITED WARRANTY This Limited Warranty is a legal document. Keep it in a safe place. Remember to keep your Sales Receipt for warranty service. We will consider any items you return without a copy of the Proof of Purchase to be out of warranty. This warranty extends only to the original user (“you,” “your”) of the DISH Network remote control and is limited to the purchase price of the remote control.
DISH NETWORK’S EXCHANGE PROGRAMS DISH Network offers two options if you need to replace your remote control; the Advanced Exchange Program and the Post Receipt Exchange Program. Advance Exchange Program The Advanced Exchange Program allows you to have a replacement remote shipped immediately to you. Depending upon where you live, the remote should arrive within 3 to 5 business days. You will not have to return your defective remote to DISH Network using this program.
IF YOU NEED HELP 1. 2. 3. Review this User Guide. See Troubleshooting on page 24. Call the Customer Service Center at 1-800-333-DISH (3474). Have the date of purchase and your customer account number ready. a. If the representative finds you should return the remote control, you’ll get a telephone number to call for a Return Authorization (RA) number. Before shipping any equipment to us, you must get a Return Authorization number. b. You must package returned equipment the right way.
PUBLISHING INFORMATION Copyright © 2009. EchoStar Technologies L.L.C., Englewood, Colorado 80112. All rights reserved. The information in this Guide may change without notice. Revisions may be issued to tell you about such changes. You should address comments or questions about this User Guide to techpubs@echostar.com or Technical Publications, EchoStar Technologies Corporation, 90 Inverness Circle East, Englewood, Colorado 80112.
If you enter a “1” as the last number of your code, your remote is in Limited Mode (see page 3 for more details). To read out your remote codes, see page 9 for instructions.
For all your customer needs, call the Customer Service Center at 1-800-333-DISH(3474) 167820