Remote Control User Guide
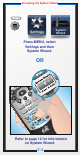
Accessing the System Wizard Press MENU, select Settings and then System Wizard.
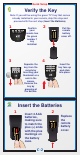
Quick Setup 1 Verify the Key Note: If you will be using the green TV1 key that comes already installed in your remote, skip this step and proceed with the next step (Insert the Batteries). 1 2 Confirm your remote has the green number 1 key installed. 3 Separate the key from the remote by inserting your thumbnail or a coin in the crease. Remove the key by grasping at the bottom. 2 Pull the remote battery cover off. 4 Insert the key face up and slide into place.
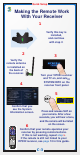
3 Quick Setup Making the Remote Work With Your Receiver 1 Verify this key is installed, and continue with step 2. 2 3 Verify the remote antenna is installed on the back of the receiver. REMOTE ANTENNA 4 Turn your ViP922 receiver and TV on, and select SYSTEM INFO on the receiver front panel. 5 Confirm that you see the System Information screen. 6 Press and release SAT on your remote. After a few seconds, you will hear a tone, and the remote will be listed on the screen.
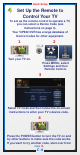
4 Quick Setup Set Up the Remote to Control Your TV To set up the remote control to operate a TV, you can select a Device Code (see instructions on page 3). Your ViP922 DVR has a large database of Device Codes for other equipment. 1 2 Turn your TV on. Press MENU, select Settings and then Remote Control. 3 Select TV Code and then follow the on-screen instructions to enter your TV’s device code. 4 Press the POWER button to turn the TV on and try other buttons to make sure the code works.
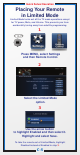
Quick Setup/Operation Placing Your Remote in Limited Mode Limited Mode locks out all the TV mode operations except for TV power, Mute, and Volume. This prevents you from accidentally tuning away from satellite programming. 1 Press MENU, select Settings and then Remote Control. 2 Select the Limited Mode option. 3 Use the arrow button to highlight Enabled and then select it. Highlight and select Save. To take the remote out of Limited Mode, highlight Disabled instead of Enabled in step 3.
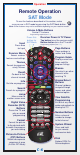
Operation Remote Operation SAT Mode To use the features described in this section, make sure you are in SAT mode by pressing the SAT Mode button. SAT Note: Some features may not be available depending on your receiver model.
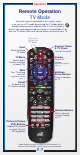
Operation Remote Operation TV Mode To use the features described in this section, make sure you are in TV mode by pressing the TV Mode button. TV Remote programming is required. See C-4 for instructions. Note: If you have programmed the remote in Limited Mode (C-5), only the TV Power, Mute and Volume buttons will control your TV.
Operation Remote Operation DVD Mode DVD To use the features described in this section, make sure you are in DVD mode by pressing the DVD Mode button. You can use this mode to operate your VCR instead of a disc player. Remote programming is required. See page 2 for instructions.
Table of Contents Quick Setup Verifying the Key................................................................... C-2 Inserting the Batteries........................................................... C-2 Linking Your Remote Control ................................................ C-3 Operation Setting Up the Remote to Control Your TV ........................... C-4 Placing Your Remote in Limited Mode.................................. C-5 Remote Operation in SAT/TV/DVD Modes ...................
REMOTE CONTROL OVERVIEW Use this full-function remote control to operate the DISH Network ViP® 922 SlingLoaded™ DVR receiver. Also, you can program this remote control to operate most popular brands of audio/video equipment like a TV, a DVD/BD player (or VCR), or an audio receiver/ amplifier. See Setting Up the Remote to Work With Your Equipment on page 3. Note: This remote control may support features not used by your receiver. Also, new features may be added by future software updates.
If you program the remote control to operate other equipment, refer to page C-6 and the following for remote-control operation instructions: • POWER, INPUT, MUTE, and VOLUME remote buttons are used to control your TV when it is programmed in TV mode. • The same buttons your DVR uses when in SAT mode are used to control a DVD/BD player (or VCR) when this equipment is programmed in DVD mode (or alternatively, in AUX mode).
(or TV/VCR), follow the instructions to program the remote to operate the TV using its code, and then repeat those instructions for the DVD/ BD player or VCR in AUX mode using its code. Press the TV mode button to use the combination device’s TV functions, or the AUX mode button to use DVD/BD (or VCR) functions. SETTING UP THE REMOTE TO WORK WITH YOUR EQUIPMENT You can set up the remote control to operate other equipment using the following steps and the modes as shown on page 1.
4 Instructions Additional Information 5 Scroll the Sort By: (or Aux Device:) list to position the option you wish to select within the blue highlight bar. Then highlight your device’s name in the Brand: list and select Next. If the brand is not listed, see Entering Equipment Codes on page 5. If there is no equipment code for your device right now, you can check to see if one has been added after your receiver’s next scheduled software update.
Instructions Additional Information 10 If the code worked for other buttons, select Yes and continue with step 11. If the code did not work, select No and repeat steps 6 through 9 for the next code for your brand. Choose the code that provides the remote with support for the most device functions. If you wish to verify the support of volume and mute functions, go to step 13. 11 On the Home screen, confirm that the device’s brand name you found in step 5 is in parentheses after a four-digit code.
Instructions Additional Information 2 Turn on your ViP922 DVR and access Remote Control settings using a linked remote. Press MENU, select the Settings tile. Then from the Settings screen, select Remote Control. 3 Select the TV Code, DVD Code, or AUX Code option on the Remote Control settings screen. Select TV Code in order to program the remote to control your TV when in TV mode.
Instructions Additional Information 8 Press and release the mode button for the device you are setting up (TV, DVD, or AUX). If you are setting up a TV, you can remain in SAT mode and press the TV POWER button in step 9. 9 Press the POWER button. If your equipment does not turn off, then press and release the SAT button to switch modes, and try entering the code again. If the device code you entered works, then your equipment should turn off. Continue with step 10.
SWITCHING BETWEEN TV AND AMPLIFIER VOLUME CONTROL If a remote control used with the ViP922 DVR has been set up to operate a TV, then MUTE and VOLUME +/- buttons adjust the TV’s volume. To use the remote to adjust the volume of your remotecontrollable audio equipment instead of adjusting your TV’s volume, use the steps in the left column of the following table. To switch back to controlling the TV’s volume, use the steps in the right column.
VIEWING EQUIPMENT CODES These instructions explain how to read out and verify the device code(s) for the equipment you have programmed the remote to control. You may write these code(s) in the spaces provided in the table on the last page, just in case you need to enter a device code manually. Instructions Additional Information 1 Press MENU, select the Settings tile, and then select Remote Control. The Home screen for your current remote control is displayed.
1 Make sure the UHF-2G remote antenna is connected to the correct input on the receiver’s back panel and is not touching anything else. It should be tightened only by hand. Note: Remote antennas used with other DISH Network satellite receivers and remotes cannot be used with your ViP922 receiver or remote controls. 2 Try varying the tilt angle of the receiver's remote antenna. Locate the antenna’s tip away from any other electronic equipment or metal surfaces, even if separated by wooden shelving.
COLORED BUTTONS The following table lists some of these shortcuts for the colored set of buttons on your ViP922 DVR remote control. Note that scheduled updates to your receiver software may add to or modify these shortcuts.
To access the System Wizard from your ViP922 DVR front panel: 1 With your receiver turned on, touch the front panel to activate it, and then select MENU. 2 Use the arrow controls to highlight the Settings tile and then SELECT it. 3 Use the arrow controls to scroll down the list of Settings items, highlight System Wizard, and then SELECT it. 4 Follow the on-screen instructions to use the Backup or Restore options for your ViP922 DVR system and remote control settings.
32.0 Troubleshooting.fm Page 13 Thursday, March 4, 2010 11:14 AM TROUBLESHOOTING What’s Happening What’s Wrong What You Can Do The remote control or one or more buttons on it seems to have stopped working. The remote control has gone to “sleep” to reduce battery drain. Wake the remote control by pressing one or more button(s) on the remote, such as the SELECT button, while observing the mode lights for activity.
32.0 Troubleshooting.fm Page 14 Thursday, March 4, 2010 11:14 AM What’s Happening What’s Wrong What You Can Do • The remote control is in the wrong mode. • Make sure the remote control is in the correct mode. For example, if you want to control the ViP922 receiver, put the remote control in SAT mode (see Remote Control Modes on page 1). • You might be using the wrong remote control (use only 30.0- or 32.0-model DISH Network remotes). • Make sure you are using the correct model of remote control.
32.0 Troubleshooting.fm Page 15 Thursday, March 4, 2010 11:14 AM LIMITED WARRANTY This Limited Warranty is a legal document. Keep it in a safe place. Remember to keep your Sales Receipt for warranty service. We will consider any items you return without a copy of the Proof of Purchase to be out of warranty. This warranty extends only to the original user (“you,” “your”) of the DISH Network remote control and is limited to the purchase price of the remote control. EchoStar Technologies L.L.C.
32.0 Troubleshooting.fm Page 16 Thursday, March 4, 2010 11:14 AM Advance Exchange Program The Advanced Exchange Program allows you to have a replacement remote shipped immediately to you. Depending upon where you live, the remote should arrive within 3 to 5 business days. You will not have to return your defective remote to DISH Network using this program. A shipping charge will be applied for shipping the replacement remote.
32.0 Troubleshooting.fm Page 17 Thursday, March 4, 2010 11:14 AM IF YOU NEED HELP 1. 2. 3. 4. Review this User Guide. See Troubleshooting on page 13. Go to the www.dishnetwork.com website and select the link for Support. Call the Customer Service Center at 1-800-333-DISH (3474). Have the date of purchase and your customer account number ready. a. If the representative finds you should return the remote control, you’ll get a telephone number to call for a Return Authorization (RA) number.
32.0 Troubleshooting.fm Page 18 Thursday, March 4, 2010 11:14 AM REGULATORY FACTORS This device complies with Part 15 of FCC Rules. Operation is subject to the following two conditions: 1. this device may not cause harmful interference, and 2. this device must accept any interference received, including interference that may cause undesired operation. Changes or modifications to this device may void your authority to operate this equipment.
Remote Key 1 If your remote is in Limited Mode (see page C-6), then only Volume and Mute buttons work in TV mode. Auxiliary Equipment Code To read out your remote codes, see page 9 for instructions.
For all your customer needs, call the Customer Service Center at 1-800-333-DISH(3474) 176842