
User guide


Parental Controls
45
Creating or Changing Channel Locks
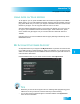
7 Select Save. To ensure new parental controls take effect, you will need to set a password
if you have not already. See the instructions for creating a new password on page 41.
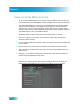
CREATING OR CHANGING CHANNEL LOCKS
You can lock any channel, including Pay-Per-View channels. Locked channels can be
accessed or recorded only after you enter the password created for your receiver.
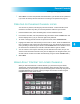
1 Press the MENU button, select the Settings tile, and then Parental Controls.
2 If the receiver is locked, enter the password using the remote control NUMBER PAD. The
receiver displays stars (*) as you enter the digits of the password.
3 To create or change parental controls for specific channels, select Lock Channels.
4 Highlight and select each channel that you want to lock or unlock. Press the ARROW but-
tons to navigate to each channel, and then SELECT it. You can also move the list of chan-
nels by entering a number using the remote control NUMBER PAD. If the checkbox next to
the channel has a checkmark, the channel is selected. Select it again to unlock it.
5 You can choose to view only the channels you have selected to be locked, and you can
choose to hide the locked channels so they are not displayed in the Program Guide. (You
can still enter the number of a locked channel directly using the remote NUMBER PAD.)
6 Select Save.
HIDING ADULT CONTENT OR LOCKED CHANNELS
When you hide adult channels or locked channels, you prevent the Program Guide,
Themes lists, and the Browse Banner from displaying these channels. When you Hide
Adult Channels, you also prevent anyone from choosing these channels by using the UP
or DOWN ARROWS or by directly entering the digits of the channel number using the
NUMBER PAD on their remote control.