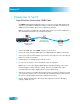
Connections Connecting Your Satellite Receiver What you’ll find in this chapter: • CONNECTING TO THE TV • CONNECTING TO YOUR DISH ANTENNA • CONNECTING THE PHONE LINE • CONNECTING A BROADBAND INTERNET CONNECTION • CONNECTING AN OVER-THE-AIR ANTENNA • SCANNING FOR OVER-THE-AIR CHANNELS • USING TROUBLESHOOTING TOOLS 85
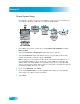
Chapter 12 Connecting to the TV CONNECTING TO THE TV High-Definition Connection: HDMI Cable The HDMI (High-Definition Multimedia Interface) connection provides high-quality audio and video to your HDTV or HD Monitor using one cable. If your HDTV or monitor has an HDMI connection available, this is the recommended connection. Note: Connecting your TV directly to the audio/video outputs of your receiver will assure a more vivid picture and enhance your viewing enjoyment.
Connections Connecting to the TV High-Definition Connection: YPBPR (Component) Cables The YPBPR connections provide high-quality video to your HDTV or HD monitor. Use these connections if your TV does not have an HDMI connection.
Chapter 12 Connecting to the TV Setting Up to Display in HD Once the receiver has been activated with qualifying DISH Network HD programming, you will be able to receive HD programs. Use the following steps to select the HDTV display format that best matches your TV or monitor. 1 Consult your HDTV user’s guide for the HD resolution that the TV supports (1080i or 720p). 2 Press MENU, select System Setup, then HDTV Setup.
Connections Connecting to the TV Standard-Definition Connections 1 Connect the receiver to the TV using one of the following: • AUDIO/VIDEO connection (RCA-type composite connection) • S-VIDEO and LEFT/RIGHT AUDIO • TV SET OUT 2 If using the TV SET OUT connection, peel off the white sticker and attach it to the cable close to where it connects to the TV SET OUT connection on the back of the receiver. The sticker is in the front cover of this guide.
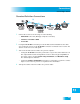
Chapter 12 Connecting to Your Dish Antenna CONNECTING TO YOUR DISH ANTENNA Connect your TV to the satellite receiver using the previous sections before connecting the receiver to the dish antenna. 1 Connect two RG-6 coaxial cables between the SATELLITE IN 1 and SATELLITE IN 2 ports on the receiver’s back panel and two available ports on either the switch, LNBF, or DISH Pro Plus Separator in your existing system.
Connections Connecting the Phone Line CONNECTING THE PHONE LINE You must keep the receiver connected to an active telephone line to order Pay-Per-View programs, use all of the DishHOME Interactive features, or use other services from DISH Network with your remote control. Note: You may be able to use a wireless modem jack. However, this may not support all the features of this receiver, such as Caller ID. See www.dishnetwork.com for compatible modem products.
Chapter 12 Connecting the Phone Line Phone System Setup You must also set up the receiver for your telephone system (touch tone or rotary). If you need a prefix to make an outside call, set a telephone number prefix. 1 Press MENU on the remote control, then select System Setup, Installation, and then Phone System. 2 Select the Touch Tone or Rotary Phone option in the Phone Type list. 3 Select the Prefix Code option under Outside Line if you need to dial a prefix to make outside calls.
Connections Connecting a Broadband Internet Connection CONNECTING A BROADBAND INTERNET CONNECTION If you have broadband (high-speed) Internet access at home, you can access additional features and capabilities by connecting your receiver to your home network. Refer to tech.dishnetwork.com and search for “home networking” for detailed instructions on making this type of connection.
Chapter 12 Scanning for Over-the-Air Channels SCANNING FOR OVER-THE-AIR CHANNELS After your over-the-air antenna is adjusted for the best reception and connected to the receiver’s OVER-THE-AIR ANTENNA IN connection, use these instructions to scan over-theair channels into the satellite receiver’s menus.
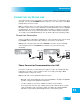
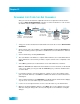
Connections Scanning for Over-the-Air Channels Peaking Your Over-the-Air Antenna Local Channels Scan Locals 2-1 KWGN-D 2-2 TUBE Select All Add Locals 4-1 KCNC-D Chan Display 6-1 KRMA-D 6-2 V-mo Edit Name 7-1 KMGH-H Delete 0 Not Locked Done Cancel Help 50 100 Signal Strength: 0 8 1 Press MENU, select System Setup, and then Local Channels. 2 Highlight a channel in the local channels list to display its signal strength.
Chapter 12 Scanning for Over-the-Air Channels • You may be able to receive a poor analog signal but not be able to receive a digital signal at all. To get the best possible digital signal reception, make sure you use the best over-the-air antenna for where you live: • You can receive a limited number of channels using a rabbit ears type antenna on top of the TV set, or a much larger number via a large UHF/VHF indoor/outdoor antenna.
Connections Using Troubleshooting Tools USING TROUBLESHOOTING TOOLS Your receiver has troubleshooting tools that you can use to solve many common problems. Resetting Your Receiver 1 Press and hold the receiver POWER button until the front panel lights blink. 2 Release the POWER button. The receiver will take several minutes to reset, will display the message “Acquiring Satellite Signal”, may download the Program Guide, and then will return you to programming.
Chapter 12 Using Troubleshooting Tools Point Dish and Check Switch The Point Dish and Check Switch screens are helpful to the Customer Service Representatives. You may be asked to display these screens when you call DISH Network. Even though there are items that can be changed, only change them when specifically directed by a Customer Service Representative.