Warning and Attention Symbols You must be aware of safety when you install and use this system. This User Guide provides various procedures. If you do some of these procedures carelessly, you could injure or kill yourself or damage equipment or property. Some other procedures require special attention. The WARNING! symbol means that if you are not careful, You could injure or kill yourself, or You could damage equipment or property.
Important Safety Precautions 1 v Introduction WELCOME 2 HOW TO USE THIS GUIDE 2 ABOUT YOUR DISH NETWORK ACCOUNT WATCHING TV NOW 5 ADDITIONAL SERVICES 7 ABOUT SATELLITE TV RECEPTION WHY CONNECT TO A PHONE LINE MOVING ON-SCREEN LOGO 8 2 4 7 8 Receiver and Remote Controls SATELLITE RECEIVER OVERVIEW DUAL AND SINGLE MODES REMOTE CONTROL 13 16 SATELLITE RECEIVER FRONT PANEL SATELLITE RECEIVER BACK PANEL USING THE MENUS USING TEXT FIELDS 12 21 21 22 24 i
Table of Contents 3 Finding Programs to Watch CHANGING CHANNELS 28 USING THE PROGRAM GUIDE 28 USING THE BROWSE BANNER 30 USING THEMES AND SEARCH 31 USING PICTURE-IN-PICTURE 4 Pay Per Programs PAY-PER-VIEW 36 DISH ON DEMAND 5 33 36 Favorites Lists WHAT ARE FAVORITES LISTS? 40 CREATING OR CHANGING FAVORITES LISTS NAMING FAVORITES LISTS USING FAVORITES LISTS 6 41 41 41 Locks WHAT ARE LOCKS? 44 CREATING OR CHANGING A PASSWORD 45 LOCKING AND UNLOCKING YOUR RECEIVER CREATING OR CHANGIN
Table of Contents 8 Digital Video Recording WHAT IS DVR? 54 PAUSING A PROGRAM 54 REVERSING, FAST FORWARDING, AND SKIPPING SLOW MOTION AND FRAME-BY-FRAME RECORDING A LIVE PROGRAM 55 56 PLAYING A RECORDED PROGRAM USING RECORD PLUS 55 56 56 RECORDING WHILE WATCHING DIFFERENT PROGRAMS RECORDING OPTIONS 9 57 59 Record Future Programs TIMERS AND RECORDINGS USING THE TIMERS LIST 62 65 USING THE DAILY SCHEDULE 65 SETTING UP AN AUTOMATIC TIMER SETTING UP A MANUAL TIMER 66 67 SETTING UP A DISH
Table of Contents 11 Receiver Customization USING SHARED VIEW 86 MODULATOR SETUP 86 USING MULTIMEDIA 86 USING CALLER ID 88 CHANGING LANGUAGES 89 USING CLOSED CAPTIONING 90 USING DOLBY® SURROUND SOUND 91 CHANGING THE PROGRAM GUIDE ORDER CHANGING THE GUIDE DISPLAY 92 RESETTING TO FACTORY DEFAULTS SCHEDULING RECEIVER UPDATES INACTIVITY STANDBY 92 93 94 94 12 Connections and Setup CONNECTING TO THE NEARBY TV (TV1) 98 CONNECTING TO THE REMOTE TVS (TV1 OR TV2) CONNECTING TO YOUR DISH ANTENN
Important Safety Instructions 1 Read these instructions. 2 Keep these instructions. 3 Heed all warnings. 4 Follow all instructions. 5 Do not use this apparatus near water. 6 Clean only with a dry cloth. 7 Do not block any ventilation openings. Install in accordance with the manufacturer’s instructions. 8 Do not install near any heat sources such as radiators, heat registers, stoves, or other apparatus (including amplifiers) that produce heat.
Safety Note to Satellite TV System Installer: This reminder is provided to call the satellite TV system installer’s attention to Article 820-40 of the National Electrical Code (NEC) that provides guidelines for proper grounding and, in particular, specifies that the cable ground shall be connected to the grounding system of the building as close to the point of cable entry as practical. • Operate the receiver using only the type of power source indicated on the marking label.
Introduction Introduction to DISH Network Services So you bought yourself a new receiver and you want to know how it works, right? Take a look through this guide and you’ll quickly learn how to use all of the features. This chapter familiarizes you with your DISH Network satellite TV receiver.
Chapter 1 Welcome WELCOME Thank you for choosing DISH Network. You are about to experience the excitement and convenience of our Direct Broadcast Satellite (DBS) service, which delivers the very best picture and sound quality. DISH Network consistently provides the latest products and satellite-delivered services — with high performance, ease of operation, and a wide variety of entertainment options.
Introduction How to Use this Guide Guide Conventions • The names of remote control buttons are all uppercase. Example: Press SAT. • Select means to move the highlight to an on-screen option or choice in a list and press SELECT on the remote control. Example: Select the Locks option. • Where this guide mentions nearby TV, it refers to the HDTV near the receiver. The nearby TV receives TV1 menus and programming from the receiver’s TV1 outputs and is connected using short audio/video cables.
Chapter 1 About Your DISH Network Account ABOUT YOUR DISH NETWORK ACCOUNT This section describes how to order your packages and provides information on how to find information about your DISH Network account. Ordering Your Programming Packages Before you can enjoy your new receiver, order your programming packages. 1 Press POWER on the front panel to turn on the receiver. 2 Press SYSTEM INFO on the front panel to display the receiver’s System Information menu on the nearby TV screen.
Introduction Watching TV Now WATCHING TV NOW After you have ordered your programming package, you can begin enjoying the features of your new satellite TV receiver. When you complete these simple tours, you’ll be familiar with the remote control and be able to find a program to watch; pause live TV; and record your favorite shows. Finding a Program to Watch You’re already itching to use your remote control, so pick it up now and find something to watch.
Chapter 1 Watching TV Now Pausing Live TV Here’s something you can’t do with regular old TV: pause live TV because someone’s at the door or calling you on the phone or there’s something you just have to do right now. For more about the pause feature of your receiver, see Pausing a Program on page 54. Recording and Playing Back a Program Take this tour to learn how to make basic recordings of your favorite shows.
Introduction Additional Services ADDITIONAL SERVICES Pay-Per-View Catch all the action on Pay-Per-View. Take a break from regular TV and order the latest movies, sports, and special events. For details on ordering Pay-Per-View events, see page 36. Be sure to connect an active phone line to your receiver before you order a PayPer-View event (see the instructions on page 105). DISH On Demand Enjoy movies and other programming any time without schedules, without waiting and without leaving your home.
Chapter 1 Why Connect to a Phone Line Solar Interference Twice a year, the sun moves to a position behind the DISH Network satellite as it orbits the Earth. This event occurs during a few days at the beginning of the spring and the beginning of the autumn and lasts only a few minutes. During these brief periods, you will not be able to see programs on DISH Network. When the sun has moved from behind the satellite, the programs will reappear.
Introduction Tips TIPS • Always have the latest software - Turn off the receiver when you’re not using it. • Order Pay-Per-View with your remote control - Keep an active phone line connected to the receiver. Not only will you have Pay-Per-View at your fingertips, but you’ll also avoid unnecessary charges. QUESTIONS • How do I find something to watch? Refer to page 5. For more information on finding something to watch, see Chapter 3 - Finding Programs to Watch.
Chapter 1 Questions Notes 10
Receiver and Remote Controls About Your Satellite Receiver This chapter helps you get to know your remote control, which lets you use all the functions of your receiver. After you read the information here, be sure to practice what you learn so that you can quickly understand what’s presented in later chapters.
Chapter 2 Satellite Receiver Overview SATELLITE RECEIVER OVERVIEW This section gives you an overview of your DISH Network satellite TV receiver system. Satellite Receiver Use this dual-tuner satellite receiver to watch different programs in two locations: • Nearby TV (TV1) - Programming from the receiver is delivered to the nearby TV using short audio/video cables. • Remote TV(s) (TV2) - Programming from the receiver is delivered to the remote TV(s) using existing in-home coaxial cable.
Satellite Receiver Dual and Single Modes DUAL AND SINGLE MODES Your satellite receiver includes two modes of operation: Dual and Single. These modes increase your entertainment options because you’ll be able to choose how you watch and record your favorite programs.
Chapter 2 Dual and Single Modes Single Mode Single Mode provides dual-tuner receiver features—like Picture-in-Picture (PIP) and the ability to watch one live program while recording another—to all connected TVs. Single Mode delivers the same programming to all of the TVs connected to the satellite receiver and allows this programming to be controlled by either remote control.
Satellite Receiver Dual and Single Modes Switching Between Dual and Single Mode Put the satellite receiver in Single or Dual Mode by pressing the front panel MODE button. Keep the following items in mind when switching the satellite receiver between Dual and Single Mode: Dual Mode Single Mode Indications Dual Mode front panel indicator lights. Single Mode front panel indicator lights. Recording The Recording front panel indicator lights to show whether TV1, TV2, or both are currently recording.
Chapter 2 Remote Control REMOTE CONTROL The two remote controls give you access to all the features of your satellite receiver. You can set up each remote to control the satellite receiver and up to three other devices (see page 75). These devices can be a TV, a VCR or DVD player, and a third device. This section describes how to use the various features on the two types of remote controls included with your satellite TV system.
Satellite Receiver Remote Control Remote Control Batteries The remote control comes with AAA batteries. When you replace old batteries, you should replace all of the batteries. Use batteries of the same kind, for example, alkaline or carbon zinc. Don’t mix batteries of different kinds. Alkaline batteries last longer. 1 Press down on the top of the battery cover and slide the cover off. 2 Take out all of the old batteries. 3 Put the new batteries in.
Chapter 2 Remote Control Remote Control Buttons 18
Satellite Receiver Remote Control 19
Chapter 2 Remote Control 20
Satellite Receiver Satellite Receiver Front Panel SATELLITE RECEIVER FRONT PANEL SATELLITE RECEIVER BACK PANEL 21
Chapter 2 Using the Menus USING THE MENUS The menus make using the receiver and selecting programs quick and easy. Use the menus to control the receiver and to use its features, such as setting locks, choosing a program, or creating a favorites list. Open and Close Menus You can open the menus in either of two ways: • Press MENU to open the Main Menu, then open any of the other menus from the Main Menu. • Use the following buttons on the remote control: – Press GUIDE to open the Program Guide.
Satellite Receiver Using the Menus List of Choices in the Menus When you make a choice in a list, the receiver does not apply the change until you select Save or Done. If you do not want to save any changes, select Cancel to discard all the changes made in the menu. There are two types of lists: • A single choice list allows you to select only one choice at a time. If you select another choice, your previous choice is deselected.
Chapter 2 Using Text Fields USING TEXT FIELDS When you use features on the receiver, you might be required to enter information, such as the name of a movie when using Search, into areas known as text fields. Your receiver has two basic ways to enter the information: • Virtual Keyboard • Remote Control NUMBER PAD Using the Virtual Keyboard Use the virtual keyboard letters to type the information. Use the LEFT, RIGHT, UP, and DOWN ARROWS to navigate around the keyboard. Select the characters you want.
Satellite Receiver Tips TIPS • You can use the Front Panel Locks to prevent the mode from being changed accidentally. See page 49 for instructions. • The only way to turn off the TV2 outputs is by using POWER on Remote Control 2. • In Dual Mode, Remote Control 1 is used to control TV1 menus on the nearby TV. Remote Control 2 is used to control TV2 menus on the remote TV(s). • If you do not do anything in a menu for several minutes, the menu automatically closes.
Chapter 2 Questions Notes 26
Finding Programs to Watch Watching TV The receiver is on channel 414, but you want to change the channel to 210. How do you change the channel? You know your team is playing, but you’re not sure of the channel. How do you find the game? You’re in the mood for a movie, but you don’t know which one. Is there a way to look for movies? This chapter shows you the various ways for you to find something to watch.
Chapter 3 Changing Channels CHANGING CHANNELS There are two basic ways to change the channel on your satellite TV receiver: • Use UP and DOWN ARROWS on your remote control • Enter a channel number with the NUMBER PAD Using the Up and Down Arrows While watching live TV, if you want to change the channels one at a time to see what’s on, press the UP and DOWN ARROWS on your remote control. You can also change the channels the same way using the UP and DOWN ARROWS on the receiver front panel.
Finding Programs to Watch Using the Program Guide • A green background behind a channel means that you can use your remote control to add the channel to your subscription. • The Program Guide shows which Favorites List is active. If All Chan is active, the Program Guide shows all the channels. The All Sub list shows only the channels in your subscription. If you activate another list, the Program Guide shows only the channels on that list. See page 39 for information on Favorites Lists.
Chapter 3 Using the Browse Banner USING THE BROWSE BANNER Use the Browse Banner to see what other programs are on and not miss any of a program you are watching. When the Browse Banner is open, you will see the Program Banner information on the current program at the top of the screen, and on the left side of the Browse Banner at the bottom of the screen. At the bottom right of the screen is information on the program that is coming on next on the same channel.
Finding Programs to Watch Using Themes and Search USING THEMES AND SEARCH Use the Themes and Search Feature to find exactly what you want to watch. This section shows you how to use Themes to find your favorite programs by type (for example, movies, sports, news, and so on), or by keyword (if you’re looking for a particular actor or description). You can list and choose programs by the theme of their contents, for example, just movies or just sports.
Chapter 3 Using Themes and Search Using Themes Using Keywords Using History After you have searched previously for programs or other information, your receiver builds a history. In Dual Mode, TV1 and TV2 keep separate Search History information. In Single Mode, only TV1’s Search History is available. You can use the Search History to re-search programming instead of typing the information again. Note: Use the Edit or Delete options to change or delete Search Keywords.
Finding Programs to Watch Using Picture-In-Picture USING PICTURE-IN-PICTURE Picture-In-Picture (PIP) lets you watch two programs at once and is only available in Single Mode. The following instructions describe how to use PIP (see page 15 for instructions on changing to Single Mode). TIPS • Press INFO to get more information about the program you highlighted. • Press VIEW LIVE TV to cancel almost any screen and return to live TV.
Chapter 3 Questions • • • 34 Why are some of my channels missing? – You may have locked or hidden the channels. See Chapter 6 - Locks on page 43 for information on locking and unlocking the receiver. – You may have the wrong list showing in the Program Guide. Press GUIDE to open the Program Guide. Press GUIDE again to select the next Favorites List. Press GUIDE repeatedly to scan through all the available lists. See Favorites Lists on page 39 for more information.
Pay Per Programs Pay-Per-View and DISH On Demand Is tonight a popcorn and movie night? Why rent videos when you can just watch Pay-PerViews? This chapter describes how to use these additional services: • PAY-PER-VIEW • DISH ON DEMAND 35
Chapter 4 Pay-Per-View PAY-PER-VIEW To buy Pay-Per-View programs using your remote control, you must connect the receiver to an active phone line. After you buy a Pay-Per-View program, you can watch it on all of the receivers on your DISH Network account. Using the remote control, you can order the exact same program for each receiver but you pay for the program only once. However, replays of programs are separate events. Go to dishnetwork.com/ppv for a description of the types of Pay-Per-View events.
Pay Per Programs Tips The following are details about this important feature: • You can repeatedly watch a rented program for the period of time (for example, 24 hours) listed. Rented programs cannot be saved to the DVR Events list. • The Play List shows you how much time you have remaining on your DISH On Demand Programs. • You can use Pay-Per-View Locks and Ratings Locks to control the programs your family views. See Using Locks on page 93.
Chapter 4 Questions QUESTIONS • 38 How can I order an event for all my receivers? – Order on each receiver, one at a time with the remote control. Make sure an active phone line is connected to each receiver. – Order the event over the phone 1-877-DISH-PPV (347-4778). Charges may apply. – Order the event online at www.dishnetwork.com/ppv. – Order the event over the phone at 1-800-333-DISH. Charges may apply. • I ordered a Pay-Per-View but can only see it on one receiver.
Favorites Lists Setting Up Your Favorites Lists One of the benefits of DISH Network is that you have access to many channels. However, the number of channels can make it difficult to find something to watch. When you read this chapter, you’ll learn how to set up and use Favorites Lists. The information in this chapter shows you how to fit your favorite channels into neat, organized lists.
Chapter 5 What are Favorites Lists? WHAT ARE FAVORITES LISTS? Favorites Lists are lists of your favorite channels. You can create and change the lists yourself, adding and removing channels as you wish. Your favorite channels can be grouped into up to four lists for TV1 and four lists for TV2 (in Dual Mode). 40 • When using a Favorites List, the Program Guide and Browse Banner display only the channels in that Favorites List.
Favorites Lists Creating or Changing Favorites Lists CREATING OR CHANGING FAVORITES LISTS You can create, add channels to, and remove channels from a Favorites List. When you use your Favorites List only those channels in your list are shown in the Program Guide and Browse Banner. NAMING FAVORITES LISTS You can name your Favorites Lists whatever you want, up to eight characters long. USING FAVORITES LISTS Press GUIDE to open the Program Guide. Press GUIDE again to select the next Favorites List.
Chapter 5 Tips TIPS • Two lists cannot have the same name. For example, on TV1, you cannot have two lists named “Dad’s List.” However, TV1 and TV2 can have lists with the same names. • Pressing GUIDE to switch Favorites Lists works only if you have added channels to the Favorites List. If you have not created a Favorites List, pressing GUIDE switches the receiver between the All Chan and All Sub Lists. • When you put the receiver in Single Mode, the Favorites Lists for TV2 are not available.
Locks Securing Your Receiver and Account An important concern to parents is the ability to protect their children. With high tech television comes greater potential for unwanted programming beamed into your home. Use the safeguards described in this chapter to set up and use locks.
Chapter 6 What are Locks? WHAT ARE LOCKS? Locks allow you to password-protect programming based on ratings, or on a channel-bychannel basis. When you have locked the receiver: • If you try to access a locked item or open the Locks menu, the receiver displays a message prompting you to enter the password. • The receiver allows you three attempts to enter the correct password. If you fail to enter the correct password, the receiver does not allow you to try again for several minutes.
Locks Creating or Changing a Password CREATING OR CHANGING A PASSWORD The first thing to do before using the receiver locks is set up your password. 1 Press MENU and select Locks (5). 2 If the receiver is locked, enter the password using the NUMBER PAD. The receiver displays stars (*) as you enter the digits of the password. Select OK. 3 Select Change Password. 4 Enter the current password using the NUMBER PAD. Select OK. 5 Press SELECT. 6 Enter the new password using the NUMBER PAD. Select OK.
Chapter 6 Creating or Changing Ratings Locks 1 Press MENU and select Locks (5). 2 If the receiver is locked, enter the password using the NUMBER PAD. The receiver displays stars (*) as you enter the digits of the password. Select OK. 3 Select Lock System or Unlock System. If you are locking the receiver, the receiver displays a message prompting you to enter a password. 4 Enter a password, using the NUMBER PAD. The receiver displays stars (*) as you enter the digits of the password. Select OK.
Locks Creating or Changing Channel Locks CREATING OR CHANGING CHANNEL LOCKS You can lock any channel, including Pay-Per-View and off-air channels. This type of lock keeps anyone from viewing these channels unless they enter the correct password. 1 Press MENU and select Locks (5). 2 If the receiver is locked, enter the password using the NUMBER PAD. The receiver displays stars (*) as you enter the digits of the password. Select OK. 3 Select Channel Locks.
Chapter 6 Hiding Adult Content or Locked Channels 1 Press MENU and select Locks (5). 2 If the receiver is locked, enter the password using the NUMBER PAD. The receiver displays stars (*) as you enter the digits of the password. Select OK. 3 Select Lock PPV or Unlock PPV. 4 Select Yes. Make sure the receiver is locked as described on page 45.
Locks Locking or Unlocking the Front Panel LOCKING OR UNLOCKING THE FRONT PANEL This lock keeps anyone from using the front panel buttons unless they enter the correct password, but it does not lock the remote control buttons. This option is only available on TV1 menus. 1 Press MENU and select Locks (5). 2 If the receiver is locked, enter the password using the NUMBER PAD. The receiver displays stars (*) as you enter the digits of the password. Select OK.
Chapter 6 Tips TIPS • If the receiver displays a message prompting you to enter a password, the receiver is locked. • If you want to unlock the receiver or any specific lock, use the password for the TV output you’re watching. For example, use TV1’s password to unlock TV1’s locks and TV2’s password for TV2’s locks. • When you lock a rating, you also lock all other more restrictive ratings.
Interactive TV Interacting with Your TV Play games, shop, and get help from Customer Service! Use the information in this chapter learn about interactive services available on your satellite receiver.
Chapter 7 DISH HOME Interactive TV dish home INTERACTIVE TV Press DISH on the remote control to go to dish home features available with your service. You can order channels, check the news and weather, and even play games. Make sure you connect an active phone line to your receiver. You can enjoy this feature on one TV at a time. CUSTOMER SERVICE An important feature of your satellite TV receiver is Customer Support.
Digital Video Recording Recording and Pausing Live Programs Your important phone call came after the movie started. If only you could pause TV. With your DISH Network receiver, you can pause TV. This chapter gives you the skills to use the DVR functions of the receiver to pause, reverse, and fast-forward your favorite programs.
Chapter 8 What is DVR? WHAT IS DVR? The Digital Video Recorder (DVR) features let you watch TV the way you want. You can pause, reverse, or skip back through a program. Then you can continue watching TV. Also, you can record and play back programs with full digital audio and video quality, without a VCR. For example, if you get a phone call while you are watching a live or pre-recorded program, you can pause the program, talk on the phone for an hour, restart the program, and not miss any of the action.
Digital Video Recording Reversing, Fast Forwarding, and Skipping REVERSING, FAST FORWARDING, AND SKIPPING This section describes how to use the DVR buttons to move forward and back quickly while you watch TV. Press BACK once to reverse the program 4 times as fast as normal play. Press BACK twice to reverse at 15 times normal speed, three times to reverse at 60 times normal speed, and four times to reverse at 300 times normal speed. The onscreen bar shows how far you’ve gone.
Chapter 8 Recording a Live Program RECORDING A LIVE PROGRAM Use the following instructions when you want to record a live program. PLAYING A RECORDED PROGRAM Use the following instructions when you want to play a recorded program. Note: If you have already watched part of the recording, choose either Start Over or Resume. USING RECORD PLUS When Record Plus is enabled, you can decide which receiver output (TV1 or TV2) will usually record your events as a default location.
Digital Video Recording Recording While Watching Different Programs RECORDING WHILE WATCHING DIFFERENT PROGRAMS This section describes the three basic ways to record a program while watching different programs at the same time. • Recording in Single Mode (in the following section). • Recording Events with Record Plus (on page 58). • Recording Events without Record Plus (on page 59).
Chapter 8 Recording While Watching Different Programs Recording Events with Record Plus When Record Plus is enabled, you can record two programs from the same location while watching a pre-recorded program if no one is using the other tuner. 1 Select a program you want to record. 2 Press RECORD. 3 When the Record Remainder of This Event screen displays, select one of the following: • From TV1, select TV2. • From TV2, select TV1.
Digital Video Recording Recording Options Recording Events without Record Plus While in Dual Mode with Record Plus disabled, you can set up the satellite receiver to record one program from both locations (TV1 and TV2) at the same time. 1 Find a program to watch as described on page 28. 2 Press RECORD. A message will display asking whether you want to record the remainder of the program. Select OK to begin recording now. 3 Press DVR. The DVR Event screen will open.
Chapter 8 Tips TIPS • If you have a program paused, press PLAY to watch the program. Also, press PLAY to switch from forward or reverse to play. • Press VIEW LIVE TV to catch up with the program as it’s showing now. QUESTIONS • 60 How can I fast forward through commercials? If you’re watching a pre-recorded program or if you’ve delayed a live program, press SKIP FWD or FWD on your remote control. However, you cannot skip ahead while watching live TV.
Record Future Programs Setting Up and Using Timers Have you found yourself having to make a choice between watching your favorite show and living your life away from television? Here’s some news for you: the days of rushing home to watch TV are over. Use the information in this chapter to set up to record future programs so that you’ll never miss your favorite shows.
Chapter 9 Timers and Recordings TIMERS AND RECORDINGS A timer is your instruction telling the satellite receiver the programs you want to view in the future. For most Digital Video Recorder (DVR) timers, you select a specific program on a specific channel, and tell the satellite receiver how often you want to record that program. A recording is the actual program stored for you to watch. DVR recordings are listed in the My Recordings screen, which you can find quickly by pressing DVR on the remote control.
Record Future Programs Timers and Recordings Timer Options The Timer Options screen lets you set the following (not used on all options screens): • Protect Event - Prevents your programs from being erased when the receiver fills up. • Set Channel - Select a specific channel. • Start Early - Select this option if you want to begin recording a few minutes early. • End Late - Select this option if you want to continue recording after the scheduled program ending.
Chapter 9 Timers and Recordings Reasons Why Timers are Skipped If a timer is skipped, the reason is stated on the Timers List. • Priority - This timer had a lower priority than other events being recorded at the time. • User - A user chose to skip that timer. • Duplicate event - There is already another timer set to record that program. • Event exists in DVR - The program was already recorded and can be seen in the Daily Schedule list. • Not a new episode - Used for New Episode timers.
Record Future Programs Using the Timers List Special Considerations When Using Timers • For Locked Programs - You must enter the receiver password before you can create an automatic timer. You can create a manual timer for a locked program without entering the password. However, if you do this, when the timer operates the receiver may display only an error or password entry menu. • For Pay-Per-View Programs - You must order a Pay-Per-View program when you create a timer for it.
Chapter 9 Setting Up an Automatic Timer SETTING UP AN AUTOMATIC TIMER You can create an automatic timer for a future event. The following instructions explain the simplest way to set up an automatic timer. 1 Find the program that starts in the future to record using the Program Guide or Browse Banner. The program can be a satellite or off-air program (see page 108 for instructions on connecting an off-air antenna to your receiver). 2 Select the future event. The Create Timer screen displays.
Record Future Programs Setting Up a Manual Timer SETTING UP A MANUAL TIMER A manual timer lets you set custom start and stop times for a timer. 1 Press MENU and select Daily Schedule (7). 2 Select Timers. 3 Select Manual Timer. 4 Select the Timer Frequency (see page 62 for more details). 5 Select a Timer Type (see page 62 for more details). 6 Select Options (see page 63 for more details). 7 Select the channel (satellite or off-air). Use the UP/DOWN ARROWS, PAGE UP/DOWN, or NUMBER PAD to find the channel.
Chapter 9 Setting Up a DISH Pass™ Timer SETTING UP A DISH PASS™ TIMER DISH Pass lets you create timers to record programs automatically based on your search criteria. When the receiver finds programs that meet your search criteria, it will automatically set a timer to record that program. As the program guide is updated, DISH Pass will continue to find and record your shows based upon your search criteria. Note that DISH Pass only finds programs on satellite channels.
Record Future Programs Deleting a Timer • Adjust your search terms and method.Select Set Priority to change the priority of your DISH Pass. To adjust your search, delete the unwanted DISH Pass timer and try the following: — Change your DISH Pass search term(s) to be more specific. — Select Exact Match with the Title or Info. — Choose DISH Pass when you select a future program within the Program Guide, Browse Banner or Search. This will enter the program's exact title. 8 Select Done.
Chapter 9 Tips TIPS • Make sure the Updates feature is enabled as described on page 94. By enabling this feature, the Program Guide will have the most up-to-date information, and can adjust or create timers accordingly. • Weekly, Daily, and Monday-Friday timers move only if the program is within one hour earlier or four hours later than the original time the timer was set up. These timers will adjust their length if their program's time block is extended.
Remote Control Setup Personalizing Your Remote Controls Use the information in this chapter to learn more about using your remote controls.
Chapter 10 Improving Receiver Control IMPROVING RECEIVER CONTROL These instructions help you improve your remote control settings to best operate your satellite receiver. Use the following instructions to make your remote control operate more efficiently with your receiver. Changing the Address for Remote Control 2 Because UHF signals travel long distances and go through walls, a neighbor’s remote may control your receiver by mistake. To keep this from happening, you can change the remote address.
Remote Controls Improving Receiver Control Checking the Remote Control Address You can see what address is programmed on the remote control by completing the following instructions. 1 Press and hold the SAT mode button for three seconds, until all of the mode buttons light up, and then let go of the SAT button. 2 Press POUND (#) twice. The SAT mode button will flash the same number of times as the address number (three flashes means address 3).
Chapter 10 Improving Receiver Control Adjusting the Remote Antenna Be sure to set the remote control antenna (back of the receiver) straight up so you can use the remote control from as far away as possible. Don't let the antenna touch anything. If your UHF Pro Remote Control isn't working very well from far away, you may be experiencing interference from objects near your receiver.
Remote Controls Controlling Other Components Installing a UHF Attenuator Unwanted UHF signals may interfere with signals from the remote control to the receiver. To prevent such interference, you can install a 10 dB attenuator (available from many consumer electronics parts stores). Adding this attenuator will help keep out stray UHF signals, but it also cut down how far away you can use the remote control. 1 Remove the UHF antenna from the UHF Remote Antenna input on the receiver back panel.
Chapter 10 Controlling Other Components Remote Control Modes Use the remote control’s mode buttons, SAT (satellite receiver), TV (for a TV), VCR (for a VCR or a DVD player), and AUX (“auxiliary,” for a second TV, a VCR, a tuner, an audio amplifier, or a second DISH Network satellite receiver) to set the remote to the right mode for the device. To change the mode, press the button for the device you want the remote to control.
Remote Controls Controlling Other Components Setting Up Using Device Code Tables Set up the remote to control other devices using the device codes listed on page 128. In the instructions below, the column on the left contains the instructions and the column on the right provides additional information. Instructions Additional Information 1 Turn the device on. Use the device’s front panel buttons or its remote control.
Chapter 10 Controlling Other Components Instructions 10 If the code doesn’t work, redo steps 3 through 9 with another device code from the tables. Additional Information Try every code listed for your brand until one works for your device. 11 If you can’t find a code that works try, Setting Up Using Device Codes Scan that follows.
Remote Controls Controlling Other Components Instructions Additional Information 5 Press the UP or DOWN ARROW As you press the UP or DOWN ARROW, the remote tries each code in the memory to see if it can turn off your device. When the device turns off, you have found a code that might work. Note: The mode button for the device will flash rapidly eight times when you’ve scanned all the codes for that device. 6 Press POUND (#). The mode button flashes three times if you have entered the code correctly.
Chapter 10 Controlling Other Components Instructions Additional Information For AUX mode: The first group of flashes tells you what the AUX mode controls. A quick flash (zero) before the three-digit code is for a TV; one regular flash is for a VCR; and two flashes is for a tuner, or amplifier. For example, if the TV code is 570, the AUX mode button flashes once quickly (indicating 0 for TV), pauses, flashes five times, pauses, flashes seven times, pauses, and flashes once quickly.
Remote Controls Controlling Other Components Switching Between TV and Device Volume Control When you set up the remote to control a TV, the mute and volume buttons control the TV volume. However, if you want to use the AUX mode to control a tuner or amplifier and the device has a volume setting, you can set up the remote to control the device’s volume instead of the TV volume. Be sure to set up the remote to control a device in AUX mode before using this feature.
Chapter 10 The Recover Button 1 Turn on the other receiver and display the System Info screen as described in the user’s guide for information on how to display the screen). Write the address: 2 Press and hold AUX until all the other mode buttons light up, and then let go of the button. AUX flashes. 3 Press the 3 button. 4 Use the NUMBER PAD to enter the address you wrote in step 1. 5 Press POUND (#). AUX blinks three times.
Remote Controls The Recover Button Programming the Recover Button for Remote Control 2 When your Remote Control 2 is shipped from the factory, RECOVER is set up to restore satellite TV viewing by tuning your TV (or VCR) to channel 3, 4, and other inputs. However, to use RECOVER with your remote TV (or VCR), you need to program RECOVER with the specific channel (for example, channel 60) that you use to watch TV2 programming.
Chapter 10 Tips Removing the Recover Button Channel Programming The following instructions describe how to reset RECOVER to restore satellite TV viewing by tuning your TV (or VCR) to channel 3, 4, and other inputs. TIPS • If using a specific channel for TV2 (for example, channel 60), TV2’s remote control must be programmed with a TV2 channel/input before you can use RECOVER. • Place the channel sticker on the remote TV and write down the channel you use to watch DISH Network programming.
Receiver Customization Personalizing Your Satellite Receiver Take a look through this chapter and you’ll find out how to change settings on the receiver to make it just the way you like it. As an added bonus, if you find out that you don’t like how it turned out, you can reset the receiver to the way it was when you got it. Here’s what’s in this chapter:.
Chapter 11 Using Shared View USING SHARED VIEW Shared View is a feature of Single Mode that lets you activate the TV2 audio and video outputs to display the same programming as the TV1 outputs. While using this feature, both the Remote Control 1 and Remote Control 2 for your satellite receiver can control what is displayed on all TVs connected to the system. This feature is available only in Single Mode.
Receiver Customization Using Multimedia Transferring Photos to Your Receiver Viewing Photos on Your Receiver PocketDISH Connect the PocketDISH (sold separately) to your receiver so that you can transfer your favorite recorded programs and take them wherever you go. Be sure to follow the instructions that came with your PocketDISH.
Chapter 11 Using Caller ID USING CALLER ID Caller ID displays on your TV the names of people and/or telephone numbers as they call you if you subscribe to Caller ID from your local phone company. To use this feature, make sure you have a phone line connected to the receiver and that the Caller ID feature is enabled. Caller ID Screens When you receive a call, you will see a Caller ID popup screen. You can select OK to eliminate the message. If you do nothing, it will disappear after 20 seconds.
Receiver Customization Changing Languages Using Caller ID History Use the following instructions to view and delete numbers from your Caller ID History. CHANGING LANGUAGES You may be able to change the language of some programs. An alternate language may not be available for all programs. Some programs, such as movies, indicate at the beginning whether an alternate language or descriptive video is available.
Chapter 11 Using Closed Captioning USING CLOSED CAPTIONING The receiver has many options for Closed Captioning, which allow you to change it to suit your needs. The receiver generates these closed captions directly onto the picture, so to enjoy their benefits you must enable closed captions on the receiver, not on your TV. However, if you prefer, you can still use the closed caption facility built-in to your TV if you are using the SD video outputs.
Receiver Customization Using Dolby® Surround Sound USING DOLBY® SURROUND SOUND Dolby Digital gives you the capability to enjoy programs in surround sound. An external decoder is required to enjoy this feature. Refer to your decoder user’s guide. Note: Not all programs contain a Dolby Digital sound track. The receiver uses an optical port for outputting digital audio. The optical output can provide two audio data types: Dolby Digital and Linear PCM (only Dolby Digital can provide full 5.1-channel sound).
Chapter 11 Changing the Program Guide Order • Line Mode. When you use this setting, in comparison to RF Mode, the dynamic range is wider, which makes the music and loud noises louder, but voices quieter. • RF Mode. When you use this setting, in comparison with Line Mode, the dynamic range is narrower, which makes music and loud noises quieter, but voices louder.
Receiver Customization Resetting to Factory Defaults • Standard - Partial Guide with Video. This option is preset when you first set up the receiver. The Program Guide displays video in the upper right corner and 1.5 hours of schedule per page. • Enhanced - Partial Guide with Video. Choose this option if you’d like larger text on your Program Guide. The Program Guide displays video in the upper right corner and one hour of schedule per page. • Extended - Partial Guide with Video.
Chapter 11 Scheduling Receiver Updates SCHEDULING RECEIVER UPDATES The receiver comes scheduled to update the Program Guide at 3:00 am every day. This section describes how to change the Updates settings. Keep this feature enabled so that your DVR Events and DISH Pass Timers remain current. Note: This feature does not interfere with scheduled timers.
Receiver Customization Tips TIPS • To take full advantage of Dolby Digital 5.1 surround sound, you need an optical cable and a stereo that supports this feature. • Be sure to have the receiver connected to an active phone line and have Caller ID service from your phone company to use the Caller ID feature on this receiver. QUESTIONS • How can I see who has called me in the past? Open your Caller ID History by pressing MENU, select System Setup (6) and then Caller ID History (4) on your remote control.
Chapter 11 Questions Notes 96
Connections and Setup How to Connect Your Satellite Receiver Do you have a handful of cables and a head full of questions? This chapter is the perfect place to find out how to connect the receiver to all kinds of equipment. You’ll find this chapter particularly helpful if you decide to move your receiver or if you get a new TV, VCR, or DVD player.
Chapter 12 Connecting to the Nearby TV (TV1) CONNECTING TO THE NEARBY TV (TV1) This section describes how to connect receiver TV1 output ports to a nearby TV. Select one of the following methods. HDTV Digital Audio/Video Connections The HDTV Digital Audio/Video connection provides high-quality audio and video to your HDTV or HD Monitor in one cable. 1 Connect an HDTV Digital Audio/Video cable between the HDTV Digital Audio/Video connection on the receiver and HDTV set or monitor.
Connections and Setup Connecting to the Nearby TV (TV1) YPBPR Connections The YPbPr connections provide high-quality video to your HDTV or HD monitor. 1 Connect between the YPbPr component connections on the receiver and the nearby TV using component video cables. 2 Connect audio (red and white) RCA-type cables between the receiver Audio Outputs and audio input connections that go with the YPbPr connectors on your HDTV or monitor.
Chapter 12 Connecting to the Nearby TV (TV1) Setting Up to Display in HD Once the receiver has been activated with qualifying DISH Network programming, you will be able to receive HD programs to watch. Use the following steps to select the desired HDTV format. 1 Consult your HDTV user’s guide for the HD format resolution that the TV supports (1080i or 720p). 2 Press MENU, select System Setup (6), and then HDTV Setup (8) to open the receiver HDTV Setup screen.
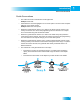
Connections and Setup Connecting to the Remote TVs (TV1 or TV2) CONNECTING TO THE REMOTE TVS (TV1 OR TV2) This section describes how to connect the receiver CH 21–69 Out connection to the cableready remote TV located in another room away from the receiver. You can use these instructions to connect TVs in your house to see programming from TV1 or TV2. This installation uses your in-home cable system.
Chapter 12 Connecting to the Remote TVs (TV1 or TV2) Note: The remote TV(s) will have to be set to the same channel mode, either off-air or cable channel mode for this installation. See your TV user’s guide for instructions on how to set your TV to off-air or cable channel modes. 4 Pick the channel in the middle of the three you selected in step 3. Write that channel down in the blank provided in step 5.
Connections and Setup Connecting to the Remote TVs (TV1 or TV2) 15 Confirm that you see a picture from the receiver on your remote TV(s). • If your picture looks good, go to step 23. • If your TV(s) do not have a picture or if it is not as clear as you would like it to be, go to the next step. 16 You may need to change the cable connection on the splitter that sends the TV signal throughout your house.
Chapter 12 Connecting to Your Dish Antenna 21 Reconnect the receiver’s cable to the input of the splitter. 22 Make sure you have a good picture on your remote TV(s). 23 If desired to remind you of which TV channel your satellite programming is on, write the channel number you wrote in step 5 on a blank channel sticker and place it on or near your remote TV(s). The stickers are inside the front cover of this guide.
Connections and Setup Connecting the Phone Line 5 Select Check Switch. Select Test. 6 The receiver begins performing the Check Switch tests. When it is finished, the Installation Summary screen displays. 7 Make sure that the information on the Installation Summary screen identifies your system correctly and shows all transponders for all satellites in your system. 8 Select OK to go to the Point Dish/Signal screen. 9 Select Cancel to exit the Point Dish menu.
Chapter 12 Connecting the Phone Line Phone System Setup You must also set up the receiver for your telephone system (touch tone or rotary), and set a telephone number prefix, if you need a prefix to make an outside call. 1 Pressing MENU, then select System Setup (6), Installation (1), and then Phone System (4). 2 Select the Touch Tone or the Rotary Phone option in the Phone Type list. 3 Select either the No Prefix or the Prefix Code option in the Outside Line Prefix list.
Connections and Setup Connecting a VCR to the Remote TV CONNECTING A VCR TO THE REMOTE TV The diagram below provides example of how to connect VCRs to your satellite TV system. For this installation, always leave your VCR powered on so that the TV can receive satellite programming. If you turn off your VCR, your TV will not be tuned to the correct channel to receive satellite programming. Note: Connecting your TV directly to the satellite receiver provides the best audio and video quality.
Chapter 12 Connecting Off-Air Antenna CONNECTING OFF-AIR ANTENNA If you want to receive channels from an off-air antenna or cable in addition to your satellite receiver programming, connect the off-air antenna/cable into your TV distribution equipment. • The 8VSB TV Antenna/Cable In on your receiver's back panel can be used to receive and view programming on the nearby TV from an off-air antenna or cable service. • Connect a VHF/UHF off-air antenna to the 8VSB TV Antenna/Cable port.
Connections and Setup Connecting Off-Air Antenna Scanning for Off-Air Channels With your off-air antenna adjusted for best reception, use these instructions to scan for offair channels for the nearby TV. 1 Make sure you have your off-air antenna connected to the receiver’s 8VSB TV Antenna/ Cable connection. 2 Press MENU, select System Setup (6), and then Local Channels (9) to open the Local Channels screen. If this is the first time you have opened this screen, it will have no channels listed.
Chapter 12 Connecting Off-Air Antenna Peaking Your Off-Air Antenna 1 Press MENU, select System Setup (6), and then Local Channels (9) to open the Local Channels screen. 2 Highlight the Channel field and use the UP and DOWN ARROWS to select a digital off-air channel. Make sure you see a green signal strength bar and a Locked indication on the meter. 3 Adjust the orientation of your antenna to maximize the signal strength.
Connections and Setup Connecting Off-Air Antenna Transmit Channel Numbers For information on channel numbers, you can visit the National Association of Broadcasters (NAB) web page at www.nab.org. On this web page, go to www.nab.org/ Newsroom/Issues/digitaltv/DTVstations.asp for a listing of digital broadcast stations and their Transmit Channel numbers. Note: Where Transmit Channel is displayed by the receiver, the NAB web page uses the term RF Channel. These terms mean the same thing.
Chapter 12 Connecting Off-Air Antenna To get the best possible digital signal reception, make sure you use the best off-air antenna for where you live: • You can receive a limited number of channels using a rabbit ears type antenna on top of the TV set, or a much larger number via a large UHF/VHF indoor/outdoor antenna. • The higher the quality of the antenna you use, the greater its range and the better its reception will be. The Consumer Electronics Association maintains a website, www.antennaweb.
Connections and Setup Using Troubleshooting Tools USING TROUBLESHOOTING TOOLS Your receiver has troubleshooting tools that a Customer Service Representative may ask you to use if you should ever run into problems while using your equipment. Even though these tools are quite helpful, it is recommended that you only use them when on the phone with a DISH Network representative.
Chapter 12 Using Troubleshooting Tools Point Dish and Check Switch The Point Dish and Check Switch screens are helpful to the Customer Service Representatives. You may be asked to display these screens when you call DISH Network. Even though there are items that can be changed, only change them when specifically directed by a Customer Service Representative. 1 Press MENU. 2 Select System Setup. 3 Select Installation. 4 Select Point Dish.
Troubleshooting and Device Codes • TROUBLESHOOTING TABLES • REMOTE CONTROL DEVICE CODES 115
Reference Troubleshooting Tables TROUBLESHOOTING TABLES Use these tables if you have problems using the system. Look in this section for a description of the problem before calling the Customer Service Center. Many problems arise from basic misunderstandings of how the system works, especially when you are just becoming familiar with it. These tables cover many problems, usually with a simple solution for each one.
Reference Troubleshooting Tables Message Numbers Number Possible Reason What to Do • There may be a problem with the multi-dish switch. • Check the coaxial cables and their connections to and from the multi-dish switch. Make sure that all required cables are in place, and check that all cable connections are tight and dry (for outdoor cables). Run Check Switch as described on page 114. If this does not work, call the Customer Service Center at 1-800-333-DISH (3474) for help.
Reference Troubleshooting Tables Message Numbers Number Possible Reason • 015 You may have just plugged in the receiver, and it is acquiring the satellite signal. Or, the receiver may have temporarily lost the signal. What to Do • • • 018 The receiver may not be connected to an active telephone line. • • • 022 • The receiver may not yet have been electronically linked with the system, via the satellite signal.
Reference Troubleshooting Tables Message Numbers Number Possible Reason • The receiver gives you three chances to enter the correct password. If you fail to do so, the receiver “times out” and will not allow you to try again for several minutes. • Wait a few minutes and then try again to enter the password. Note: The “time out” feature is designed to prevent someone from trying password after password until he or she happens to guess the right one and so gains unauthorized access to the receiver.
Reference Troubleshooting Tables Remote Control What Is Happening What to Do You cannot find the remote control. • N/A • Use the receiver front panel Control Buttons to control the receiver until you find the remote. If the remote control is permanently lost or too damaged to use, call the Customer Service Center to order a replacement. When you press a button on the remote control, the receiver does not do what you expect.
Reference Troubleshooting Tables Remote Control What Is Happening Possible Reason You use an IR extender (not a “mouse tail”), and it does not seem to work. What to Do • The IR sensor on the extender that receives the remote control signals may not be facing the remote control. • Make sure that the extender that receives the signal from the remote control is facing the right way, so that the IR sensor can receive the remote control signals.
Reference Troubleshooting Tables Watching A Program What Is Happening The receiver front panel Power light is on, but the TV image: • is black (no picture) • is frozen • has break-ups • has “snow,” • shows small squares of various colors Possible Reason • • • The receiver front panel Power light is on, and there is a picture on the TV screen, but the picture: • has sparkles or is grainy • has a herringbone pattern • lacks color or vertical hold • wobbles • looks “washed out” or fuzzy.
Reference Troubleshooting Tables Watching A Program What Is Happening Possible Reason • What to Do There may be interference from other nearby electrical devices (such as radio towers, cellular telephones, computers, microwave ovens, radios, stereos, or TVs). • Check other nearby electrical devices as possible sources of interference. • Check that all required coaxial cables are in place. • Check for moisture or water leaking into all connections.
Reference Troubleshooting Tables Timers What Is Happening 124 Possible Reason What to Do You try to set up an event timer and the receiver displays a message noting that the program is locked. • You must enter the password before you can create an event timer for a locked program. • To be able to set up an event timer for the program, first enter the password. You try to set up an event timer and the receiver displays a message noting that the program is a Pay-Per-View event.
Reference Troubleshooting Tables Timers What Is Happening Possible Reason What to Do You try to set up a manual event timer. The receiver displays an Error message. • You may have tried to set a manual event timer with invalid start or stop times. • Review the rules on start and stop times for manual event timers. The receiver does not display the program name for a manual event timer. • The receiver may not be able to display a program name for a manual event timer.
Reference Troubleshooting Tables Telephone for Voice/Data/FAX What Is Happening Possible Reason What to Do While you are making a telephone call, you hear “clicks.” • The receiver may have tried to call the Customer Service Center to send Pay-Per-View purchase information. When the receiver found that the telephone was busy, it automatically disconnected. • You do not have to do anything.
Reference Troubleshooting Tables Buying a Pay-Per-View Program What Is Happening Possible Reason What to Do Someone orders a Pay-PerView program without your permission. • You may have been away from the receiver, and someone else used it. • Lock the purchase of Pay-Per-View programs. Remember that you are responsible for all PayPer-View purchases, whether or not you authorize such purchases.
Reference Remote Control Device Codes REMOTE CONTROL DEVICE CODES These tables contain the manufacturer codes for programming the remote to control your TV, VCR, DVD player, or audio amplifier. Every attempt has been made to include all codes. If your device brand is not listed or if the codes do not work, the remote may not control your device. In some cases, codes may operate some but not all buttons shown in this guide.
Reference Remote Control Device Codes Tandy 521 605 Tatung 509 651 663 698 Technics 508 673 676 Techwood 523 573 652 654 660 676 Teknika 504 505 512 516 523 524 525 526 534 536 541 573 644 652 653 654 655 657 658 661 662 664 665 666 670 672 675 680 682 685 726 727 Telefunken 679 Toshiba 516 590 617 631 635 667 680 683 688 750 771 Totevision 526 658 668 Ultra 672 Universal 543 690 Vector Research 506 Video Concepts 570 661 Viewsonic 760 Wards 536 573 607 645 650 652 653 654 656 659 664 665 666 667 668 669 6
Reference Remote Control Device Codes Sansui 753 Sanyo 741 Sharp 712 713 714 715 749 Sherwood 646 670 736 738 744 Sony 639 645 650 687 728 729 730 Soundmatters 763 Teac 684 737 Technics 643 644 652 742 746 764 Toshiba 710 Yamaha 663 730 731 732 733 745 747 DVD Player Codes Programming in AUX mode: In most cases use these codes to program in VCR mode; however, if programming in AUX mode, press 1 before entering the VCR code.
• LIMITED WARRANTY • RESIDENTIAL CUSTOMER AGREEMENT • STAYING LEGAL • FCC COMPLIANCE 131
Appendix LIMITED WARRANTY This Limited Warranty is a legal document. Keep it in a safe place. Remember to retain your Bill of Sale for warranty service! Any items returned without a copy of the Proof of Purchase will be considered out of warranty. What the Warranty Covers This warranty extends only to the original user of the equipment and is limited to the purchase price of each part.
Appendix Residential Customer Agreement Advance Exchange Program The Advance Exchange Program allows you to have replacement equipment shipped immediately to you (depending upon where you live, it could take three to five business days). Along with replacement equipment, you will receive a prepaid shipping label and instructions on how to return the defective equipment.
Appendix Residential Customer Agreement 1. THE DISH NETWORK SERVICE A. Services Defined. DISH Network offers a wide variety of video, audio and interactive programming and other services and we are constantly striving to add new services to our lineup. For purposes of this Agreement, the term “Services” shall mean any programming or other services that are currently available from DISH Network (whether subscription based or pay-per-view based) or that we may provide to consumers either now or in the future.
Appendix Residential Customer Agreement may also be assessed. You may submit your payment by mail, on our website, through our credit card autopay program, by calling a DISH Network customer service representative or by any other means we may designate. Different or other payment options may be applicable where billing is provided through a billing agent. If payment is made using a DISH Network customer service representative, a fee will be assessed (“Live Operator Payment Fee”) as described below.
Appendix Residential Customer Agreement D. If your Services are canceled or disconnected for any reason, you are still responsible for payment of all outstanding balances accrued, including without limitation any applicable Fees. E. You understand that, except in certain limited circumstances, charges for Services, once charged to your account, are nonrefundable and no refunds or credits will be provided in connection with the cancellation of subscriptions.
Appendix Residential Customer Agreement alter any, Equipment without our prior written consent. We reserve the right to make such filings as may be determined to be necessary by us in our sole discretion to evidence our ownership rights in such Equipment, and you agree to execute any and all documents as may be so determined to be necessary for us to make such filings.
Appendix Staying Legal account to any Consumer Reporting Agency. Please include the specific item of dispute and why you believe the information reported is in error in any such notice. D.Personal Information. If you have an on-line account with us, you are fully responsible for maintaining the confidentiality of your password and account username and for all activities that occur under your password and/or account.
Appendix FCC Compliance Compliance Information Statement EchoStar Technologies Corporation, 94 Inverness Terrace East, Englewood CO., (303) 706-4000, declares that: This device complies with Part 15 of the FCC Rules. Operation is subject to the following two conditions: (1) this device may not cause harmful interference, and (2) this device must accept any interference received, including interference that may cause undesired operation.
Appendix FCC Compliance Notes 140
942 Two ColorIX.
942 Two ColorIX.
942 Two ColorIX.
942 Two ColorIX.
942 Two ColorIX.
942 Two ColorIX.
622_Inside Back.fm Page 1 Monday, December 19, 2005 1:17 PM Receiver Information Write the following information in the spaces provided below. You may need to provide this information if you call the Service Center. To get the Conditional Access Numbers, display the Important System Information menu (see Ordering Your Program Packages).