® User’s Manual
Table of Contents About the iStorage diskAshur Secure Hard Drive 4 4 iStorage diskAshur button panel 5 iStorage diskAshur - Getting Started 6 6 6 7 7 7 Using the iStorage diskAshur 8 8 8 8 9 9 Package contents Before you begin Connecting the diskAshur Connecting the diskAshur with USB Y-Cable How do I use the diskAshur the first time? What if I forget the User Password? Entering the Standby Mode Entering the User Mode Exiting the User Mode Entering the Admin Mode Exiting
Hibernating, Suspending, or Logging off 17 Troubleshooting 18 Technical Support 20 20 Warranty and RMA information Copyright © iStorage, Inc 2012. All rights reserved. Windows is a registered trademark of Microsoft Corporation. All other trademarks and copyrights referred to are the property of their respective owners. Distribution of modified versions of this document is prohibited without the explicit permission of the copyright holder.
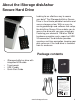
About the iStorage diskAshur Secure Hard Drive Looking for an effortless way to secure your data? The iStorage diskAshur Secure Drive is the ultimate portable hard drive and secure storage system. With an easy-touse keypad design and software free setup, the diskAshur Secure Drive enables you to access the drive with your own unique pin. Featuring your choice of 128-bit or 256 bit hardware encryption and a super-fast USB 3.
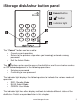
iStorage diskAshur button panel 1 2 1 2 abc def 4 ghi 5 jkl mno 7 8 wxyz cancel 0 pqrs tuv 3 3 Cancel button button Indicator light 6 9 The “Cancel” button can be used to: • Cancel current operation • Return to the previous step when you knowingly entered a wrong password • Exit the Admin Mode The button can be used to access the diskAshur and it can also be used as an OK acknowledgement in the following operations: • Entering a password • Confirming a new password The indicator light di
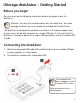
iStorage diskAshur - Getting Started Before you begin Be sure to review the following information before you begin to use the diskAshur. Attention: Use only the included cables with your diskAshur. You might damage the drive if you use a cable not included with the diskAshur. The diskAshur is designed for portable use without an AC power adapter and in most cases will be able to power on a single USB port.
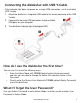
Connecting the diskAshur with USB Y-Cable If the indicator light does not power on a single USB connection, use the included USB Y-cable. 1. Attach the diskAshur’s integrated USB cable to the female connector of the USB Y-cable. 2. Connect the two male USB connectors to two available USB ports on your computer. 3. The diskAshur indicator light should glow RED.
Using the iStorage diskAshur Entering and exiting the Standby Mode, Admin Mode, and User Mode Entering the Standby Mode The Standby Mode is the default working mode of the diskAshur and is the gateway to other working modes. To enter the Standby Mode, attach the diskAshur to your computer. The drive automatically goes into Standby Mode and the indicator light turns RED. In this mode, the diskAshur is locked.
Entering the Admin Mode Note: The diskAshur cannot be recognized by the operating system in the Admin Mode. To enter the Admin Mode, do the following: 1. Attach the USB cable to an available USB port on your computer. The diskAshur goes into the Standby Mode, and the indicator light turns RED. 2. Press and hold + 0 for five seconds until the indicator light flashes RED. This indicates that you can enter the Admin Password. 3. Enter the Admin Password and press . The default Admin Password is 123456.
Password Management This section provides information about managing your password in the Admin Mode and User Mode. Changing the Admin Password You can change the Admin Password by doing the following: 1. Enter Admin Mode (refer to page 9 for details). 2. Press and hold + 9 until the indicator light flashes BLUE. 3. Enter the new password and press (The Password must be a minimum of 6 digits and a maximum of 16 digits). The indicator light flashes GREEN three times. See note below. 4.
Adding a new User Password You can add a new User Password by doing the following: 1. Enter the Admin Mode (refer to page 9 for details). 2. Press and hold + 1 until the indicator light flashes BLUE intermittently. 3. Enter a User Password and press (a minimum of 6 digits and a maximum of 16 digits) The indicator light flashes GREEN three times. 4. Re-enter the new User Password and press .
Setting the Unattended Auto Lock Feature To protect against unauthorized access if the drive is unlocked and unattended, the diskAshur can be set to automatically lock after a pre-set amount of time. In its default state, the diskAshur Unattended Auto Lock feature is turned off. The Unattended Auto Lock can be set to activate after 5, 10 or 20 minutes. To set the Unattended Auto Lock please use the following steps: 1.
iStorage diskAshur Brute Force Protection What is Brute Force Attack? A brute force attack is a method of defeating a cryptographic scheme by systematically trying a large number of possibilities; for example, a large number of the possible keys in a key space in order to decrypt a message. In most schemes, the theoretical possibility of a brute force attack is recognized, but it is set up in such a way that it would be computationally infeasible to carry out.
Setting a Self Destruct Password The diskAshur has the ability to set a password that will reset the encryption key if needed. By resetting the encryption key all data on the drive will be lost and cannot be recovered. After initiating the Self Destruct sequence, the PIN used to initiate the self destruct sequence will become the default Admin password. The drive will need to be initialized and reformatted. For directions see page 15. To set a Self Destruct password please use the following steps: 1.
Completely resetting the diskAshur If you forget all the User Passwords or Admin Passwords, you can perform a complete reset to remove all the User Passwords, and restore the Admin Password to the default 123456. Attention: Completely resetting the diskAshur will reset the encryption key, in effect making all the data on the drive unrecoverable. You will need to partition and format the diskAshur with disk management applications. To perform a complete reset of the drive, do the following: 1.
5. In the Computer Manage window, click Disk Management. In the Disk Management window, the diskAshur is recognized as an unknown device that is uninitialized and unallocated. 6. Do the following to make the drive recognized as a basic drive. • If the Initialize and Convert Disk Wizard window opens, click Cancel, then initialize the disk manually using the following steps. a. Right-click Unknown Disk, and then select Initialize Disk. b. In the Initialize Disk window, click OK. 7.
Hibernating, Suspending, or Logging off from the Operating System Be sure to save and close all the files on your diskAshur before hibernating, suspending, or logging off from the Windows operating system. It is recommended that you log off the diskAshur manually before hibernating, suspending, or logging off from your system. To log off the diskAshur, double-click Safely Remove Hardware on the Windows desktop and remove the diskAshur from your computer.
Troubleshooting This section contains troubleshooting information for the diskAshur. If you encounter any of the following problems when using the diskAshur, refer to the corresponding answers.
Q: How do I use the diskAshur without a password? A: As a full disk encryption product, the diskAshur can never be used without a password. Q: What encryption algorithm is used in this product? A: Depending on your model the diskAshur uses either AES 128-bit or 256-bit algorithm. Q: Why could I not initialize, partition or format the diskAshur? A: Ensure that you have administrator privileges. You can use only the administrator account to initialize, partition or format the diskAshur in the Admin Mode.
Technical Support iStorage provides the following helpful resources for you: 1. iStorage’s Website (http://www.istorage-uk.com) This gives you the ability to check for up-to-date information. 2. E-mail us at support@istorage-uk.com 3. Or call the Technical Support Department at +44 (0) 20 8537-3435. iStorage’s Technical Support Specialists are available from 8:00 a.m. to 5:00 p.m., GMT, Monday through Friday.
© iStorage, 2012. All rights reserved. iStorage Limited, Research House, Fraser Road Greenford, Middx. UB6 7AQ England www.istorage-uk.