User’s Guide
TABLE OF CONTENTS Disk Jockey Limited Warranty Introduction Safety Precautions Main Features Known Limitations Before Using Product Specifications List of included items Diagram of Components USB and FireWire System Requirements USB System Requirements Supported Operating Systems FireWire System Requirements Disk Jockey Overview Disk Jockey Layout How to attach a hard disk drive to the Disk Jockey General Rules for Using Disk Jockey Working with the Disk Jockey Modes Audible Warning Sounds Step-by-step examp
Host Protected Area (HPA) Troubleshooting Q & A 43 46
DISK JOCKEY LIMITED WARRANTY GENERAL TERMS EXCEPT AS EXPRESSLY SET FORTH IN THIS LIMITED WARRANTY, DISKOLOGY MAKES NO OTHER WARRANTIES OR CONDITIONS, EXPRESSED OR IMPLIED, INCLUDING ANY IMPLIED WARRANTIES OF MERCHANTABILITY AND FITNESS FOR A PARTICULAR PURPOSE. DISKOLOGY EXPRESSLY DISCLAIMS ALL WARRANTIES AND CONDITIONS NOT STATED IN THIS LIMITED WARRANTY. ANY IMPLIED WARRANTIES THAT MAY BE IMPOSED BY LAW ARE LIMITED IN DURATION TO THE LIMITED WARRANTY PERIOD.
only to the original purchaser or lessee of this Diskology branded product and is not transferable to anyone who obtains ownership of the Diskology branded product from the original purchaser or lessee. During the Limited Warranty Period, Diskology will repair or replace the defective component parts or the hardware product. All component parts of hardware products removed under this Limited Warranty become the property of Diskology.
These terms and conditions constitute the complete and exclusive warranty agreement between you and Diskology regarding the Diskology branded product you have purchased. These terms and conditions supersede any prior agreements or representations, including representations made in Diskology sales literature or advice given to you by Diskology or an agent or employee of Diskology that may have been made in connection with your purchase of the Diskology branded product.
INTRODUCTION Thank you for purchasing the Disk Jockey™, the only hard disk copy and diagnostic tool that you’ll ever need! With the Disk Jockey you can mount, mirror, span, compare, check, copy and erase hard disk drives quickly and easily. The Disk Jockey is a Swiss Army Knife of hard disk copy and diagnostic tool and it is extremely simple to use.
SAFETY PRECAUTIONS Before using the Disk Jockey, please follow these important safety precautions. Improper use of the Disk Jockey could potentially cause serious harm or injury. We recommend that you go through this document thoroughly before attempting to use the Disk Jockey. Please be careful and use common sense when working with your Disk Jockey. General Disk Jockey Warnings • If you see or smell smoke coming from the Disk Jockey immediately remove the main power adapter from the unit.
around it. If you continue to use the Disk Jockey after you suspect that it may be broken you could be at risk for fire. •Please only use the included power adapter with the Disk Jockey. Please do not connect it to another power adapter. Please make sure you insert the power cord into the proper power outlet. If you happen to plug it into a different power outlet beyond the spec of the unit it may cause the unit to fail. • Do not place heavy objects on the unit or on top of the power adapter or power cord.
all necessary static precautions including wearing antistatic wristbands (not included) and grounding yourself before working with the unit.
MAIN FEATURES 1. The Disk Jockey supports seven different copy and diagnostic modes in one product. 2. The Disk Jockey copies a hard disk drive sectorby-sector meaning that all OS files, partitions and hidden files are copied. The Disk Jockey copies data at speeds of over 2 GB/min. Copying an 80 GB drive, for example, takes approximately 35 minutes. 3. The Disk Jockey can be used as a stand-alone unit for high-speed disk copy, verify, test and erase modes. 4.
KNOWN LIMITATIONS 1. You cannot boot an operating system from hard disk drives attached to the Disk Jockey. 2. Diskology will not be responsible or liable, for any data erased inadvertently with usage of this unit. Always have a backup of valuable data before removing a hard disk drive from a computer. 3. The Disk Jockey was not designed to be used as special equipment in demanding environments such as medical, nuclear or airborne.
BEFORE USING 1. The content of this manual may change without notice; we reserve the right to update this manual without notice (please register your unit on the Diskology web site, www.diskology.com, to be made aware of any updates via email). 2. We have taken every effort to ensure that this manual is complete. However if you notice anything that is incorrect, please notify the Diskology support team at support@diskology.com 3. Windows is a registered trademark of Microsoft Corporation. 4.
PRODUCT SPECIFICATIONS 1. 2. 3. 4. 5. 6. 7. Model number, DJ-2000 Product Name: Disk Jockey IT Interface: USB 2.0 (standard rev 2) / IEEE 1394 (S400) USB Connector: Receptacle B IEEE 1394 connector type: 4 pin by 2 Weight: Approximately 4 ounces Dimensions: W 64mm D 148 mm H 42mm 8. Temperature / Humidity Specs: Temperature 5 – 35 degrees centigrade. Humidity: 20-80% (Non condensing) * There are no hard disk drives included with Disk Jockey. LIST OF INCLUDED ITEMS 1. 2. 3. 4. 5. 6. 7.
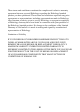
DIAGRAM OF COMPONENTS Firewire Port Access LED USB Port Power LED IDE Connector IDE Connector AC Access LED Power Button Mode Switch 12
USB AND FIREWIRE SYSTEM REQUIREMENTS The USB and FireWire system requirements are only necessary when you are using the Disk Jockey in a mode setting in which the Disk Jockey will be connected to the computer (i.e. mount, mirror or span). For copy, verify, test or erase you do not need to connect the Disk Jockey to a computer and these requirements are not applicable. USB System Requirements Windows • USB 2.0 connection • USB 1.1 connection (data transfer limited to USB 1.
• Some laptops featuring the AMD K6 CPU may not be supported at this time. Check the Diskology website for updated information. •Diskology cannot guarantee that the Disk Jockey will work in all environments. Please contact support@diskology.com for questions concerning compatibility. FireWire System Requirements Windows • Virtually any desktop or laptop system with a FireWire connection • PC’s that run versions of Windows OS’s that support FireWire as a standard component.
dowsXP • Windows 3.1, Windows95, WindowsNT, Windows98 Original Edition are not supported. Macintosh • Virtually any Macintosh with a built-in or ad-on PCI FireWire bus. Supported Macintosh Operating Systems • Mac OS 9.1, Mac OS 9.2.1, Mac OS X (10.2 or higher) • Diskology cannot guarantee that the Disk Jockey will work in all environments. Please contact support@diskology.com for questions concerning compatibility.
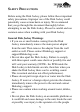
Firewire Port Access LED USB Port Power LED IDE Connector IDE Connector AC Access LED Power Button Mode Switch DISK JOCKEY OVERVIEW The Disk Jockey is a very simple, but powerful unit. Once you understand how the Disk Jockey works, you can quickly and easily accomplish a variety of tasks with the unit. In a nutshell, the Disk Jockey operates in two distinct ways, attached to a computer and not attached to a computer. The functions that can be accomplished while attached to a computer, i.e.
1. The Disk Jockey layout, what the different parts of the unit are called. 2. How to attach a hard disk drive to the Disk Jockey 3. General Rules for using the Disk Jockey that apply when using any mode. 4. Working with the Disk Jockey modes. Disk Jockey Layout First we’ll take a look at the Disk Jockey itself to familiarize you with the names of the different parts of the unit.
Jockey. If power is already applied to the unit and you try to attach hard disk drives it may be cause for electric shorts or equipment failure. 2. When attaching the hard disk drive be very cautious of static electricity. Static electricity that might have built up in the human body can cause damage to precision electronic equipment such as hard disk drives.
present,” simply set the drive to master. 5. When attaching the power cable connector and flat cable connector to the hard disk drive, make sure that the orientation is correct. If you try to force it in it could cause damage to the unit. 6. Always place the bare hard disk drive mechanisms on the included electrostatic mats when connected to the Disk Jockey. 7.
USB and a FireWire cable to the Disk Jockey. General Rules for Using Disk Jockey There are some general notes to remember when working with hard disk drives attached to the Disk Jockey: 1. The Disk Jockey supports FireWire Revision A, or the 50 MB/sec flavor of FireWire. 2. If you are ever only attaching one drive, for example in Mode 0 (Standard Mode) or if you are only erasing or checking one hard disk drive, please attach the hard disk drive to the Drive 1 port on the Disk Jockey. 3.
rest the hard disk drive on the static mats included with the Disk Jockey. 7. The Disk Jockey will automatically shut itself off after completing a Copy, Compare, Check or Erase. Once the action has been completed the Disk Jockey will emit an audible alarm to signal its completion. The Disk Jockey will then spin down the hard disk drives and automatically shut itself off.
NOTE: At shipping the unit is set to Mode 0, or standard mode Audible Warning Sounds The Disk Jockey has been designed to alert you to any failures during the various operations via audible warning sounds emitted from the Disk Jockey body. The audible warnings are as follows: 1. Three long beeps (beeeeep, beeeeep, beeeeep) indicates that there is no hard disk drive attached to the Drive 1 port or that the hard disk drive that is attached to the Drive 1 port is not Ultra DMA compatible.
Step-by-step example of a Disk Copy Throughout the rest of the manual you will be given more detailed information on the various modes of the Disk Jockey. Overwhelmingly, however, the Disk Jockey is used as a portable hard disk duplicator. The following step-bystep guide takes you through the copy process using the Disk Jockey. Once you have a feel for how the Disk Jockey works in copy mode, you will most likely be able to work the Disk Jockey in any mode. 1. Make sure power is off or disconnected. 2.
blinking and the LEDs on the source and target sides of the Disk Jockey will remain solid red showing disk access. 10: The Disk Jockey copies data at approximately 2GB/ min, meaning an 80 GB drive should take slightly less than 40 minutes. 11. When the copy has been completed, the Disk Jockey will emit one audible alarm and then power down the drives and turn off allowing you to leave the copy process unattended. PROGRESS INDICATOR % of Mode Complete 0-19% 20-39% 40-59% 60-79% 80-99% No.
to the Disk Jockey via the Drive 1 and Drive 2 ribbon and power cables (disk ports). The Disk Jockey is then attached directly to your Macintosh or Windows computer using either USB 2.0 or FireWire (IEEE 1394). The Disk Jockey is also backward compatible with USB 1.1 although data transfer speeds will be limited to USB 1.1 standards (translation: slow).
3. Push down on the Blue Function Button (located on the top of the Disk Jockey) one time. This will apply power to the hard disk drives and they will begin to rotate (spin up). The Power light, located on the “Drive 1” side of the Disk Jockey will be red. When the Power light turns green the hard disk drives should mount to the desktop (Mac) or become accessible under My Computer (Windows) making them accessible to your computer for erasing, partitioning or formatting the drives.
you must get them in the same state, meaning either erase the data on both (using the Erase Mode on the Disk Jockey) or if you would like to mirror a drive that already has data on the drive, copy the data to the second drive using the Copy Mode, compare that the data on both drives are exact by using the Compare Mode and then switch to the Mirror mode to continue working with the Mirror. There are a few important details to be aware of when working in Mode 1, or Mirror Mode: 1.
1. If the error is on the hard disk drive attached to the Drive 1 port you will hear three long beeps (beeeeep, beeeeep, beeeeep). 2. If the error is on the hard disk drive attached to the Drive 2 port you will hear two short beeps three times (beep beep, beep beep, beep beep). How to create a mirror using Mirror Mode 1. Turn the power off to the Disk Jockey and change the mode select switch to Mode 1, Mirror Mode. 2. Attach the hard disk drives to the Drive 1 and Drive 2 ports. 3.
Mode 2 is referred to as the Combine Mode or Spanning. In this mode two drives of various or the same sizes can be attached to the Disk Jockey on the Drive 1 and Drive 2 ports. The Disk Jockey will then combine the two drives and mount one hard disk drive on your desktop. Data written to the Combined disks will be written contiguously to the first disk and then will be “spanned” onto the second disk without the user or the computer seeing a delay.
2 ports. 3. Push down on the Blue Function Button (located on the top of the Disk Jockey) one time. This will apply power to the hard disk drives and they will begin to rotate (spin up). The Power light, located on the “Drive1” side of the Disk Jockey will be red. When the Power light turns green the hard disk drives should mount to the desktop (Mac) or become accessible under My Computer (Windows) making them accessible to your computer for erasing, partitioning or formatting the drives.
1. The speed of the copy is dependant on several factors including: spindle speed of the hard disk drives, both the master disk and the target disk. Naturally a 5400 RPM hard disk drive copying to another 5400 RPM hard disk drive will be significantly slower than two 10,000 RPM hard disk drives copying data from one to the other.
remaining free space may be used if the operating system supports this. NOTE - Macintosh users will not be able to access the extra space after a disk copy. 5. Sector-by-sector copies copy the free space on the disk. For example, if you have a 20 GB drive and it only contains 10 GB of information, the Disk Jockey will still copy the unused sectors of the hard disk drive to the disk attached to the Drive2 port.
The Power light (located on the side of the Disk Jockey near the Drive1 port) will be red, once it turns to green, the Disk Jockey is ready to begin the copy (see step 4). 4. Push down on the Blue power button once again and the disk-to-disk copy will begin. WARNING - Copy mode will over write all of the data on the hard disk drive attached to the Drive2 port. It is not necessary to format or erase the disk on the Drive2 port prior to copying. 5.
4). This mode will do a sector-by-sector compare to ensure that the data was copied exactly from Drive1 to Drive2. CAUTION – If during copying some abnormality occurs or errors are detected a low frequency sound (a buzzer will sound a low frequency buzz) will occur and then the power LED will turn red. When this happens push on the blue Power button for approximately 10 seconds and the Disk Jockey will power off. It is a good idead to recheck the hard disk drives using the standard mode.
1. Turn the mode select switch to the Compare Mode 2. Connect the hard disk drive that you want to “compare from” to the Drive1 port and connect the hard disk drive that you want to “compare to” to the Drive2 port. 3. Push down on the Blue power button firmly. The first push of the button will apply power to the hard disk drives and they will begin to rotate, or spin up. 3.
hard disk drives are attached to the Disk Jockey. The Disk Jockey will check the hard disk drives for disk errors and will report to the user the status of the drives via audible alert signals. In Disk Check Mode the Disk Jockey IS NOT connected to the computer. There are a few notes to be familiar with prior to running the Disk Check operation. 1. Both hard disk drives need to be Ultra DMA compatible. 2. You can connect two hard disk drives to the Disk Jockey to check them both simultaneously. 3.
seen via the LED. The LED is labeled as “LED 1” and is located to the right of “Access 2” and “Access 1.” The visual representation of the progress on all Disk Jockey modes (where applicable) can be viewed based on the following chart: 5. At the end of the Disk Check Mode the buzzer will sound signaling completion and the LED will continue to stay on, 3 seconds later power will be turned off automatically.
There are a few notes to be familiar with prior to running the Disk Erase operation. 1. Both hard disk drives need to be Ultra DMA compatible. 2. You can connect two hard disk drives to the Disk Jockey to check them both simultaneously. 3. If you are checking only one hard disk drive please make sure that you connect it to the Drive 1 port. Data Erase 1. Turn the Mode Select switch to Data Erase mode (either x1 or x3) 2.
5. At the end of the Data Erase Mode the buzzer will sound signaling completion and the led will continue to stay on, 3 seconds later power will be turned off automatically.
FORENSIC DISK JOCKEY ADDENDUM The Forensic model of the Disk Jockey adds the security of write protection. While the copy procedure of the DJ IT has always featured write protection, meaning that in a mode 3 copy the source disk was always write protected, you could write to a disk attached to the Drive1 port, or source side, in various other modes, including standard mode (mode 0), mirroring mode (mode 1), spanning mode (mode 2) and in either erase mode (modes 6 and 7).
Other than the constant write protection of the Drive1, or Source side, the Forensic and IT models of the Disk Jockey operate in much the same manner. The way one would complete a mode 3 copy with the IT model, for example, is the same way one would complete a mode 3 copy with the Forensic model. The two models do, however, differ slightly in feature set. Mode switch settings for the Forensic Disk Jockey: Mode 0 – Standard Mode.
Mode 3 – Copy w/ HPA & DCO – In this mode you can copy data from a source to a destination hard drive including the HPA & DCO information. More on HPA and DCO follow this table of mode switch settings. Mode 4 – Compare Mode – This mode is exactly the same as the mode 4 position found with the DJ IT. For more information on this mode please see the description of Mode 4 compare, or verify, found elsewhere in this guide.
remains write protected in either of the erase modes. One of the key features of the Forensic Disk Jockey is the ability to copy the Host Protected Area (HPA) and Device Configuration Overlay (DCO) areas of a hard disk drive. Many capture devices (hardware and software) do not actually copy the HPA and DCO areas of a hard disk because the device is not designed to detect these areas and therefore will simply ignore them altogether.
DCO allows systems to modify the apparent features provided by a hard disk drive device. DCO provides a set of commands that allows a utility or program to modify some of the modes, commands and feature sets supported by the hard disk drive. DCO can be used to hide and protect a portion of the drive’s area from the operating system and file system.
45
TROUBLESHOOTING Q & A Q. What happens when copy mode ends in an error? A. Please verify the hard disk drive (HDD) specs. Copy mode requires that both HDDs be UltraDMA compatible. Also, there is possibility that the HDD itself may have a problem. Here, we recommend you test the HDD in “check mode” first to verify there is no problem with the HDD itself, before copying. Q. After copying from the boot HDD which includes a bootable operating system, is it possible to boot from the copied-to HDD? A.
use the copied-to HDD’s additional space as an expanded space. If the copied-to HDD has already pre-assigned this additional space, then it must first be deleted before being assigned as expanded space. With a Macintosh it is necessary to purchase the Disk Jockey Expander to recover the extra space as the ability to recover the space IS NOT built into the Macintosh operating system. Q. Is it possible to copy hard drives of different specifications (RPM, cache memory size, manufacturer, access time)? A.
Q. If the copied-from HDD has a bad sector, is it still possible to continue the copy operation? A. No, it’s not. The Disk Jockey does not have a sector-skip function; hence if there is a problem reading a particular sector from the copied-from HDD, the copy operation ceases, and reports an error. Q. How long does the copy operation take? A. It depends on the capacity of the copied-from and the copied-to HDD. In our testing, a 40GB HDD was copied in approximately 20 minutes. Q.
1. Cabling – Often times, the cabling is not firmly connected. We recommend that you remove the drive from the cable, the cable from the DJ, reassemble and try again. 2. Master – Make sure that both drives connected to the Disk Jockey have been jumpered to “master” and not to “slave” or “master with slave present.” On very rare occasions we have seen success with the drives set to cable select. See the FAQ on the Diskology web page http://www.diskology.com/ djfaqs.
numbers, built at different manufacturing facilities or at different dates (example one in April, one in November). So with this all said, we typically recommend copying to a slightly larger drive. 4. Bad sectors – If the Disk Jockey encounters a bad sector on a hard disk drive, it will retry the bad sector 32 times. If after 32 times the Disk Jockey still cannot successfully read data from the disk it will issue an audible alert. Typically this means physical damage to the disk platter.
up and the “power” light will light up red. If you watch closely, you can see the drive access LED light up very quickly one time when each of the drives has been spun up or becomes “on line.” Then you will see the power light go from red to green and the device is ready for the copy process. Press down on the blue button one more time firmly and the copy process should begin. Thank you again for your purchase! We hope that you enjoy using the Disk Jockey and recognize what a powerful tool it can be.