
User Manual

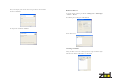


Now enter your product details, in the following screen and click OK. To add
more products repeat this task
In the above example we have created a product identifier for a 15” TV 001-
3004. Normally these fields would be created by the software application
driving Bounce, but in this case you just need to create a placeholder for
assigning an EPOP
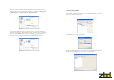
Assigning an EPOP
Once the product has been added, you now need to add an EPOP to the
system, right click on the product you created to assign the EPOP too, as
shown below.
You have now completed adding a product and EPOP onto the system
Updating an EPOP
The supplied software includes a utility application that provides the ability to
update EPOPs with pre-defined images. The application is called
BounceUpdater.
To update an image to the EPOP, first you need to move the required images
to the following default image directory location
XP is
“<drive>:\Documents and Settings\All Users\Application
Data\Bounce\BounceUpdater\Images
Vista is
“<drive>:\Program data\Bounce\BounceUpdater\Images
Please note this is a hidden folder location and will require you to set folder
settings to view hidden files and folders
You can find a selection of predefined images on the supplied CD-ROM in
D:\Images\EPOP500 and D:\Images\EPOP300
The following screen will appear, enter the EPOP serial number located on
the back of the EPOP and click OK.
(Please note the process for adding a new EPOP to the system can take up to
50sec and happens only once during the initial configuration phase when
adding a new EPOP.