
User's Manual


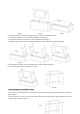


Table Of Contents
- Features
- Safety Warnings and Precautions
- Assembly and Connection
- Packing List
- Interfaces
- Remote Control
- Description of Basic Operation
- Power on/Standby
- About Launch Desktop
- Description of Wallpaper Switch
- File Manager
- Local Settings
- Technical Specifications
- Cleaning and Maintenance
- Names and Contents of Toxic and Hazardous Substan
- or Elements in the Product

7
/
25
(Fig. 3) (Fig. 4) (Fig. 5)
4. Assemble the bracket and digital signage using a hex wrench and dedicated screws.
4-1. First lock the bracket on one side with 3 dedicated screws (Fig.6).
4-2. Tighten the bracket on the other side with 3 dedicated screws (Fig.7).
4-3. Finally lock the support bar, and install two dedicated screws on the left and right sides (Fig.8).
(Fig. 6) (Fig. 7) (Fig. 8)
5. Gently shake the support to confirm whether the screws are tightened (FIG. 9).
6. As shown in Figure 10, lift and place the machine.
(Fig. 9) (Fig. 10)
Cable Management Installation mode
1. Take out the cord management channel and tear off the surface coating of the bottom adhesive on the back.
Refer to Figure 1.
2. Paste the channel on one of the leg of the table, leaving 25mm space from the top and bottom to let cord
come through, as shown in Figure 2.