
User's Manual


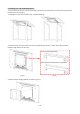
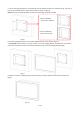
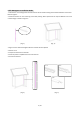

Table Of Contents
- Safety Warnings and Precautions
- Assembly and Connection
- Packing List
- Interfaces
- Remote Control
- Description of Basic Operation
- Power on/Standby
- About Launch Desktop
- Description of Wallpaper Switch
- File Manager
- Local Settings
- Technical Specifications
- Cleaning and Maintenance
- Names and Contents of Toxic and Hazardous Substan
- or Elements in the Product

7
/
26
If installing as a wall-mounted product
1. Use the 6mm hex wrench in the accessory bag to remove the 8 socket head cap screws connecting the base
bracket and the screen(Fig.1);
2. Carefully lift out the unit as shown in Fig. 2 (avoid scratching);
(Fig. 1) (Fig. 2)
3. Continue to use a 6mm hex wrench to loosen 4 socket head cap screws, and then lift the wall-mounted
bracket to align with the screw holes;
(Fig. 3) (Fig. 4)
4. Remove the wall hanging bracket, as shown in Figure 5;
(Fig. 5)
Wall mounted bracket fixing:
Wall-mounted bracket position is adjustable: