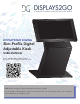
DISPLAYS2GO DIGITAL Slim-Profile Digital Adjustable Kiosk USER MANUAL Model: DGKTCH49BK, DGKTCH49WH Description: 49-Inch Digital Touchscreen Kiosk NOTE: Before using the product, please read the instructions carefully. Do not attempt to disassemble this product. If the product does not work properly, please call our Customer Service Department at 1-844-221-3393.
Contents Features ................................................................................................................................ 3 Safety Warnings and Precautions ........................................................................................... 3 Assembly and Connection ...................................................................................................... 5 Packing List ...............................................................................................
Features 1. Embedded with Android 7.1 smart operating system and unique UI design, bringing you a more convenient operation and better visual experience. 2. Support USB mouse and keyboard, realizing easy manipulation like a computer. Using a mouse for set up is recommended. 3. Built-in Wi-Fi module, high capacity memory and high capacity cache, making it smoother to watch 1080P HD movies and play big games. 4.
WARNING Do not use power supply other than AC 110V, 60Hz. Cut off the power supply before connecting or disconnecting any cables. Do not place the Digital Signage on any instable positions, or else it may be damaged or cause fire. Do not place the Digital Signage in the positions such as: 1. The environment subject to direct strong sunlight, moisture, extreme temperature or too much dust; 2. The environment with flammable or explosive materials; 3.
CAUTION Do not let children climb onto the Digital Signage. Keep the small parts away from children to prevent them from swallowing. If the Digital Signage won’t be used for a long time, please turn it off and pull out the power plug. To adjust the position of the Digital Signage, please disconnect all power cords and move slowly to avoid tip over. Do not scratch or knock the LCD with hard object, or twist and squeeze the LCD.
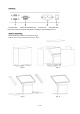
Interfaces 1. USB interface; 2.RJ45 interface(Ethernet); 3.Power port; 4.On/Off button; Note: Please pull out the power plug before installing or disassembling the unit! Steps for Unpacking 1. Disassemble the wooden case as shown in Fig.2; 2. Lift out the unit, then remove EPE as shown in Fig. 3; (Fig. 1) (Fig. 2) (Fig. 3) (Fig.
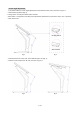
Screen angle adjustment 1. The switch button for screen angle adjustment is at the bottom of the screen, as shown in Figure 1 2. Switch button guidance (Fig. 2): Locking status: normally, the switch button is locked Active status: it is required to manually press and hold the switch button to raise the screen to 10°, or press the screen down to 35 ° Locking status Active status Fig. 1 Fig. 2 3. Take the device out of the crate, screen default angle is 35 °(Fig. 3) 4.
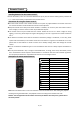
Remote Control Installing batteries for the remote control: Remove the battery cover and insert two AAA batteries (1.5V). Ensure that the battery polarity matches the “+”/“-” marks in the battery compartment of the remote control. Precautions for using the remote control: Aim the remote control at the receiver window. Do not place any object between the remote control and the receiver window to avoid interference with the normal operation. Keep the remote control away from violent vibration.
Description of Basic Operation Power on/Standby Insert the power plug into the outlet. If the Digital Signage has the switch button “I”, turn it on; if you press the switch button “O”, the Digital Signage enters standby state. In power on state, enter “System Assistant” and press the “ ” button on the remote control, and the Digital Signage enters standby state.
Fig. 3 Local Settings 1. Click the Main Apps button “ ” in the Home page to enter the “APPS” menu interface (Fig. 1) 2. Click the “Settings” icon in the “APPS” menu interface (Fig. 2) and enter “Wi-Fi” menu (Fig. 3); 3. Click options in the “Wi-Fi” menu and set up different options. Fig. 1 Fig. 2 Fig.
Description of Settings Interface (shown on the right) Icon Function WIFI switch Bluetooth Data usage Display Notifications Sound Apps Screenshot Setting Storage Battery Memory Users Location Security Accounts Google Languages & input Backup & reset Date & time Status of Menu Bar 1. Click the “setting”(Fig. 1); 2. Click the “Display”(Fig. 2); 3. In "Display navigation", click "√" in the option box to hide the menu bar (Fig. 3); 4. The display interface of the hidden menu bar is shown in Figure 4. Fig.
Fig. 3 Fig. 4 DiViEx APP Introduction System requirements: Step 1: Before using this application, make sure your machine meets or exceeds the following system requirements: CPU RK3288 ROM 16GB Operating system Android 7.1 How to upload media files : Step 2: Make new directory named “MediaFolder” in root directory in U disk. Open "MediaFolder", create 3 subfolders, and change their names to "Images", "Videos", "Music".
Step 3: Plug in the USB drive into the device and click the DiViEx App to open it. Step 4:When the screen shows “Copy finished” after “Usb Disk:”, Setting: Step 1: Select the time you would like each picture to be on the screen for by dragging the bar to the desired time. Select how you would like the images to display. Select the desired transition effect between pictures.
Edit picture: This function show all pictures, you can edit all pictures, and remove it. Edit picture There are four corners and four border to crop the picture, you can drag it Filter Set different filter for the picture, we support the following filter: AUTO_FIX, BLACK_WHITE, BRIGHTNESS, CONTRAST, CROSS_PROCESS, DOCUMENTARY, DUE_TONE, FILL_LIGHT, FISH_EYE, FLIP_HORIZONTAL, FILP_VERTICAL, GRAIN, GRAY_SCALE, LOMISH, NEGATIVE, PSTERIZE, ROTATE, SATURATE, SEPIA, SHARPEN, TEMPERATURE, TINT, VIGNETTE.
Image deletion Click " " to delete unwanted pictures Music: List all music files int Playlist library Add music to playing list music from Playlist library, you can click right arrow, music title will show the number of playlist music. To remove background music from the playlist, click the left arrow in the playlist Factory Reset: 1. Get into Settings, then click “Backup & reset” (Fig. 1) 2. Click “Factory data reset” (Fig. 2) 3.
Fig. 1 Fig. 2 Fig. 3 Screen Rotate: 1. Click the Main Apps button “ ” in the Home page to enter the “APPS” menu interface (Fig. 1) 2. Click “System aide” into Fig. 2 3. Choose the degree you would like to Rotate screen, then click “Confirm”, after the restart, the screen will be rotated (Fig. 3) Fig. 1 Fig. 2 Fig.
Choose System Language: 1. Get into Settings, then click “Language & input” (Fig. 1) 2. Click “Languages”, then click “Add a language” (Fig. 3) 3. You can add the required system language (Fig. 4) 4. Drag the system language you just added up to the front(Fig. 5) Fig. 1 Fig. 2 Fig. 3 Fig. 4 Fig.
Technical Specifications Panel Power supply Environment Functions ITEM SPECIFICATION LCD size 49” Light source LED backlight Resolution 1920*1080 (pixels) Brightness (typ.)/(min) 400cd/m2 (typ.) Contrast (typ.) 1200:1 (typ.) Response (ms) 10ms (typ.) Pixel pitch 0.19 (H) mm * 0.56 (V) mm Refresh rate 60Hz Viewing angle 178° (H)/178° (V) Color saturation 68% Viewable area 1073.8(H) mm * 604.0(V) mm Chromaticness 16.
Functions I/O interfaces Structure Language Supported Video Files AVI, MPEG4, WMV, MKV, FLV, MP4, MOV Supported Photo Files JPG, JPEG, BMP, PNG, GIF Audio output, supported files Left and right audio channel, MP3 RTC (real-time clock) Yes Schedule power on/off Yes System update USB compatible App installation Support download and installation TF N/A Ethernet (RJ45) 1 HDMI N/A VGA N/A Headset N/A USB 2 SIM N/A Net weight 73kg Gross weight 99kg Unit dimensions (W*D*H) 1157
Troubleshooting the Digital Signs – DGKTCH49BK, DGKTCH49WH Issue No picture or sound Probable Cause Unit not plugged into wall outlet Power cord not properly connected to the terminal on the back of the unit. Unit not powered on Wall outlet not working Solutions □ □ □ □ □ No sound (but picture is working) Volume not adjusted on the remote control. Content/Video does not have sound. Content format is not compatible. Speakers do not work.
No Wi-Fi signal Wi-Fi is not turned on in product settings. Wi-Fi is not connected to a network Low or no signal from the router Antenna is missing or not pointed upward. Damaged PC board □ Check that Wi-Fi is turned on in settings o Click the settings icon from the Android home screen. o o Click “Wi-Fi”. Click the on/off icon in the upper right hand corner to turn on Wi-Fi. “On” will appear on the upper left hand side.
Android board is defective. Images> Editor > Paste o Open SlideShow app and select desired trasitions, slide time and looping > Play MX Player steps > Follow same steps as SlideShow App > MediaFolder > Video > Editor > Paste. o Open MX Player and select video to play. o Loop video: While the video is playing, click on the video and there should be 3 dots in the top right corner.
Names and Contents of Toxic and Hazardous Substances or Elements in the Product Part name Toxic and hazardous substances or elements Pb Display Shell О Circuit board assembly * Hg Cd Cr6+ PBB PBDE О О О О О О О О × × О О О О О Wires О О О О О О Metal parts О О О О О О Packaging materials* О О О О О О Remote control О О О О О Speaker О О О О О О О О О О Accessories* О * : Circuit board assembly includes PCB and the electronic elements thereof;
FCC STATEMENT: This device complies with Part 15 of the FCC Rules. Operation is subject to the following two conditions: (1) This device may not cause harmful interference, and (2) This device must accept any interference received, including interference that may cause undesired operation. Warning: Changes or modifications not expressly approved by the party responsible for compliance could void the user's authority to operate the equipment.