
Install Instructions
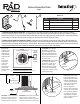

5 Anchor must be driven to the appropriate depth.
IMPORTANT: Cable shall be fully tensioned when
attached to the angle bracket. Drive rod may
be used to attach cable to the angle bracket as
shown to ensure adequate tension.
5 El ancla debe descender hasta la profundidad
apropiada.
IMPORTANTE: El cable debe mantenerse
totalmente tenso al sujetarse a la escuadra.
Puede usarse la barra de impulsión para sujetar
el cable al escuadra. Tal como aparece en el
dibujo, a n de asegurar la tensión debida.
DRIVE POSITION
(POSICIÓN DE IMPULSIÓN)
DRIVE ROD
(BARRA DE IMULSIÓN)
AC UNIT
ANGLE BRACKET
(ESCUADRA)
CABLE EYE
(OJILLO DEL
CABLE)
LOCKED POSITION
(POSICIÓN DE
CIERRE)
ANCHOR BEGINNING TO
ROTATE (DE ANCIA
COMENZODE A GIRAR)
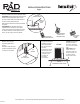
6 Secure anchor eye by
hammering down tab on
bracket.
6 Asegure el ojillo del ancla
doblando la pestaña sobre la
escuadra con un martillo.
CABLE EYE
(OJILLO DEL CABLE)
TAB
(PESTAÑA)
7 With both brackets
installed, ensure the
cable attachments
are tight and unit is
secured.
7 Asegúrese que las
adiciones de cable
se encuentren bien
ajustadas y que
la unidad se
encuentre
inmovilizada.
SIDE VIEW
CONDENSER WITH ANCHOR SYSTEM
CAUTION: Use care when
operating a weedeater
near anchor cable. Metal
strap can be used to shield
cable.
PRECAUCIÓN: Tenga
cuidado al usar una
segadara de pasta cerca
del cable de anciaje. Los
cortadores metalicos
podrían dañas el cable.
AC Unit
www.diversitech.com | DiversiTech Corporation 6650 Sugarloaf Parkway #100 Duluth, Ga 30097 | 800.995.2222
AC ANCHOR SYSTEM
INSTALLATION INSTRUCTIONS
Page 2
DOC19712