User Manual v1.0 2022.
Searching for Keywords Search for keywords such as “battery” and “install” to find a topic. If you are using Adobe Acrobat Reader to read this document, press Ctrl+F on Windows or Command+F on Mac to begin a search. Navigating to a Topic View a complete list of topics in the table of contents. Click on a topic to navigate to that section. Printing this Document This document supports high resolution printing.
Using this Manual Legend Warning Important Hints and Tips Reference Read Before the First Flight Read the following documents before using DJI AVATATM. 1. User Manual 2. Quick Start Guide 3. Safety Guidelines It is recommended to watch all tutorial videos and read the safety guidelines before using for the first time. Prepare for your first flight by reviewing the quick start guide and refer to this user manual for more information.
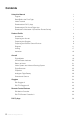
Contents Using this Manual 1 Read Before the First Flight 1 Video Tutorials 1 Download the DJI Fly App 1 Download the DJI Virtual Flight App 1 Download DJI Assistant 2 (Consumer Drones Series) 1 Product Profile 4 Introduction 4 Preparing the Aircraft 5 Preparing the Goggles 6 Preparing the Remote Control Devices 9 Diagram 11 Linking 17 Activation 18 Aircraft 19 Flight Modes 19 Aircraft Status Indicator 20 Return to Home 21 Vision System and Infrared Sensing System 23 Fl
DJI Avata User Manual Flight 59 Flight Restrictions 59 Pre-Flight Checklist 61 Starting/Stopping the Motors 61 Flight Test 63 Maintenance 64 Aircraft 64 Goggles 74 Appendix 3 59 Flight Environment Requirements 77 Specifications 77 Firmware Update 83 Aftersales Information 83 © 2022 DJI All Rights Reserved.
Product Profile Introduction DJI Avata features a compact and portable aircraft body, which is equipped with a propeller guard. With both a Vision System and an Infrared Sensing System, it can hover stably and fly flexibly indoors as well as outdoors, and automatically initiate Return to Home (RTH). With a gimbal and 1/1.7″ sensor camera, the aircraft stably shoots 4K 60fps ultra-HD video and 4K photos. The aircraft has a maximum hover time of approximately 18 minutes.
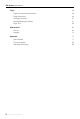
DJI Avata User Manual Preparing the Aircraft 1. Remove the gimbal protector from the camera. 2. Remove the Intelligent Flight Battery and use a USB charger to charge the battery. It takes approximately 90 minutes to fully charge an Intelligent Flight Battery. 3 2 1 ≥30 W USB PD 1 2 It is recommended to use the DJI 30W USB-C Charger or other USB Power Delivery chargers. It is recommended to attach a gimbal protector to protect the gimbal when the aircraft is not in use.
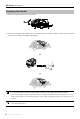
DJI Avata User Manual Preparing the Goggles DJI Goggles 2 1. Unfold the antennas. 2. Remove the screen protector. 3. Attach the headband to the goggles. 3 1 2 4. Use the power cable (USB-C) provided to connect the power port of the goggles to the goggles battery. Press the power button once, then press again and hold for two seconds to power the goggles on. 3 1 2 6 © 2022 DJI All Rights Reserved.
DJI Avata User Manual 5. Wear the goggles and adjust the headband until the goggles fit comfortably. 6. Use the IPD (Interpupillary Distance) Slider / Diopter Adjustment Knob (hereinafter referred to as "knob") to adjust the distances between the lenses and the diopter to get a clear view. a. Rotate both the knobs in the direction as shown to unlock them. Once unlocked, the knobs will pop out. 56 - 72 mm 56 - 72 mm b.
DJI Avata User Manual The diopter lenses do not support astigmatism correction. If you require astigmatism correction or if the goggles’ diopter is unsuitable, you can purchase additional lenses and use the eyeglass frames provided to install them on the goggles. Refer to the “Using the Eyeglass Frames” for more information. When adjusting the diopter for the first time, you are advised to adjust to a degree that is slightly lower than the strength of your actual eyeglasses.
DJI Avata User Manual 4. Align the lenses over your eyes and pull the headband down. Adjust the headband size until the goggles fit securely and comfortably on your face and head. 5. Turn the IPD slider to adjust the distance between the lenses until the images are properly aligned. 58-70 mm The goggles can be worn over glasses. DO NOT use the goggles battery to power other mobile devices. Preparing the Remote Control Devices Press the power button once to check the current battery level.
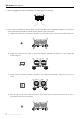
DJI Avata User Manual DJI FPV Remote Controller 2 1. Charge the battery. 2. Remove the control sticks from the storage slots and mount them on the remote controller. 3. Unfold the antennas. 2 1 10 © 2022 DJI All Rights Reserved.
DJI Avata User Manual Diagram Aircraft 5 6 7 4 3 8 1 10 11 13 12 2 9 14 1. Propellers 6. Upper Frame 11. Power Port 2. Motors 7. Intelligent Flight Battery 12. USB-C Port 3. Propeller Guard 8. Battery Buckles 13. microSD Card Slot 4. Gimbal and Camera 9. Power Button 5. Aircraft Status Indicator 10. Battery Level LEDs 14. Landing Gears (Built-in antennas) 15 16 16 15. Infrared Sensing System 16.
DJI Avata User Manual Goggles DJI Goggles 2 1 22 3 4 5 6 1. Antennas 2. Touch Panel 3. Headband Attachment 4. Power Port 5. USB-C Port 6. IPD Slider / Diopter Adjustment Knob 7. microSD Card Slot 8. 3.5 mm Audio Port 9. LED Dot Matrix Display 10. Lenses 10 10 8 9 11 11. Proximity Sensor Detects whether the user is wearing the goggles and automatically turns the screen on or off. 13 12 12. Link Button 7 13. Foam Padding DJI FPV Goggles V2 1 3 22 4 66 88 12 5 5 77 1.
DJI Avata User Manual 10 10 12 12 99 13 13 11 14 14 15 15 16 18 18 9. Headband Attachment 10. Foam Padding 11. Lenses 12. Air Vent 13. Shutter/Record Button Press once to take photos or start or stop recording. Press and hold to switch between photo and video mode. 14. Back Button Press to return to the previous menu or exit the current mode. 13 © 2022 DJI All Rights Reserved. 17 17 15. 5D Button Toggle the button to scroll through the menu. Press the button to confirm.
DJI Avata User Manual Remote Control Devices DJI Motion Controller 11 22 7 7 10 10 44 3 3 55 66 8 8 99 1. Battery Level LEDs 5. 2. Lock Button Press twice to start the motors of the aircraft. Gimbal Tilt Slider Push up and down to adjust the tilt of the gimbal. Only available before takeoff, during RTH, or landing. 6. Shutter/Record Button Press once to take photos or start or stop recording. Press and hold to switch between photo and video mode. 7.
DJI Avata User Manual DJI FPV Remote Controller 2 5 5 3 3 4 7 7 4 6 2 6 1 2 99 1 88 8 9 12 11 10 10 14 1. Power Button Press once to check the current battery level. Press, and then press and hold to power the remote controller on or off. 2. Battery Level LEDs Displays the current battery level of the remote controller. 3. Lanyard Attachment 4. C1 Button (Customizable) The function of this button can be adjusted in the goggles. By default, press once to enable or disable ESC Beeping.
DJI Avata User Manual 15 16 16 17 17 18 18 15. F1 Right Stick Resistance Adjustment Screw (Vertical) Tighten the screw clockwise to increase the vertical resistance of the corresponding stick. Loosen the screw to decrease vertical resistance. 16. F2 Right Stick Recentering Adjustment Screw (Vertical) Tighten the screw clockwise to disable the vertical recentering of the corresponding stick. Loosen the screw to enable vertical recentering. 17.
DJI Avata User Manual Linking Follow the steps below to link the aircraft, goggles, and remote control devices. Make sure that the DJI devices used with the aircraft are activated through the DJI Assistant 2 (Consumer Drones Series) and updated to the latest firmware before linking. 1. Power on the aircraft, goggles, and remote control devices. Press and then press and hold the power button to power devices on or off. 2. Press the link button on the goggles. The goggles will start to beep continually. 3.
DJI Avata User Manual Make sure the goggles and the remote control device are within 0.5 m of the aircraft during linking. To switch between the aircraft or air unit, enter the goggles menu and select before linking. For DJI Goggles 2, enter the Status page to select the aircraft or air unit. For DJI FPV Goggles V2, switch in Settings and then go to About page. The aircraft can be controlled with only one remote control device during flight.
Aircraft DJI Avata contains a flight controller, gimbal and camera, video downlink system, vision system, propulsion system, and an Intelligent Flight Battery. Flight Modes DJI Avata has three flight modes, which can be switched via the flight mode switch or button on the remote control devices. Normal Mode: The aircraft utilizes GNSS, the Downward Vision System, and the Infrared Sensing System to locate itself and stabilize.
DJI Avata User Manual Aircraft Status Indicator DJI Avata has an aircraft status indicator on the top. Aircraft Status Indicator The aircraft status indicator shows the status of the flight control system of the aircraft. Refer to the table below for more information about the aircraft status indicator.
DJI Avata User Manual Return to Home The Return to Home (RTH) function brings the aircraft back to the last recorded Home Point and lands when the GNSS signal is strong. There are three types of RTH: Smart RTH, Low Battery RTH, and Failsafe RTH. If the aircraft successfully recorded the Home Point and the GNSS signal is strong, the RTH will be triggered when either Smart RTH is initiated, the aircraft battery level is low, or the signal between the remote control device and the aircraft is lost.
DJI Avata User Manual RTH (Straight Line) 1. The Home Point is recorded automatically. 2. RTH is triggered. 3. If the aircraft is less than 5 m from the Home Point when RTH begins, it lands immediately. If the aircraft is more than 5 m and less than 50 m from the Home Point when RTH begins, it will return home at the current altitude with a maximum horizontal speed of 3 m/s.
DJI Avata User Manual Vision System and Infrared Sensing System DJI Avata aircraft is equipped with both an Infrared Sensing System and a Downward Vision System. The Downward Vision System consists of two cameras. The Infrared Sensing System consists of two 3D infrared modules. The Downward Vision System and Infrared Sensing System help the aircraft maintain its current position, hover more precisely, and to fly indoors or in other environments where GNSS is unavailable.
DJI Avata User Manual Calibrating Vision System Cameras Auto Calibration The Downward Vision System cameras installed on the aircraft are calibrated before shipping. If any abnormality is detected with a vision system camera, the aircraft will automatically calibrate and a prompt will appear in the goggles. No further action is required to address the issue. Advanced Calibration If the abnormality persists after auto calibration, a prompt appears in the goggles that advanced calibration is required.
DJI Avata User Manual Pay attention to the flight environment. The Downward Vision System and Infrared Sensing System only work in certain scenarios and cannot replace human control and judgment. During flight, pay attention to the surrounding environment and to the warnings on the goggles. Be responsible for and maintain control of the aircraft at all times. The aircraft has a max hovering altitude of 20 m when using the vision system in an open and flat environment with clear texture.
DJI Avata User Manual Propellers There are two types of DJI Avata propellers, which are designed to spin in different directions. Make sure to match the propellers and motors by following the instructions. Propellers With Marks Without Marks Illustration Mounting Position Attach on motors with marks Attach on motors without marks Attaching the Propellers Flip the aircraft over so that the bottom is facing up, and mount the marked propellers onto the motors with marks.
DJI Avata User Manual Detaching the Propellers Flip the aircraft so that the bottom is facing up, use a screwdriver to loosen the two screws and detach the propellers from the motors. Propeller blades are sharp. Handle with care. Only use official DJI propellers. DO NOT mix propeller types. Propellers are consumable components. Purchase additional propellers if necessary. Make sure that the propellers and motors are installed securely before each flight.
DJI Avata User Manual Intelligent Flight Battery The Avata Intelligent Flight Battery is a 14.76 V, 2420 mAh battery with smart charging and discharging functionality. Battery Features 1. Battery Level Display: The battery level LEDs display the current battery level. 2. Auto-Discharging Function: To prevent swelling, the battery automatically discharges to approximately 96% of the battery level when it is idle for one day, and approximately 60% when idle for five days.
DJI Avata User Manual The battery level LEDs display the power level of the battery during charging and discharging. The statuses of the LEDs are defined below: LED is on. LED1 LED2 LED is off. LED3 LED is blinking. LED4 Battery Level 89%-100% 76%-88% 64%-75% 51%-63% 39%-50% 26%-38% 14%-25% 1%-13% Powering On/Off Press the power button once and then press again and hold for two seconds to power the aircraft on or off.
DJI Avata User Manual ≥30 W USB PD It is recommended to use the DJI 30W USB-C Charger or other USB Power Delivery chargers. The charging time is approximately 90 minutes. For safety purposes, keep the batteries at a low power level in transit. Before transportation, it is recommended to discharge the batteries to 30% or lower. DO NOT charge an Intelligent Flight Battery immediately after flight as it may be too hot. Wait for the battery to cool down to room temperature before charging again.
DJI Avata User Manual Battery Protection Mechanisms The battery level LEDs can display battery protection notifications triggered by abnormal charging conditions.
DJI Avata User Manual Maintenance Return to home or land promptly if a prompt appears in the goggles that the Intelligent Flight Battery requires maintenance. 1. Fully charge the battery. 2. Leave the battery for 24 hours. 3. Insert the battery in the aircraft and hover at an altitude of up to 2 m after takeoff. When the battery reaches 20%, land the aircraft and power off, and remove the battery. 4. Leave the battery for 6 hours. 5. Maintenance should now be complete and the battery is ready to use.
DJI Avata User Manual Camera DJI Avata uses a 1/1.7" CMOS sensor camera with up to 48 million effective pixels. The aperture of the lens is F2.8, the focus range is 0.6 m to infinity, and the FOV of the lens can reach 155°. DJI Avata camera can shoot up to 4K 60fps HD video and 4K photos. Make sure the temperature and humidity are suitable for the camera during use and storage. Use a lens cleanser to clean the lens to avoid damage or poor image quality.
Goggles DJI Goggles 2 DJI Goggles 2 are equipped with high-performance dual displays and ultra-low-latency image transmission for use with DJI aircraft, giving you a real-time aerial FPV (First Person View) experience. The wireless streaming function enables you to project the live-feed from your mobile phone or computer to the goggles screen, bringing you an immersive viewing experience. DJI Goggles 2 support the Head Tracking function.
DJI Avata User Manual Using the Eyeglass Frames The goggles support diopter adjustment in the range of -8.0 D to +2.0 D. The goggles do not support astigmatism correction. If you require astigmatism correction or the goggles’ diopter is unsuitable, you can purchase additional lenses and use the eyeglass frames to install them on the goggles. When purchasing lenses, bring the eyeglass frames (a pair) to a professional optical shop to ensure that the shape, size, astigmatism axis, and edge thickness (< 2.
DJI Avata User Manual 4. Install the left and right frames onto the goggles. When installing, make sure that the mark on the top of the frame is facing upwards, and the triangular arrow is aligned with the white dot on the upper edge of the goggle lens. L R Operation The touch panel enables you to operate with only one hand. To ensure flight safety when using the motion controller, press the brake button once to brake and hover before operating the touch panel of the goggles.
DJI Avata User Manual 15min 15min 10min 10min 20.5km/h 1.8km/h 20.5km/h 500m Mode ISO Shuttle Manual 300 1/200 1024.4m H H 500mD D 1024.4m 20.5km/h 1.8km/h 20.5km/h 500m 1.8km/h Apeture 5.5 M.M +3 80 12'59'' WB 80 Manual 12'59'' 201200K 20 75% 1024.4m H H 500mD 15min 15min 10min 10min 1.8km/h 80 12'59'' D 1024.
DJI Avata User Manual Home Screen 1 2 3 14 4 13 12 11 10 9 8 7 6 5 1. Flight Direction Indicator When the motion controller is stationary, it indicates the midpoint of the screen. When the motion controller is moved, it indicates the change of the aircraft orientation or gimbal tilt. 2. Storage Information Displays the remaining capacity of the aircraft and goggles. A flashing icon will appear when recording. 3.
DJI Avata User Manual 10. Aircraft Battery Level 11. Distance to the Ground Displays the current altitude information of the aircraft from the ground when the aircraft is less than 10 m above the ground. 12. Flight Telemetry Displays the horizontal distance (D) and speed as well as vertical distance (H) and speed between the aircraft and the Home Point. 13. Flight Modes Displays the current flight mode. 14. Home Point Indicates the location of the Home Point.
DJI Avata User Manual Camera Settings Swipe up from the bottom of the touch panel to enter the camera settings to change the camera parameters. Menu Swipe right from the left of the touch panel to open the goggles menu. 1 2 3 4 5 1. Status Displays the in-use aircraft model and detailed information of prompt alerts. To change aircraft, use the switch function in the upper right corner. 2. Album Shows the photos or videos stored on the microSD of the goggles. Select the file and confirm to preview.
DJI Avata User Manual 3. Transmission The Transmission menu has a Pilot sub-menu and Audience sub-menu. • The video transmission settings for the current device can be set under the Pilot sub-menu, including but not limited to: a. Enable or disable the broadcast mode. The device number will be displayed when Broadcast mode is enabled so that other devices can find the device and enter the channel to see the camera view. b. Set the focus mode to on, off, or auto.
DJI Avata User Manual • Display Adjust screen brightness, zoom, and display or hide the Home Point. • About a. View device information, such as the serial number and the firmware of the goggles and linked devices. b. Select the system language. c. Select Reset All to reset the goggles and the linked devices to their default settings. 5.
DJI Avata User Manual DJI FPV Goggles V2 The DJI FPV Goggles V2 are equipped with a high-performance display and support 810p 120fps HD display and real-time audio transmission. By receiving the video signal from the aircraft, users can enjoy a first-person view of their aerial experience in real-time. They can also be used to play videos recorded by the goggles and set transmission, control, and camera parameters.
DJI Avata User Manual Operation 5D Button Toggle the button to scroll through the menu. Press the button to confirm. On the home screen, press the button to enter the menu. Toggle left or right to adjust the screen brightness. Toggle up or down to adjust the volume. Channel Adjustment Buttons During video playback, press the 5D button to pause or continue, toggle the 5D button left or right to adjust the progress bar, and toggle up or down to adjust the volume.
DJI Avata User Manual 1. Flight Direction Indicator When the motion controller is stationary, it indicates the midpoint of the screen. When the motion controller is moved, it indicates the change of the aircraft orientation or gimbal tilt. 2. Storage Information Displays the remaining capacity of the aircraft and goggles. A flashing icon will appear when recording. 3. Gimbal Slider Displays the gimbal tilt angle when the gimbal slider or dial is toggled. 4.
DJI Avata User Manual Menu Press the 5D button on the goggles to enter the menu bar. 1 2 3 4 1. Status Displays detailed information for current status warning prompts. 2. Album Shows the photos or videos stored on the microSD of the goggles. Select the file and confirm to preview. 3. Transmission The Transmission menu has a Pilot sub-menu and Audience sub-menu. • The video transmission mode for the current device can be set under the Pilot sub-menu, including but not limited to: a.
DJI Avata User Manual c. Advanced Safety Settings include aircraft signal lost action, enabling/disabling AirSense, and emergency propeller stop. The aircraft can be set to hover, land, or RTH when it loses the signal from the remote controller devices. If the emergency propeller stop is enabled, the motors can be stopped mid-flight anytime by pressing the lock button twice on the motion controller or performing a combination stick command (CSC) on the remote controller.
Remote Control Devices DJI Motion Controller When used with the goggles, the DJI Motion Controller provides an immersive and intuitive flying experience that allows users to easily control the aircraft using hand movements. Built into the DJI Motion Controller is DJI's O3+ transmission technology, offering a maximum transmission range of 6 mi (10 km). The motion controller works at both 2.4 and 5.8 GHz and is capable of selecting the best transmission channel automatically.
DJI Avata User Manual Controlling the Aircraft The motion controller has two modes: Normal mode and Sport mode. Normal mode is selected by default. It is recommended to watch the tutorial video in the goggles before using for the first time. Go to Settings > Control > Motion Controller > Flight Control > First Flight Tutorial. Before using for the first time, practice flying with the motion controller using DJI Virtual Flight.
DJI Avata User Manual Lock Button Mode Button Brake Button Lock Button Press twice to start the motors of the aircraft. Press and hold to make the aircraft take off automatically, ascend to approximately 1.2 m, and hover. Press and hold while the aircraft is hovering to land it automatically and stop the motors. Press once to cancel Low Battery RTH when the countdown appears in the goggles. Critical Low Battery landing cannot be canceled.
DJI Avata User Manual Optimal Transmission Zone The signal between the aircraft and the motion controller is most reliable when the motion controller is positioned in relation to the aircraft as shown below. Optimal Transmission Zone In order to avoid interference, DO NOT use other wireless devices on the same frequency as the motion controller. Motion Controller Calibration The compass, IMU, and accelerator of the motion controller can be calibrated.
DJI Avata User Manual DJI FPV Remote Controller 2 Built-into the DJI FPV Remote Controller 2 is DJI O3+ transmission technology, offering a maximum transmission range of 6 mi (10 km). The buttons make control of the aircraft and camera effortless while the detachable control sticks allow for the remote controller to be easily stored. Operation Powering On/Off Press the power button once to check the current battery level. If the battery level is too low, recharge before use.
DJI Avata User Manual Controlling the Aircraft The control sticks can be operated in Mode 1, Mode 2, or Mode 3, as shown below. Mode 1 Left Stick Right Stick Forward UP Down Backward Left Turn Left Mode 2 Right Turn Right Left Stick Right Stick Forward UP Down Backward Turn Left Mode 3 Left Stick Left Turn Right Right Right Stick Forward UP Down Backward Left Right Turn Left Turn Right The default control mode of the remote controller is Mode 2.
DJI Avata User Manual Remote Controller (Mode 2) ( Aircraft Indicates nose direction) Remarks Throttle Stick: moving the left stick up or down changes the altitude of the aircraft. Push the stick up to ascend and down to descend. Push the stick gently to prevent sudden and unexpected changes in altitude. Normal/Sport mode The aircraft hovers in place if the stick is in the center. Use the left stick to take off when the motors are spinning at an idle speed.
DJI Avata User Manual Manual mode is disabled by default. Make sure that the switch is set to Manual mode in the goggles before switching to Manual mode. The aircraft will remain in Normal or Sport mode if the switch is not set to Manual mode in the goggles. Go to Settings > Control > Remote Controller > Button Customization, and then set Custom Mode to Manual mode.
DJI Avata User Manual Customizable Buttons The functions of the customizable buttons can be set on the remote controller settings in the goggles, including the C1 button, C2 switch, and the custom mode. The C1 button and C2 switch can be used as shortcuts for functions such as raising, lowering, or recentering the gimbal, flipping the aircraft, or enabling or disabling ESC beeping. The custom mode can be set to Manual or Sport mode.
DJI Avata User Manual Stick Adjustment When using Manual mode, adjust the throttle stick based on your stick mode for a better user experience. 1. Turn the remote controller over and lift the rear rubber grip from the inside groove. Groove 2. The screws under the grip can adjust the corresponding stick on the front of the remote controller. Use an H1.5 hex key to adjust the resistance of the stick and recenter the stick vertically.
DJI Fly App Connect the goggles to the mobile device, launch DJI Fly, and enter the home screen. Tap GO FLY to display the video transmission, which allows you to share the FPV camera view. Fly Spots View or share nearby suitable flight and shooting locations, learn more about GEO zones, and preview aerial photos of different locations taken by other users. Academy Tap the icon in the top right corner to enter Academy and view product tutorials, flight tips, flight safety notices, and manual documents.
Flight After completing the pre-flight preparation, it is recommended to train your flying skills and practice flying safely. Make sure that all flights are carried out in an open area. The flying height is limited to 500 m. DO NOT exceed this height. Strictly abide by local laws and regulations when flying. Make sure to read the DJI Avata Safety Guidelines to understand the safety notices before flying. Flight Environment Requirements 1.
DJI Avata User Manual Max Altitude Home Point Max Radius Height of aircraft when powered on Home Point not manually updated during flight Strong GNSS Signal Restriction Goggles Max Altitude Aircraft's altitude cannot exceed the specified value set in goggles. Prompt: Max flight altitude reached. Max Radius The straight-line distance from the aircraft to the Home Point cannot exceed the max flight distance set in goggles. Prompt: Max flight distance reached.
DJI Avata User Manual GEO Zones DJI’s GEO system designates safe flight locations, provides risk levels and safety notices for individual flights, and offers information on restricted airspace. All restricted flight areas are referred to as GEO Zones, which are further divided into Restricted Zones, Authorization Zones, Warning Zones, Enhanced Warning Zones, and Altitude Zones. Users can view such information in real-time in DJI Fly.
DJI Avata User Manual DJI FPV Remote Controller 2 Starting the Motors Normal/Sport mode: A CSC is used to start the motors. Push both sticks to the inner or outer bottom corners to start the motors. Once the motors start spinning, release both sticks simultaneously. OR Manual mode: Make sure the throttle stick is in the lowest position and press the start/stop button twice to start the motors.
DJI Avata User Manual Stopping the Motors Mid-Flight When using Normal or Sport mode, the motors can only be stopped by pressing the lock button twice on the motion controller or performing a CSC on the remote controller mid-flight in an emergency situation such as if the aircraft has a stalled motor, is involved in a collision, is rolling in the air, is out of control, or is ascending or descending quickly. The default setting can be changed in goggles.
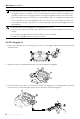
Maintenance Aircraft Follow the steps below to replace components of the aircraft such as the propeller guard, or upper frame. It is recommended to remove the propellers and Intelligent Flight Battery before replacing the propeller guard and upper frame. Propeller Guard Detaching 1. Flip the aircraft over, remove the two screws as shown in the figure below, then gently remove the vision module and disconnect the FPC connector. DO NOT over-extend the cable to avoid irreversible damage. 1 2 2.
DJI Avata User Manual 3. Remove the four screws on the bottom of the aircraft and the two screws on the top, then gently turn left and right to remove the propeller guard. Be careful not to pull out the propeller guard with force to avoid damaging the cables. 65 © 2022 DJI All Rights Reserved.
DJI Avata User Manual 1 2 Attaching 1. Fix the antenna cables in the cable slot on the side of the center module to avoid damaging the cables. 66 © 2022 DJI All Rights Reserved.
DJI Avata User Manual 2. Prepare a new propeller guard and pass the two antenna boards through the hole in the center of the propeller guard. Adjust the propeller guard so that the square groove at the rear aligns with the battery port. 3. When installing, slowly tilt and press the side with the USB-C port and microSD card slot cover first, be careful not to catch the antenna cable on this side, then gently turn the propeller guard left and right to secure the other side.
DJI Avata User Manual 4. Check the L and R marks on the antenna board and the inside of the propeller guard, and install the antenna board on the corresponding landing gear. Tilting the antenna board to make it fit tightly into the slot on the inner side of the landing gear and then arranging the antenna cable to fix it in the cable groove. L R 68 © 2022 DJI All Rights Reserved.
DJI Avata User Manual 5. Tighten the two M2×4.3 screws and the two M1.6×5 screws on the bottom of the aircraft in turn, and then the two M2×4.3 screws on the top. (Note that the two M1.6×5 screws on the rear side of the bottom are relatively longer). 1 M2×4.3 M1.6×5 2 M2×4.3 69 © 2022 DJI All Rights Reserved.
DJI Avata User Manual 6. Insert the end of the antenna cover into the landing gear, press the antenna cover to fit the propeller guard, and then tighten the four M2×4.3 screws. Make sure that the antennas and antenna covers on both sides are firmly installed. 1 2 M2×4.3 2 70 © 2022 DJI All Rights Reserved.
DJI Avata User Manual 7. Check the shape of the vision module and the position of the opening in the center of the propeller guard, and then connect the FPC cable to the vision module correctly. After ensuring that the FPC cable is completely placed inside the propeller guard, tighten the two M2×6.3 screws to complete the installation. 1 2 1 M2×6.3 1 2 2 Check to make sure the USB-C port and microSD card slot cover is correctly and securely sealed to avoid contact with the propellers.
DJI Avata User Manual Upper Frame Detaching 1. Remove the two screws on both sides of the upper frame. 3 2 1 2. Flip the aircraft over, remove the six screws as shown in the figure below, then remove the upper frame. Remove the upper frame gently to avoid damaging the GNSS module above. Attaching 1. Prepare a new upper frame and install it on the top of the aircraft. Make sure to align the corresponding holes and that the gimbal and camera cable is in the groove to avoid damage.
DJI Avata User Manual 2. Adjust the position of the GNSS module so that the screw holes on the module are aligned with the screw holes on both sides of the upper frame, then tighten the two M2×4.3 screws. M2×4.3 M2×4.3 3. Tighten the six M1.6×5 screws on the bottom to complete the installation. M1.6×5 73 © 2022 DJI All Rights Reserved.
DJI Avata User Manual Goggles DJI Goggles 2 Replacing the Antennas If an antenna is damaged, you can contact DJI after-sales to purchase a new one for replacement. To remove the antenna, hold the bottom of the antenna and pull it upwards. When installing, distinguish the left and right antennas and make sure the antenna is properly aligned with the port. Replacing the Foam Padding 1. Hold the bottom of the foam padding and remove it gently as shown below. 74 © 2022 DJI All Rights Reserved.
DJI Avata User Manual DO NOT pull the sides when removing the foam padding. Otherwise, the padding may be damaged. 2. Align the positioning columns of the new foam padding with the positioning holes on the goggles, install it and press the left and right sides. After hearing a "click", check and make sure that there is no gap between the foam padding and the goggles.
DJI Avata User Manual DJI FPV Goggles V2 Cleaning Make sure to disconnect the goggles from the power outlet before cleaning and make sure that there are no cables connected. Clean the surface of the goggles with a soft, dry, clean cloth. To clean the foam padding, moisten the cloth with clean water and wipe the foam padding. Replacing the Foam Padding The foam padding is attached to the goggles with Velcro. When replacing the foam padding, peel it gradually from the left or right side.
Appendix Specifications DJI Avata Aircraft Model Takeoff Weight Dimensions (L×W×H) Diagonal Distance Max Ascent Speed Max Descent Speed Max Horizontal Speed (near sea level, no wind) Max Service Ceiling Above Sea Level Max Hover Time Max Flight Distance Max Wind Speed Resistance Operating Temperature GNSS Hovering accuracy range Antennas Internal Storage Transmission Operating Frequency Transmitter Power (EIRP) Communication Bandwidth Live View Modes and Latency Max Video Bitrate Max Transmission Range Au
DJI Avata User Manual Sensing System Downward Vision System Operating Environment Camera Image Sensor Lens ISO Range Shutter speed Still Photography Modes Max Photo Size Photo Format Video Resolution Video format Max Video Bitrate Color Profiles RockSteady EIS Distortion Correction Supported File System Intelligent Flight Battery Capacity Standard Voltage Max Charging Voltage Battery Type Chemical System Energy Discharge Rate Weight Charging Temperature 78 © 2022 DJI All Rights Reserved.
DJI Avata User Manual SD Cards Supported microSD Cards Recommended microSD Cards microSD card, UHS-I Speed Grade 3 SanDisk Extreme 32GB U3 V30 A1 microSDXC SanDisk Extreme Pro 32GB U3 V30 A1 microSDXC Kingston Canvas Go!Plus 64GB U3 V30 A2 microSDXC Kingston Canvas React Plus 64GB U3 V90 A1 microSDXC Kingston Canvas React Plus 128GB U3 V90 A1 microSDXC Kingston Canvas React Plus 256GB U3 V90 A1 microSDXC Samsung PRO Plus 256GB V30 U3 V30 A2 microSDXC DJI Avata dissipates heat by using the airflow of the
DJI Avata User Manual DJI Goggles 2 Goggles Model Weight Dimensions Screen Size (single screen) Resolution (single screen) Screen Refresh Rate FOV IPD Range Diopter Range Transmission Operating Frequency Transmitter Power (EIRP) Wi-Fi Protocol Operating Frequency Transmitter Power (EIRP) Bluetooth Protocol Operating Frequency Transmitter Power (EIRP) Max Video Bitrate Supported Video Recording Format Supported Video Playback Format Wi-Fi Wireless Streaming Operating Temperature Power Input Supported microS
DJI Avata User Manual DJI FPV Goggles V2 Goggles Model Weight Dimensions Screen Size Screen Resolution (Single Screen) Screen Refresh Rate FOV IPD Range Operating Frequency Transmitter Power (EIRP) Communication Bandwidth Max Video Bitrate Supported Video Recording Format Supported Video Playback Format Operating Temperature Power Input Supported microSD Cards DJI FPV Goggles Battery Weight Dimension Capacity Voltage Battery Type Chemical System Energy Charging Temperature Max Charging Power Operating Time
DJI Avata User Manual DJI FPV Remote Controller 2 Model Weight Dimensions Operating Frequency Transmitter Power (EIRP) Operating Temperature Charging Time Operating Time 82 © 2022 DJI All Rights Reserved. FC7BGC Approx. 346 g 190×140×51 mm 2.400-2.4835 GHz, 5.725-5.850 GHz 2.4 GHz: ≤28.5 dBm (FCC), ≤20 dBm (CE/SRRC/MIC) 5.8 GHz: ≤31.5 dBm (FCC), ≤19 dBm (SRRC), ≤14 dBm (CE) -10° to 40° C (14° to 104° F) 2 hours and 30 minutes Approx.
DJI Avata User Manual Firmware Update Use one of the following methods to update the firmware: 1. Use the DJI Fly App to update the firmware for the entire set of devices including the aircraft, goggles, and remote control device. 2. Use DJI Assistant 2 (Consumer Drones Series) to update the firmware for a single device. Using DJI Fly Power on the aircraft, goggles, and remote control device. Make sure all the devices are linked.
Contact DJI SUPPORT https://www.dji.com/support This content is subject to change. Download the latest version from https://www.dji.com/avata If you have any questions about this document, please contact DJI by sending a message to DocSupport@dji.com. and DJI AVATA are trademarks of DJI. Copyright © 2022 DJI All Rights Reserved.