User Manual v1.0 2021.
Searching for Keywords Search for keywords such as “battery” and “install” to find a topic. If you are using Adobe Acrobat Reader to read this document, press Ctrl+F on Windows or Command+F on Mac to begin a search. Navigating to a Topic View a complete list of topics in the table of contents. Click on a topic to navigate to that section. Printing this Document This document supports high resolution printing. 2 © 2021 DJI All Rights Reserved.
Using this Manual Legend Warning Important Hints and Tips Reference Read Before the First Flight Read the following documents before using the DJITM MAVICTM 3: 1. Safety Guidelines 2. Quick Start Guide 3. User Manual It is recommend to watch all tutorial videos on the official DJI website and read safety guidelines before using for the first time. Prepare for your first flight by reviewing the quick start guide and refer to this user manual for more information.
Contents Using this Manual Legend 2 Read Before the First Flight 2 Video Tutorials 2 Download the DJI Fly App 2 Download DJI Assistant 2 (Consumer Drones Series) 2 Product Profile 5 Introduction 6 Using for the First Time 7 Diagram 9 Aircraft 13 Flight Modes 14 Aircraft Status Indicators 15 Return to Home 16 Vision Systems and Infrared Sensing System 20 Advanced Pilot Assistance Systems (APAS 5.
Flight Flight Environment Requirements 52 Flight Limits and GEO Zones 52 Pre-Flight Checklist 53 Auto Takeoff/Landing 54 Starting/Stopping the Motors 54 Flight Test 55 Appendix 4 51 56 Specifications 57 Firmware Update 62 After-Sales Information 62 © 2021 DJI All Rights Reserved.
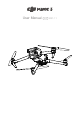
Product Profile This section introduces DJI Mavic 3 and lists the components of the aircraft and remote controller. 5 © 2021 DJI All Rights Reserved.
Product Profile Introduction DJI Mavic 3 features both an Infrared Sensing System and Forward, Backward, Upward, Lateral, and Downward Vision Systems, allowing for hovering and flying indoors as well as outdoors and for automatic Return to Home while avoiding obstacles in all directions. The aircraft has a maximum flight speed of 47 mph (75.6 kph) and a maximum flight time of 46 minutes. DJI Mavic 3 Cine comes with the DJI RC Pro remote controller that has a built-in 5.
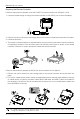
DJI Mavic 3 User Manual Using for the First Time DJI Mavic 3 is folded before being packaged. Follow the steps below to unfold the aircraft and remote controller. Preparing the Aircraft 1. Remove the storage cover. 1 2 2. All Intelligent Flight Batteries are in hibernation mode before delivery to ensure safety. Use the provided charger to charge and activate the Intelligent Flight Batteries for the first time. It takes approximately 1 hour and 36 minutes to fully charge an Intelligent Flight Battery.
DJI Mavic 3 User Manual Preparing the Remote Controller Follow the steps below to prepare to use the DJI RC Pro remote controller with DJI Mavic 3 Cine. 1. Use the provided charger to charge the remote controller via the USB-C port to active the battery. 2. Remove the control sticks from the storage slots on the remote controller and screw them into place. 3. Unfold the antennas. 4.
DJI Mavic 3 User Manual Activating DJI Mavic 3 Aircraft DJI Mavic 3 requires activation before using for the first time. After powering on the aircraft and remote controller, follow the on-screen prompts to activate DJI Mavic 3 using DJI Fly. An internet connection is required for activation. Binding the Aircraft and Remote Controller It is recommended to bind the aircraft and remote controller to help ensure the best possible after-sales service.
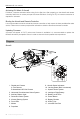
DJI Mavic 3 User Manual DJI RC Pro 1 2 3 4 5 8 6 9 7 14 19 15 18 16 17 10 11 12 13 1. Antennas Relay aircraft control and video wireless signals. 9. Confirm Button Press once to confirm a selection. The button does not have a function when using DJI Fly. 2. Back Button Press once to return to the previous screen. Press twice to return to the home screen. 10. Touchscreen Touch the screen to operate the remote controller. Note that the touchscreen is not waterproof. Operate with caution. 3.
DJI Mavic 3 User Manual 21. Control Sticks Storage Slot For storing the control sticks. 20 22. Customizable C1 Button Switch between recentering the gimbal and pointing the gimbal downward. The function can be set in DJI Fly. 21 24 23 22 23. Speaker Outputs sound. 25 24. Customizable C2 Button Press once to turn the Auxiliary Bottom Light on or off. The function can be set in DJI Fly. 20. Air Vent Used for heat dissipation. Do not block the air vent during usage. 25.
DJI Mavic 3 User Manual 7. Photo/Video Toggle Press once to switch between photo and video mode. 8. Remote Controller Cable Connect to a mobile device for video linking via the remote controller cable. Select the cable according to the mobile device. 9. Mobile Device Holder Used to securely mount the mobile device to the remote controller. 10. Antennas Relay aircraft control and video wireless signals. 11. USB-C Port For charging and connecting the remote controller to the computer.
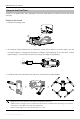
Aircraft DJI Mavic 3 contains a flight controller, video downlink system, vision systems, infrared sensing system, propulsion system, and an Intelligent Flight Battery. 13 © 2021 DJI All Rights Reserved.
Aircraft DJI Mavic 3 contains a flight controller, video downlink system, vision systems, infrared sensing system, propulsion system, and an Intelligent Flight Battery. Flight Modes DJI Mavic 3 has three flight modes, plus a fourth flight mode that the aircraft switches to in certain scenarios. Flight modes can be switched via the Flight Mode switch on the remote controller.
DJI Mavic 3 User Manual Aircraft Status Indicators DJI Mavic 3 has front LEDs and aircraft status indicators. Front LED Front LED Aircraft Status Indicator Aircraft Status Indicator When the aircraft is powered on but the motors are not running, the front LEDs glow solid red to display the orientation of the aircraft. When the aircraft is powered on but the motors are not running, the aircraft status indicators display the status of the flight control system.
DJI Mavic 3 User Manual Return to Home Return to Home (RTH) returns the aircraft to the last recorded Home Point when the positioning system is functioning normally. There are three types of RTH: Smart RTH, Low Battery RTH, and Failsafe RTH. The aircraft automatically flies back to the Home Point and lands when Smart RTH is initiated, the aircraft enters Low Battery RTH, or the video link signal is lost during flight.
DJI Mavic 3 User Manual During Advanced RTH, the aircraft will ignore the preset RTH altitude in DJI Fly and instead will automatically adjust the flight speed and altitude according the environment (wind speed and direction, obstacles, transmission signals). Advanced RTH will not be available if the lighting condition and environment were not suitable for vision systems during takeoff or RTH.
DJI Mavic 3 User Manual and flight speed. A warning prompt will appear in DJI Fly when the battery level is low and the aircraft can only support Low Battery RTH. The user can cancel RTH by pressing the RTH button on the remote controller. If RTH is cancelled following a low battery level warning, the Intelligent Flight Battery may not have enough power for the aircraft to land safely, which may lead to the aircraft crashing or being lost.
DJI Mavic 3 User Manual Landing Protection Landing Protection will activate during Smart RTH. When aircraft begins landing, Landing Protection is enabled. 1. During Landing Protection, the aircraft will automatically detect and carefully land on suitable ground. 2. If the ground is determined unsuitable for landing, the aircraft will hover and wait for pilot confirmation. 3. If Landing Protection is not operational, DJI Fly will display a landing prompt when the aircraft descends below 0.5 m.
DJI Mavic 3 User Manual Vision Systems and Infrared Sensing System DJI Mavic 3 is equipped with both an Infrared Sensing System and Forward, Backward, Lateral, Upward, and Downward Vision Systems. The Upward and Downward Vision Systems consist of two cameras each, and the Forward, Backward, and Lateral Vision Systems consist of four cameras in total. The Infrared Sensing System consists of two 3D infrared modules.
DJI Mavic 3 User Manual Using the Vision Systems When GNSS is unavailable, the Downward Vision System is enabled if the surface has a clear texture and sufficient light. The Forward, Backward, Lateral, and Upward Vision Systems will activate automatically when the aircraft is powered on if the aircraft is in Normal or Cine mode and Obstacle Avoidance is set to Bypass or Brake in DJI Fly.
DJI Mavic 3 User Manual Advanced Pilot Assistance Systems (APAS 5.0) The Advanced Pilot Assistance Systems 5.0 (APAS 5.0) feature is available in Normal and Cine mode. When APAS is enabled, the aircraft continues to respond to user commands and plans its path according to control stick inputs and the flight environment. APAS makes it easier to avoid obstacles, obtain smoother footage, and gives a better flying experience. Keep moving the control sticks in any directions.
DJI Mavic 3 User Manual Propellers There are two types of DJI Mavic 3 Low-Noise Quick Release Propellers, which are designed to spin in different directions. Marks are used to indicate which propellers should be attached to which motors. Make sure to match the propeller and motor following the instructions. Attaching the Propellers Attach the propellers with marks to the motors with marks and the unmarked propellers to the motors without marks.
DJI Mavic 3 User Manual Intelligent Flight Battery The DJI Mavic 3 Intelligent Flight Battery is a 15.4 V, 5000 mAh battery with smart charging and discharging functionality. Battery Features 1. Battery Level Display: The LED indicators display the current battery level. 2. Auto-Discharging Function: To prevent swelling, the battery automatically discharges to 96% of the battery level when it is idle for three days, and automatically discharges to 60% of the battery level when it is idle for nine days.
DJI Mavic 3 User Manual Using the Battery Checking Battery Level Press the power button once to check the battery level.
DJI Mavic 3 User Manual Charging the Battery Fully charge the Intelligent Flight Battery before every flight using the provided Mavic 3 Battery Charging Hub and DJI 65W Portable Charger. Using Charging Hub When used with the DJI 65W Portable Charger, the DJI Mavic 3 Battery Charging Hub can charge up to three Intelligent Flight Batteries in sequence from high to low power level. The charging time for one battery is approximately 1 hour and 36 minutes. 1 2 3 1. Status LED Indicator 2. Battery Port 3.
DJI Mavic 3 User Manual Using DJI 65W Portable Charger 1. Connect the DJI 65W Portable Charger to an AC power supply (100-240 V, 50/60 Hz). 2. Attach the aircraft to the charger using the battery charging cable with the battery powered off. 3. The battery level LEDs display the current battery level during charging. 4. The Intelligent Flight Battery is fully charged when all the battery level LEDs are off. Detach the charger when the battery is fully charged.
DJI Mavic 3 User Manual If the battery protection mechanisms activate, in order to resume charging it is necessary to unplug the battery from the charger and plug it in again. If the charging temperature is abnormal, wait for the charging temperature to return to normal, and the battery will automatically resume charging without requiring to unplug and plug in the charger again. Inserting the Intelligent Flight Battery Insert the Intelligent Flight Battery into the battery compartment of the aircraft.
DJI Mavic 3 User Manual Gimbal and Camera Gimbal Profile The 3-axis gimbal of DJI Mavic 3 provides stabilization for the camera, allowing you to capture clear and stable images and video. The control tilt range is -90° to +35°. 35° 0° -90° Use the gimbal dial on the remote controller to control the tilt of the camera. Alternatively, enter the camera view in DJI Fly. Press the screen until an adjustment bar appears and drag up and down to control the tilt of the camera.
DJI Mavic 3 User Manual The gimbal lock function works normally when the operating temperature is -10° to 40° C (14° to 104° F). It may malfunction outside this temperature range and a prompt will appear in DJI Fly if this occurs. If the gimbal lock malfunctions when attempting to unlock the gimbal, users can adjust the gimbal axes manually to unlock the gimbal. It is not recommended to manually adjust the gimbal axes unless necessary.
Remote Controller This section describes the features of the remote controller and includes instructions for controlling the aircraft and the camera. 31 © 2021 DJI All Rights Reserved.
Remote Controller DJI RC Pro The DJI RC Pro remote controller features O3+, the latest version of DJI’s signature OcuSync image transmission technology, works at both 2.4 and 5.8 GHz, is capable of selecting the best transmission channel automatically, and can transmit a live HD view from the camera of the aircraft at a distance of up to 15 km. The built-in 5.
DJI Mavic 3 User Manual Controlling the Aircraft Three preprogrammed modes (Mode 1, Mode 2, and Mode 3) are available and custom modes can be configured in DJI Fly. The default mode is Mode 2. Mode 1 Left Stick Right Stick Forward Up Down Backward Left Turn Left Mode 2 Left Stick Right Turn Right Right Stick Up Forward Down Backward Turn Left Mode 3 Left Stick Left Turn Right Right Stick Forward Right Up Down Backward Left 33 © 2021 DJI All Rights Reserved.
DJI Mavic 3 User Manual Remote Controller (Mode 2) ( Aircraft Remarks Indicates Nose Direction) Moving the left stick up or down changes the aircraft’s altitude. Push the stick up to ascend and down to descend. The more the stick is pushed away from the center position, the faster the aircraft will change altitude. Push the stick gently to prevent sudden and unexpected changes in altitude. Moving the left stick to the left or right controls the orientation of the aircraft.
DJI Mavic 3 User Manual RTH Button Press and hold the RTH button until the remote controller beeps to start RTH. Press this button again to cancel RTH and regain control of the aircraft. Refer to the Return to Home section for more information about RTH. Customizable Buttons Including C1, C2, and the 5D button. Go to System Settings in DJI Fly and select Control to customize the function of the button.
DJI Mavic 3 User Manual Remote Controller Alert The remote controller vibrates or beeps when there is an error or warning. Pay attention when prompts appear on the touchscreen or in DJI Fly. Slide down from the top to select Do Not Disturb or Mute to disable some alerts. Optimal Transmission Zone The signal between the aircraft and the remote controller is most reliable when the antennas are positioned in relation to the aircraft as illustrated below.
DJI Mavic 3 User Manual Touchscreen Operations Home 4:53 DJI Fly Gallery Files Firefox Setting Guide The top of the touchscreen displays the time, Wi-Fi signal, and battery level of the remote controller. Some apps are already installed by default such as DJI Fly, Gallery, Files, Firefox, Settings, and Guide. Settings includes network, display, voice, and Bluetooth configurations. Users can quickly learn about the features under Guide.
DJI Mavic 3 User Manual Quick Settings 1 2 10:12 Notifications Wechat 3 4 Sat, Mar 30 8m ago 5 new messages DJI Fly WI-FI Bluetooth Capture Disturb Airplane Share Disturb 11m ago Expore skypixel.com One billion colors captured by the 10-bit DlogM color profile. Wechat 8m ago 5 new messages 5 6 7 1. Notifications Tap to check system notifications. 2. Recent Tap to check recently opened apps. 3. Home Tap to return to the home screen. 4. System Settings Tap to access system settings. 5.
DJI Mavic 3 User Manual Advanced Feature Calibrating the Compass The compass may need to be calibrated after the remote controller is used in areas with electromagnetic interference. A warning prompt will appear if the compass of the remote controller requires calibration. Tap the warning prompt to start calibrating. In other cases, follow the steps below to calibrate your remote controller. 1. Enter the home screen. 2. Select Settings, scroll down, and tap Compass. 3.
DJI Mavic 3 User Manual RC-N1 Built into the remote controller is DJI'S long-range tranmission OcuSync 2.0 technology, offering a maximum transmission range of 15 km and displaying video from the aircraft to DJI Fly on a mobile device at up to 1080p 60fps (depending on phone type). The aircraft and camera are easy to control using the onboard buttons and the detachable control sticks make the remote controller easier to store.
DJI Mavic 3 User Manual Controlling the Aircraft The control sticks control the aircraft’s orientation (pan), forward/backward movement (pitch), altitude (throttle), and left/right movement (roll). The control stick mode determines the function of each control stick movement. Three preprogrammed modes (Mode 1, Mode 2, and Mode 3) are available and custom modes can be configured in DJI Fly. The default mode is Mode 2.
DJI Mavic 3 User Manual Remote Controller (Mode 2) ( Aircraft Remarks Indicates Nose Direction) Moving the left stick up or down changes the aircraft’s altitude. Push the stick up to ascend and down to descend. The more the stick is pushed away from the center position, the faster the aircraft will change altitude. Push the stick gently to prevent sudden and unexpected changes in altitude. Moving the left stick to the left or right controls the orientation of the aircraft.
DJI Mavic 3 User Manual Flight Pause/RTH Button Press once to make the aircraft brake and hover in place. If the aircraft is performing Smart RTH or auto landing, press once to exit the procedure and then brake. Press and hold the RTH button until the remote controller beeps to start RTH. Press this button again to cancel RTH and regain control of the aircraft. Refer to the Return to Home section for more information about RTH.
DJI Mavic 3 User Manual Linking the Remote Controller The aircraft and remote controller must be linked before using. Follow these steps to link a new remote controller: 1. Power on the remote controller and the aircraft. 2. Launch DJI Fly. 3. In camera view, tap and select Control and Pair to Aircraft (Link). 4. Press and hold the power button of the aircraft for more than four seconds. The aircraft beeps once indicating it is ready to link. The aircraft beeps twice indicating linking is successful.
DJI Fly App This section introduces the main functions of the DJI Fly app. 45 © 2021 DJI All Rights Reserved.
DJI Fly App Home Launch DJI Fly and enter the home screen. Altitude Zone (120m) Album Fly Spots Skypixel Academy Profile GO FLY Fly Spots View or share nearby suitable flight and shooting locations, learn more about GEO zones, and preview aerial photos of different locations taken by other users. Academy Tap the icon in the top right corner to enter Academy. Product tutorials, flight tips, flight safety, and manual documents can be viewed here.
DJI Mavic 3 User Manual Camera View 1 18 2 N Mode In-Flight 3 80 4 24 17 5 6 RC 7 20 8 9 17 10 1x AF 11 3m/s 4.6m/s H 150 m D 80 m 16 15 Storage RES&FPS 1:30:30 5.1K 50 14 EV +0.7 13 12 1. Flight Mode N : Displays the current flight mode. 2. System Status Bar In-Flight : Indicates aircraft flight status and displays various warning messages. 3. Battery Information 80 24'17" : Displays the current battery level and remaining flight time.
DJI Mavic 3 User Manual Battery: Tap to view the battery information such as battery cell status, serial number, times charged, and production date. Auxiliary LED: Tap to set the auxiliary LED to auto, on, or off. Do not turn on the Auxiliary LED before takeoff. Aircraft Front Arm LEDs: In auto mode, the aircraft front LEDs will be disabled during recording to ensure the quality is not affected. Unlock GEO Zone: Tap to view the information about unlocking GEO zones.
DJI Mavic 3 User Manual 11. Playback : Tap to enter playback and preview photos and videos as soon as they are captured. 12. Camera Modes Switch : Choose between Auto and Pro mode when in photo mode. Different parameters can be set in different modes. 13. Shooting Parameters RES&FPS 5.1K 50 : Displays the current shooting parameters. Tap to access parameter settings. 14. Storage Information Storage 1:30:30 : Displays the remaining number of photos or video recording time of the current storage.
DJI Mavic 3 User Manual Land the aircraft immediately in a safe location if prompted to do so in the app. Review all warning messages on the checklist displayed in the app before each flight. Use the in-app tutorial to practice your flight skills if you have never operated the aircraft or if you do not have sufficient experience to operate the aircraft with confidence. Cache the map data of the area where you intend to fly the aircraft by connecting to the internet before each flight.
Flight This section describes safe flight practices and flight restrictions. 51 © 2021 DJI All Rights Reserved.
Flight Once pre-flight preparation is complete, it is recommended to hone your flight skills and practice flying safely. Make sure that all flights are carried out in an open area. Refer to the Remote Controller and DJI Fly sections for information about using the remote controller and the app to control the aircraft. Flight Environment Requirements 1. Do not use the aircraft in severe weather conditions including wind speeds exceeding 12 m/s, snow, rain, and fog. 2. Only fly in open areas.
DJI Mavic 3 User Manual When GNSS is available Flight Limits DJI Fly App Max Altitude Aircraft's altitude cannot exceed the specified value Warning: Height limit reached Max Radius Flight distance must be within the max radius Warning: Distance limit reached Only Downward Vision System is available Flight Limits DJI Fly App Max Altitude Height is restricted to 30 m when the GNSS signal is weak. Warning: Height limit Height is restricted to 3 m when the GNSS signal is weak reached.
DJI Mavic 3 User Manual Auto Takeoff/Landing Auto Takeoff Use auto takeoff: 1. Launch DJI Fly and enter the camera view. 2. Complete all steps in the pre-flight checklist. 3. Tap . If conditions are safe for takeoff, press and hold the button to confirm. 4. The aircraft will take off and hover 1.2 m above the ground. Auto Landing Use auto landing: 1. Tap . If conditions are safe to land, press and hold the button to confirm. 2. Auto landing can be cancelled by tapping . 3.
DJI Mavic 3 User Manual Stopping the Motors Mid-Flight Stopping motors mid-flight will cause the aircraft to crash. The motors should only be stopped midflight in an emergency situation such as if a collision has occurred or if the aircraft is out of control and is ascending or descending very quickly, rolling in the air, or if a motor has stalled. To stop the motors mid-flight use the same CSC that was used to start the motors. The default setting can be changed in DJI Fly.
Appendix 56 © 2021 DJI All Rights Reserved.
Appendix Specifications Aircraft Takeoff Weight 895 g (Mavic 3) 899 g (Mavic 3 Cine) Dimensions (L×W×H) Folded: 221×96.3×90.3 mm Unfolded: 347.5×283×107.7 mm Diagonal Distance 380.
DJI Mavic 3 User Manual Video Resolution Apple ProRes 422 HQ 5.1K: 5120 × 2700@24/25/30/48/50fps DCI 4K:4096 × 2160@24/25/30/48/50/60/120*fps 4K:3840 × 2160@24/25/30/48/50/60/120*fps H264/H.265 5.1K:5120 × 2700@24/25/30/48/50fps DCI 4K:4096 × 2160@24/25/30/48/50/60/120*fps 4K:3840 × 2160@24/25/30/48/50/60/120*fps FHD:1920 × 1080@24/25/30/48/50/60/120*/200*fps * Recorded frame rate, corresponding video plays as slow motion video Max Video Bitrate H.264: 200Mbps; H.
DJI Mavic 3 User Manual Forward Vision System Precision Measurement Range: 0.5-20 m Detection Range: 0.5-200 m Effective Sensing Speed: ≤15 m/s FOV: 90° (horizontal), 103° (vertical) Backward Vision System Precision Measurement Range: 0.5-16 m Effective Sensing Speed: ≤12 m/s FOV: 90° (horizontal), 103° (vertical) Lateral Vision System Precision Measurement Range: 0.5-25 m Effective Sensing Speed: ≤15 m/s FOV: 90° (horizontal), 85° (vertical) Upward Vision System Precision Measurement Range: 0.
DJI Mavic 3 User Manual Charging Hub Input USB-C: 5 V-20 V Output Battery Port: 12 V - 17.6 V Rated Power 65 W Charging Type Charge three Intelligent Flight Batteries in sequence Charging Temperature 5° to 40° C (41° to 104° F) Car Charger 5.0 A max 5.0 A max Input Car Power Port: 12.7 V-16 V Output USB-C: 5.0 V 5.0 A/9.0 5.0 A/12.0 V 20.0 V 3.25 A/5.0~20.0 V 3.25 A USB-A: 5 V 2 A Rated Power 65 W Charging Time Approx.
DJI Mavic 3 User Manual When recording at high video resolutions, it is recommended to use SD cards listed below. Corresponding resolutions: H.264 5.
DJI Mavic 3 User Manual Firmware Update Use DJI Fly or DJI Assistant 2 (Consumer Drones Series) to update the aircraft firmware. Using DJI Fly When you connect the aircraft or remote controller to DJI Fly, you will be notified if a new firmware update is available. To start updating, connect your remote controller or mobile device to the internet and follow the onscreen instructions. Note that you cannot update the firmware if the remote controller is not linked to the aircraft. Internet is required.
DJI Support http://www.dji.com/support This content is subject to change. Download the latest version from http://www.dji.com/mavic-3 If you have any questions about this document, please contact DJI by sending a message to DocSupport@dji.com. DJI is a trademark of DJI. Copyright © 2021 DJI All Rights Reserved.