SPARK User Manual 2017.05 V1.
Searching for Keywords Search for keywords such as “battery” and “install” to find a topic. If you are using Adobe Acrobat Reader to read this document, press Ctrl+F on Windows or Command+F on Mac to begin a search. Navigating to a Topic View a complete list of topics in the table of contents. Click on a topic to navigate to that section. Printing this Document This document supports high resolution printing.
Contents Using this Manual 2 Legends 2 Read Before the First Flight 2 Video Tutorials 2 Download the DJI GO 4 App 2 Download DJI Assistant 2 2 Product Profile 6 Introduction 6 Features Highlights 6 Aircraft Diagram 7 Activation 7 Aircraft 9 Flight Modes 9 Aircraft Status Indicators 10 3D Sensing and Vision System 11 Return-to-Home (RTH) 13 Intelligent Flight Modes 16 Gesture Mode 23 Flight Recorder 26 Attaching and Detaching the Propellers 26 Intelligent Flight Batter
Flight 4 46 Flight Environment Requirements 46 Flight Limits and No-Fly Zones 46 Preflight Checklist 47 Auto Takeoff and Auto Landing 48 Starting/Stopping the Motors (When Using Remote Controller) 48 Flight Test 49 Calibrating the Compass 49 Firmware Updates 50 Appendix 53 Specifications 53 After-Sales Information 55 © 2017 DJI All Rights Reserved.
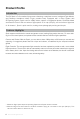
Product Profile This section introduces the DJI Spark and lists the components of the aircraft and remote controller.
Product Profile Introduction The DJI Spark is DJI's smallest flying camera featuring a stabilized camera, Intelligent Flight Modes, and Obstacle Avoidance inside a light, portable body. Equipped with a Vision System and 3D Sensing System, Spark can film 1080p videos, capture 12-megapixel photos, QuickShot Mode and Gesture Control. With a maximum flight speed* of 31 mph (50 kph), and a maximum flight time of 16 minutes**, Spark is quick and fun, making drone photography exciting and simple.
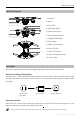
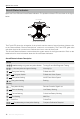
Spark User Manual Aircraft Diagram 1 2 1. Propellers 3 4 2. Motors 5 10 11 9 6 7 8 3. Front LEDs 4. 3D Sensing System 5. Gimbal and Camera 6. Aircraft Status Indicators 7. Intelligent Flight Battery 8. Power Button 9. Battery Level Indicators 13 12 10. Micro USB Port 11. Micro SD Card Slot 12. External Charging Contact 13. Vision System Activation Activation is required before using the Intelligent Flight Battery and aircraft for the first time.
Aircraft This section introduces the Flight Controller, 3D Sensing System, Vision System, and the Intelligent Flight Battery. 8 © 2017 DJI All Rights Reserved.
Aircraft Spark contains a flight controller, video downlink system, 3D Sensing System, Gimbal and Camera, propulsion system, and an Intelligent Flight Battery. This section introduces the features of the flight controller, video downlink system, and other aircraft components. Flight Modes The following flight modes are available for Spark: P Mode (Positioning): P Mode works best when the GPS signal is strong.
Spark User Manual Aircraft Status Indicators Spark has Front LEDs and Aircraft Status Indicators. The positions of these LEDs are shown in the figure below: Front LEDs Aircraft Status Indicators The Front LEDs show the orientation of the aircraft and the status of some functions (please refer to the Gesture Mode “Feature Descriptions” section for more details). The Front LEDs glow solid red when the aircraft is turned on to indicate the front or nose of the aircraft.
Spark User Manual 3D Sensing and Vision System Spark is equipped with a 3D Sensing System 1, consisting of a 3D infrared module at the front of the aircraft, which scan for obstacles during flight. The main components of the Vision System are located on the underside of the aircraft body. This includes a camera 2 and a 3D infrared module 3.
Spark User Manual Follow the steps below to use the Vision System: 1. Ensure the aircraft is in P Mode and place the aircraft on a flat surface. Note that the Vision System cannot work properly on surfaces without clear pattern variations. 2. Turn on the aircraft. The aircraft will hover in place after takeoff. The aircraft status indicators will flash green twice, which indicates the Vision System is working.
Spark User Manual Return-to-Home (RTH) The Return to Home (RTH) function brings the aircraft back to the last recorded Home Point. There are three types of RTH: Smart RTH, Low-Battery RTH, and Failsafe RTH. This following section describes the three RTH scenarios in detail. Description GPS Home Point If a strong GPS signal was acquired before takeoff, the Home Point is the location from which the aircraft launched. The GPS signal strength is indicated by the GPS icon ( ).
Spark User Manual Battery Level Warning Remark Aircraft Status Indicator DJI GO 4 App Flight Instructions Tap “Go-home” to have the aircraft return to the Home point automatically, or “Cancel” to resume normal flight. If no action is taken, the aircraft will automatically go home after 10 seconds. Remote controller will sound an alarm. Fly the aircraft back and land it as soon as possible, then stop the motors and replace the battery. Low battery level warning Battery power is low.
Spark User Manual Note: If RTH at Current Altitude is disabled in DJI GO 4, the aircraft will land automatically when the aircraft is between 3 m and 20 m from the Home Point. c. The aircraft will land automatically if RTH is triggered and the aircraft is less than 3 m from the home point. 5. The aircraft will hover 0.3 m above ground and wait for confirmation from the user. The aircraft will land and stop its motors after user confirmation.
Spark User Manual Obstacle sensing will turn off and the aircraft will ascend to the Failsafe altitude automatically and will fly to the Home Point at a flight speed of 10 m/s if the obstacle can still be sensed after the aircraft has flown backward for 10 m. The aircraft will repeat steps 1-3 if the obstacle is sensed again during ascent. The aircraft cannot avoid obstacles above, beside, or behind the aircraft.
Spark User Manual 1. Take off and ensure the aircraft is flying at least 4.5 ft (1.5 m) above the ground. 1.5 m 2. Launch DJI GO 4, tap , then select QuickShot, and follow the prompts. In-Flight(GPS) QuickShot 12 2.4G 61% 09:29 1080P/30 H 9.6 D 9.6 S 1.1 3. Select your target subject in the camera view and choose a shooting mode. Tap “GO” to begin recording. The aircraft will fly back to its original position after shooting is finished. In-Flight(GPS) QuickShot 12 2.
Spark User Manual Using ActiveTrack Ensure the Intelligent Flight Battery is fully charged and the aircraft is in P Mode. Follow the steps below to use ActiveTrack: 1. Take off and hover at least 4.5 ft (1.5 m) above ground. 1.5 m 2. In DJI GO 4, tap to bring up the flight modes and select ActiveTrack. In-Flight(GPS) P-GPS 12 2.4G 61% 09:29 1080P/30 H 9.6 D 9.6 S 1.1 3. Tap on the subject you want to track then tap to confirm your selection.
Spark User Manual ActiveTrack includes the following functions: Trace Profile The aircraft tracks the subject at a constant distance. Use the roll stick on the remote controller or the slider in DJI GO 4 to circle the subject. The aircraft tracks the subject at constant angle and distance from the side. Use the roll stick on the remote control to circle the subject. The aircraft will not be able to avoid obstacles while in Profile Mode. Use this mode in open areas.
Spark User Manual Coordinate Mode Tap a specific location on screen. The aircraft will travel to that point at your current altitude, then hover in place. Using Coordinate Mode Ensure that the Intelligent Flight Battery is fully charged and the aircraft is in P Mode. Follow the steps below to use Coordinate Mode: 1. Take off and ensure the aircraft is hovering at least 3 ft (1 m) above ground. 1m 2. Launch DJI GO 4 and tap . Select TapFly, Coordinate Mode, then follow the prompts.
Spark User Manual Exiting Coordinate Mode Use the following methods to exit Coordinate Mode: 1. Tap the icon on the screen. 2. Pull back the pitch stick on the remote controller for three seconds or more. 3. Press the Flight Pause button on the remote controller. 4. Drag the blue circle left and right. Direction Mode Keep flying in the direction you tap on the screen. Using Direction Mode Ensure the Intelligent Flight Battery is fully charged and the aircraft is in P Mode.
Spark User Manual After confirming the selection, the aircraft will fly in the direction marked by the “GO” icon. The aircraft will automatically adjust its speed when it senses an obstacle out in front or if it is flying too close to the ground. However, this feature should not be relied upon for navigation between obstacles. Failsafe procedures will override all TapFly functions. If GPS signal is weak, the aircraft will exit autonomous flight and return to home.
Spark User Manual Gesture Mode Deep learning gesture recognition allows you to take selfies with simple hand motions. Spark features brand new gesture controls like PalmLaunch, PalmControl, PalmLand, Beckon, and Selfie. Feature Descriptions Front LEDs Figure PalmLaunch 1. Power on the aircraft while holding it. Wait for the aircraft status indicators to blink green. Make sure your fingers are well below the aircraft arms. —— Solid red 2. Next, tap the Intelligent Flight Battery power button twice.
Spark User Manual Adjusting Position 1. Move your palm up or down slowly to control the aircraft’s altitude while maintaining a constant distance between your palm and the aircraft. 2. Keep your palm at a constant distance from your body (as shown), then move your arm left or right to control the aircraft’s orientation. —— Solid green 3. Keep your palm at a constant distance from your body, move forward or backward to fly forward or backward. Follow 1.
Spark User Manual Beckon 1. Raise your arms above your head in a Y shape for two seconds after the aircraft starts tracking. 2. When Beckon is successfully activated, the aircraft will fly toward you and hover in place 1.5 m above ground and 1.2 m away from you. —— Solid red 3. The front LEDs will turn solid red. PalmLand Place your palm approximately 0.5 m underneath the aircraft at a distance of no further than 1.5 m away from you. The aircraft will slowly descend and land on your palm.
Spark User Manual Flight Recorder Flight data is automatically recorded to the internal storage of the aircraft. This includes flight telemetry, aircraft status information, and other parameters. To access this data, connect the aircraft to the PC through the Micro USB port. Attaching and Detaching the Propellers Only use DJI approved propellers with your Spark. White ringed and unmarked propellers indicate where they should be attached and in which direction whey should spin.
Spark User Manual Intelligent Flight Battery Introduction The DJI Intelligent Flight Battery has a capacity of 1480 mAh, a voltage of 11.4 V, and a smart charge/ discharge functionality. It should only be charged using an appropriate DJI approved charger. Intelligent Flight Battery Charger The Intelligent Flight Battery must be fully charged before using it for the first time. DJI Intelligent Flight Battery Functions 1. Battery Level Display: The LED indicators display the current battery level. 2.
Spark User Manual Using the Battery Turning ON/OFF Turning On: Press the Power button once, then press again and hold for two seconds to power on. The remote controller system status screen will display the current battery level. Turning Off: Press the Power button once, then press again and hold for two seconds to power off. Battery Level Indicators LED1 LED2 LED3 LED4 Power Button Low Temperature Notice: 1.
Spark User Manual Charging the Intelligent Flight Battery 1. 2. 3. 4. Connect the Battery Charger to a power source (100-240 V, 50/60 Hz). Connect the Micro USB port on Spark to the charger to start charging. The Battery Level Indicator will display the current battery level as it is charging. The Intelligent Flight Battery is fully charged when the Battery Level Indicators are all off. It will take approximately 1 hour and 20 minutes to fully charge the battery.
Spark User Manual After these issues are resolved, press the Power button to turn off the Battery Level Indicators. Unplug the Intelligent Flight Battery from the charger and plug it back in to resume charging. You do not need to unplug and plug in the charger in the event of a room temperature error; the charger will resume charging when the temperature is within the allowable range. DJI does not take any responsibility for damage caused by third-party chargers.
Spark User Manual Camera Profile The onboard camera uses its 1/2.3 inch CMOS sensor to capture video up to 1080p at 30 fps and 12 megapixel stills. You can record video in either MOV or MP4 formats. Available picture shooting modes include Single Shot, Burst, Interval, Panorama, and ShallowFocus. A live preview of what the camera sees can be monitored on a connected mobile device via the DJI GO 4 app.
Spark User Manual The Wi-Fi frequency of your mobile device can be set to 2.4 GHz (default) or 5.8 GHz. On supported devices, set Wi-Fi to 5.8 GHz for less interference. Press and hold the power button for nine seconds or more until you hear three beeps to reset the Wi-Fi name and password, and reset the Wi-Fi frequency to 2.4 GHz. Or tap “Help” in the DJI GO 4 app, then follow the instructions. Only fly with a Wi-Fi connection in wide open areas with relatively little electromagnetic interference.
Spark User Manual Controlling the Aircraft This section explains how to control the aircraft. The control stick mode can be set to Mode 1, Mode 2, Mode 3, or a custom mode. Mode 1 Left Stick Right Stick Forward Up Down Backward Left Turn Left Mode 2 Right Turn Right Left Stick Right Stick Forward Up Down Backward Turn Left Mode 3 Left Stick Left Turn Right Right Right Stick Forward Up Down Backward Left Right Turn Left Turn Right The Stick Mode is set to Mode 2 by default.
Spark User Manual Virtual Joysticks / Remote Controller (Mode 2) ( Aircraft Indicates Nose Direction) Left Stick Left Stick Right Stick Right Stick 34 © 2017 DJI All Rights Reserved. Remarks Moving the left stick up and down changes the aircraft’s elevation. Push the stick up to ascend and down to descend. When both sticks are centered, the Spark will hover in place. The more the stick is pushed away from the center position, the faster the Spark will change elevation.
Remote Controller (Optional) This section describes the features of the remote controller and includes instructions for controlling the aircraft and the camera. © 2017 DJI All Rights Reserved.
Remote Controller (Optional) Remote Controller Profile Spark’s remote controller features a brand new, amplified Wi-Fi signal transmission system, capable of controlling the aircraft and the gimbal camera at a maximum transmission range of 1.2 mi (2 km)*. The remote controller can connect to a mobile device wirelessly and display a live video feed via the DJI GO 4 app. The folding clamps allow you to secure your mobile device. Maximum remote controller battery life is approximately 2.5 hours*.
Spark User Manual Compliance Standards: The remote controller is compliant with local compliance and regulations. Stick Mode: Controls can be set to Mode 1, Mode 2, or to a custom mode. Using the Remote Controller The remote controller is powered by a rechargeable battery that has a capacity of 2970 mAh. Turning the Remote Controller On and Off Press the Power button once to check the current battery level. Press once, then again and hold to turn on/off the remote controller.
Spark User Manual Flight Mode Switch Toggle the switch to select the desired flight mode. Choose between P Mode and S Mode. Position Flight Mode P Mode SPORT S Mode SPORT RTH Button Press and hold the RTH button to start the Return to Home (RTH) procedure. The aircraft will then return to the last recorded Home Point. Press this button again to cancel the RTH procedure and regain control of the aircraft.
Spark User Manual 4. Then the front LEDs turn solid red after blinking green. When the status LED on the remote controller turns solid green, linking is complete. Ensure the remote controller is within 0.66 ft (20 cm) of the aircraft during linking. Disconnect the Remote Controller Apart from using the remote controller, you can control the aircraft using virtual joysticks in DJI GO 4. However, when the remote controller is linked to the aircraft, virtual joystick control is disabled.
DJI GO 4 App This section introduces the main functions of the DJI GO 4 app. 40 © 2017 DJI All Rights Reserved.
DJI GO 4 App Use this app to control the gimbal, camera, and other aircraft functions. The app features Equipment, Editor, SkyPixel and Me sections, which are used for configuring your aircraft, editing and sharing your photos and videos with others. Equipment Enter Camera View by tapping the “GO FLY” icon on the Equipment page when your mobile device is connected to the aircraft. Camera View 1 22 2 3 4 In flight (GPS) 5 P-GPS 6 7 8 9 12 2.
Spark User Manual 5. Camera Parameters 1080P/30 Displays camera settings parameters and capacity of the Micro SD card. 6. GPS Signal Strength : Shows the current GPS signal strength. White bars indicate adequate GPS strength. 7. 3D Sensing System Status : Tap this icon to enable or disable features provided by the 3D Sensing System. 8. Wi-Fi Settings 2.4G : Tap to enter the Wi-Fi settings menu. 9. Battery Level 61% : This icon shows the current battery level.
Spark User Manual When shooting ShallowFocus photos, please note: It is suitable for shooting still scenes. When shooting people, do not move during the process, otherwise it may fail to take a ShallowFocus photo. The aircraft will ascend about 20 cm before shooting. Ensure there is no obstacle above the aircraft. The suitable range of shooting is within 30 m. 16. Playback : Tap to enter the Playback page and preview photos and videos as soon as they are captured. 17. Flight Telemetry H 9.
Spark User Manual Editor An intelligent video editor is built into the DJI GO 4 app. After recording several video clips and downloading them to your mobile device, go to Editor on the home screen. You can then select a template and a specified number of clips which are automatically combined to create a short film that can be shared immediately. SkyPixel View and share the photos and videos in the SkyPixel page.
Flight This section describes safe flight practices and flight restrictions. © 2017 DJI All Rights Reserved.
Flight Once pre-flight preparation is complete, it is recommended that you use the flight simulator in the DJI GO 4 app to hone your flight skills and practice flying safely. Ensure that all flights are carried out in an open area. Flight Environment Requirements 1. Do not use the aircraft in severe weather conditions. These include wind speeds exceeding 10 m/s, snow, rain and fog. 2. Fly in open areas.
Spark User Manual GPS Signal Strong Blinking Green Flight Limits DJI GO 4 App Maximum Flight Altitude Aircraft's altitude cannot exceed the specified value. Warning: Height limit reached. Max Radius Flight distance must be within the max radius. Warning: Distance limit reached. GPS Signal Weak Aircraft Status Indicator None.
Spark User Manual Auto Takeoff and Auto Landing Auto Takeoff Use auto takeoff only if the Aircraft Status Indicators are blinking green. Follow the steps below to use the auto takeoff feature: 1. Launch the DJI GO 4 app, and tap “GO FLY” to enter camera page. 2. Complete all steps on the pre-flight checklist. 3. Tap “ ”, and confirm that conditions are safe for flight. Slide the icon to confirm and takeoff. 4. Aircraft takes off and hovers at 1.2 meters above ground.
Spark User Manual To perform the CSC midair in case of an emergency, hold for 1.5 seconds to stop the motors midflight. Stopping the motors mid-flight will cause the aircraft to crash. Flight Test Takeoff/Landing Procedures 1. 2. 3. 4. Place the aircraft in an open, flat area with the battery level indicators facing towards you. Turn on the Intelligent Flight Battery. Launch the DJI GO 4 app and enter the camera page. Wait until the Aircraft Indicators blink green.
Spark User Manual Calibration Procedures Choose an open area to carry out the following procedures. 1. Tap the Aircraft Status Bar in the app and select “Calibrate”, then follow the on-screen instructions. 2. Hold the aircraft horizontally and rotate 360 degrees. The Aircraft Status Indicators will go solid green. 3. Hold the aircraft vertically, with the nose pointing downward, and rotate it 360 degrees around the center axis. 4. Re-calibrate the aircraft if the aircraft status indicators blink red.
Spark User Manual 1. With the aircraft powered off, connect the aircraft to a computer via the Micro USB port using a Micro USB cable. 2. Power on the aircraft. 3. Launch DJI Assistant 2 and login with your DJI account. 4. Select Spark and click on Firmware Updates on the left panel. 5. Select the firmware version that you wish to update. 6. Wait for the firmware to be downloaded and the firmware update will start automatically. 7. Reboot the aircraft after the firmware update is complete.
Appendix 52 © 2017 DJI All Rights Reserved.
Appendix Specifications Aircraft Weight 300 g Dimensions 143×143×55 mm Diagonal Length (propellers excluded) 170 mm Max Ascent Speed 9.8 ft/s (3 m/s) in Sport Mode Max Descent Speed 9.8 ft/s (3 m/s) when using auto landing Max Speed 31 mph (50 kph) in Sport Mode without wind Max Service Ceiling Above Sea Level 13123 feet (4000 m) Max Flight Time 16 minutes (0 wind at a consistent 15.
Spark User Manual ISO Range 100-3200 (video), 100-1600 (photo) Electronic Shutter Speed 2 - 1/8000 s Max Image Size 3968 × 2976 Still Photography Modes Single shot Burst shooting: 3 frames Auto Exposure Bracketing (AEB): 3 bracketed frames at 0.7EV Bias Interval (2/3/5/7/10/15/20/30/60 s) Video Recording Modes FHD: 1920×1080 30p Video Storage Bitrate 24 Mbps Supported File System FAT32 Photo JPEG Video MP4 (MPEG-4 AVC/H.
Spark User Manual Intelligent Flight Battery Capacity 1480 mAh Voltage 11.4V Max Charging Voltage 13.05 V Battery Type LiPo 3S Energy 16.87 Wh Net Weight Approx. 95 g Operating Temperature 41° to 104° F (5° to 40° C) After-Sales Information Visit the following pages to learn more about After-sales policy and warranty information: 1. After-sales Policy: http://www.dji.com/service 2. Refund Policy: http://www.dji.com/service/refund-return 3. Paid Repair Service: http://www.dji.
DJI Support http://www.dji.com/support This content is subject to change. Download the latest version from http://www.dji.com/spark If you have any questions about this document, please contact DJI by sending a message to DocSupport@dji.com. SPARK is a trademark of DJI. Copyright © 2017 DJI All Rights Reserved.