RONIN-SC User Manual 2019.08 v1.
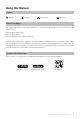
Searching for Keywords Search for keywords such as “battery” and “install” to find a topic. If you are using Adobe Acrobat Reader to read this document, press Ctrl+F on Windows or Command+F on Mac to begin a search. Navigating to a Topic View a complete list of topics in the table of contents. Click on a topic to navigate to that section. Printing this Document This document supports high resolution printing.
Using this Manual Legend Warning Important Hints and tips Reference Before You Begin The following documents have been produced to help you safely operate and make full use of your RONINTM-SC. Ronin-SC Quick Start Guide Ronin-SC User Manual Ronin-SC Disclaimer and Safety Guidelines Read this entire user manual and watch the informational and tutorial videos on the product page of DJI’s official website (http://www.dji.com/ronin-sc).
Contents Using this Manual 1 Download the Ronin App 1 Before You Begin 1 Introduction 3 Ronin-SC Diagram 3 Getting Started 4 Attaching the Tripod 4 Mounting the Grip 5 Mounting the Phone Holder 7 Locking/Unlocking the Gimbal 5 Mounting the Camera 5 Balancing 10 Before Balancing 10 2. Balancing the Vertical Tilt 11 4. Balancing the Pan Axis 12 1. Balancing Depth for the Tilt Axis 10 3.
Introduction DJI Ronin-SC is a professional 3-axis single-handed gimbal that’s been specifically designed for mirrorless cameras. The wide range of operation modes include SmoothTrack and Lock mode, while Sport mode allows users to capture fast-moving scenes effortlessly. The updated 360 Roll algorithm enables users to shoot smooth rotational footage with ease. Ronin-SC boasts 3-axis lock allowing for individual axis balancing and for faster, more convenient storage.
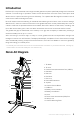
RONIN-SC User Manual 22 18 18. Power Port (USB-C) 19 20. Tripod 19. Trigger 21. Grip (Inc. 1/4” and 3/8” Mounting Holes) 22. Power Button 21 20 Getting Started Attaching the Tripod 1 2 3 4 © 2019 DJI OSMO All Rights Reserved.
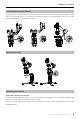
RONIN-SC User Manual Locking/Unlocking the Gimbal Toggle the pan, tilt, and roll axis lock to the locked position to lock the corresponding axis. Toggle the axis lock to the unlocked position to unlock the corresponding axis. It is recommended to hold on to the axis arm before toggling the corresponding axis lock. Pan Axis Lock Tilt Axis Lock Roll Axis Lock Mounting the Grip 2 1 Mounting the Camera Supported Cameras and Lenses Ronin-SC has been rigorously tested to support a payload of 2.0 kg.
RONIN-SC User Manual Mounting a Camera Make sure to prepare the camera before mounting it to Ronin-SC. Remove the lens cap and make sure the battery of the camera and memory card are already inserted. 1. The three axes of the gimbal are locked by default. Unlock the three axes, adjust the gimbal to the position as shown, and lock the three axes again. 2. If required, attach the riser plate* to the bottom of the camera using a flathead screwdriver.
2 1 RONIN-SC User Manual 3 4. Loosen the knob on the bottom of the camera mounting plate the camera onto the plate and move it to the side of the axis. Slide . Tighten the knob when the camera is in the middle of the plate. 1 2 Make sure to tighten the screw under the dovetail plate. Mounting the Phone Holder For using ActiveTrack 3.0, Force Mobile, and the mobile device as a monitor, the phone holder is required to be mounted in order to utilize a mobile phone properly.
RONIN-SC User Manual Make sure the gimbal is balanced every time you change the payload. Refer to the list of supported mobile phones to learn which phone models are compatible with the phone holder for using ActiveTrack 3.0. http://www.dji.com/ronin-sc/downloads. ActiveTrack 3.0 can only be used when operating in Underslung mode and Upright mode. ActiveTrack 3.0 is not available in Flashlight mode.
RONIN-SC User Manual The phone holder can be rotated 360°, allowing the mobile phone to be positioned vertically or horizontally. * To use the mobile phone as an extended monitor, a compatible camera app is required such as Sony Imaging Edge Mobile, Panasonic Image App, Nikon SnapBridge, FUJIFILM Camera Remote, and Canon Camera Connect. A secure WiFi connection between the mobile phone and camera is also required.
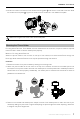
Balancing To obtain the best performance from Ronin-SC, proper balancing is essential. Proper balance is critical for shots with Ronin-SC where fast motion or acceleration is required and also offers longer battery runtimes. There are three axes that need to be properly balanced before powering on Ronin-SC and setting up the software. Before Balancing 1. The camera needs to be fully configured, with all accessories and cables connected, before installing and balancing the camera on the gimbal.
RONIN-SC User Manual 2. Balancing the Vertical Tilt a. Rotate the tilt axis so that the camera lens is pointing upward. If a phone holder and mobile phone are mounted, rotate the tilt axis so that the camera lens is tilting up at about 45°. Make sure the camera is not top or bottom-heavy. If the camera is tilted to one side, pull the tilt arm towards the other side. b. Loosen the knob on the tilt motor without tilting up or down. and adjust the balance of the camera until the camera is steady c.
RONIN-SC User Manual 4. Balancing the Pan Axis a. Unlock the pan axis. Hold the grip, tilt Ronin-SC sideways, and check the movement of the pan axis. If the camera lens rotates downward, push the pan axis back. If the camera lens rotates upward, push the pan axis forward. b. Loosen the knob on the pan motor . Adjust the camera balance until the camera is steady when rotating the pan while lifting the grip. c. Tighten the pan axis knob.
Grip and Built-In Battery The grip is for handheld use. The built-in battery within the grip has a capacity of 2450 mAh and the maximum standby time is 11 hours (when the Ronin-SC is properly balanced). Charging The battery must be charged to activate before using for the first time. Battery level indicators will light to indicate activation is successful. After attaching to the gimbal, charge the grip through the power port using a power cable (included) and a USB adapter (not included).
RONIN-SC User Manual To avoid fire, serious injury, and property damage, observe the following safety guidelines when using, charging, or storing the grip. Grip Use 1. DO NOT allow the grip to come into contact with any kind of liquid. DO NOT leave the grip out in the rain or near a source of moisture. DO NOT drop the grip into water.
RONIN-SC User Manual 3. DO NOT leave the grip near heat sources such as a furnace or heater. DO NOT leave the grip inside of a vehicle on hot days. The ideal storage temperature is 22° to 28° C (72° to 82° F). 4. Keep the grip dry. Grip Maintenance 1. DO NOT use the grip when the temperature is too high or too low. 2. DO NOT store the battery in environments with a temperature higher than 45° C (113°F) or lower than 0° C (32°F). Travel Notice 1.
Operation Activating Ronin-SC Ronin-SC needs to be activated through the Ronin app before using for the first time. 1. Press and hold the power button to power on the gimbal. 2. Enable Bluetooth on your mobile device and launch the Ronin app. Note that a DJI account is required to launch the Ronin app. Once detected in the list of Bluetooth devices, select Ronin-SC and input the default Bluetooth password: 12345678. Press the M button six times to restore the default Bluetooth password. 3.
RONIN-SC User Manual Top Bar Sleep/Wake: Tap to enter or exit sleep mode. When Ronin-SC is in sleep mode, the motor will be powered off, but the gimbal remains powered on. M1: Displays the current user profile . Battery Level: Displays the battery level of the gimbal. About Settings: View your account and the quick start guide. Device List: Displays the device name and password. Firmware: Displays the firmware version. Academy Watch the tutorials and read the manual documents.
RONIN-SC User Manual ActiveTrack 3.0 ActiveTrack 3.0 has been optimized for tracking human subjects with a head and shoulder model using deep learning algorithms. After mounting the phone holder and a mobile phone on the camera, you can start to use ActiveTrack 3.0 by following the steps below: 1. Select the subject you want to track. There are two ways to select the subject. When the subject is in the selection box, press the trigger once to select the subject.
RONIN-SC User Manual Force Mobile Force Mobile requires the phone holder and a mobile phone mounted. After enabling this feature in the Ronin app, the gimbal movement can be controlled by tilting and rotating your mobile phone. When the max speed is set to 50, the angle of rotation for the gimbal and mobile phone is a 1-to-1 ratio. The gimbal will move at an identical angle similar to the mobile phone.
RONIN-SC User Manual The interval time between shooting photos should be set to one second more than the shutter time to avoid blurred footage when using a long exposure. After confirming the camera settings, the panorama range can be set by dragging the white dots on the grid map, pushing the gimbal manually, or using the virtual joystick. The total range covered by the endpoints and the shots required to compose the panorama is displayed above the grid map.
RONIN-SC User Manual Track Track is designed to capture video with up to 10 waypoints with repeatability. The stay time in between two waypoints can also be set. You will need to select the waypoint by manually moving the gimbal or using the virtual joystick. The duration parameter beneath the grid map indicates how much time it will take for the gimbal to travel from one waypoint to the next. Stay Time determines how long the gimbal will remain steady at the waypoint before moving to the next waypoint.
RONIN-SC User Manual Motor Parameters Auto Tune: The stiffness value is determined by the payload of the gimbal. Use Auto Tune to obtain the stiffness value automatically after balancing. Tap Auto Tune and Ronin-SC automatically calculates the result based on the weight of the gimbal setup. Alternatively, press and hold the M button and trigger simultaneously for four seconds to start Auto Tune without using the app. The Auto Tune process takes approximately 15 to 30 seconds.
RONIN-SC User Manual Gimbal Follow Mode Pan and Tilt Follow: Pan and tilt axes follow the movement of the grip. Pan Follow: Only pan axis follows the movement of the grip. FPV: Pan, tilt and roll axes follow the movement of the grip. Speed must be set to Medium, High or Customized. FPV mode is not available when the speed is set to Low. When the speed is set to customized, the pan speed value must be set to 50 or higher. Note that Deadband is unavailable in FPV mode.
RONIN-SC User Manual Endpoint: Limits the rotational range of the gimbal by setting the endpoints. The pan axis has a slip-ring, enabling Ronin-SC to rotate continuously when the endpoints are set to 180°. On the tilt axis, you can set up the endpoints according to your requirements. Some longer lenses may hit the gimbal frame. Set the endpoint angle to prevent such cases. Status Settings Motor Pause: Tap to enable motor pause and the motor will power off.
RONIN-SC User Manual Button Features Power Button Press and hold the power button to turn Ronin-SC on or off. Tap the power button to enter or exit sleep mode. M Button Tap to select a user profile. Press and hold to enter Sport mode. Press three times to enter or exit 3D Roll 360 mode. Press six times to restore the default Bluetooth password. The profile light glows to indicate the password has been restored successfully.
Operation Modes There are three operation modes for the Ronin-SC: Upright mode, Underslung mode, and Flashlight mode. Upright mode Underslung mode Flashlight mode Roll 360 is available when using Ronin-SC in Flashlight mode. The slip-ring on the pan axis enables RoninSC to perform a continuous roll rotation. 3D Roll 360 can be used with the grip at any orientation. 1. To set up Ronin-SC for Roll 360, first connect to Ronin-SC with the Ronin app.
Maintenance Ronin-SC is not waterproof. Make sure to protect it from dust and water during use. After use, it is recommended to wipe Ronin-SC with a soft dry cloth. DO NOT spray any cleaning liquids onto Ronin-SC. Specification 1/4”and 3/8” Mounting Holes Accessory Port Camera Control/Accessories Port Power Port (USB-C) Ronin Series Accessories (RSA) Port Model: RB2-2450mAh-7.2V Type: 18650 LiPo Capacity: 2450 mAh Battery Cells: 2 (2S1P) External Device Input Power Energy: 17.64 Wh Max.
RONIN-SC User Manual DJI Support http://www.dji.com/support This content is subject to change. Download the latest version from http://www.dji.com/ronin-sc If you have any questions about this document, please contact DJI by sending a message to DocSupport@dji.com. Copyright © 2019 DJI OSMO All Rights Reserved. 28 © 2019 DJI OSMO All Rights Reserved.