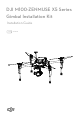
DJI M100-ZENMUSE X5 Series Gimbal Installation Kit Installation Guide V1.0 2016.
Searching for Keywords Search for keywords such as “battery” and “install” to find a topic. If you are using Adobe Acrobat Reader to read this document, press Ctrl+F on Windows or Command+F on Mac to begin a search. Navigating to a Topic View a complete list of topics in the table of contents. Click on a topic to navigate to that section. Printing this Document This document supports high resolution printing.
Contents Disclaimer 4 Using This Manual 4 Legend 4 Product Profile 5 In the Box 5 Installation 6 Removing the Battery Compartment and Mounting Rails 6 Replacing the Upper Plate 7 Mounting the Battery Compartment 10 Replacing the Landing Gear Leg 11 Mounting the Gimbal 12 © 2016 DJI. All Rights Reserved.
Disclaimer Thank you for purchasing the DJI M100-Zenmuse X5 series gimbal installation kit (abbreviated as “X5 series gimbal installation kit”). By using this product, you hereby agree to this disclaimer and signify that you understand all points completely. Please use this product in strict accordance with the manual and be sure to pay attention to the warnings. When assembling and using this product, follow all instructions carefully. SZ DJI TECHNOLOGY CO., LTD.
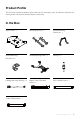
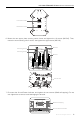
Product Profile The X5 Series Gimbal Installation Kit provides all the necessary parts to install the Zenmuse X5 series gimbal and camera onto the Matrice 100 aircraft. In the Box Upper Plate × 1 Mounting Rail Set × 1 B A Gimbal Mounting Bracket A × 1 D C Gimbal Mounting Bracket B × 2 Gimbal Mounting Plate × 1 Damper × 4 Landing Gear Leg (185 mm) × 4 Battery Power Extension Cable × 1 8-Pin Gimbal Cable × 1 10-Pin Gimbal Cable × 1 © 2016 DJI. All Rights Reserved.
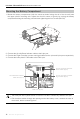
Installation Removing the Battery Compartment and Mounting Rails The following example uses a Matrice 100 with the battery installed under the center frame. Power off the aircraft and remove the Intelligent Flight Battery before installation. 1. Open the battery cover by removing the screw. 2. Remove all cables connected to the battery compartment and the center frame, including the Aircraft Status Indicator cable, CAN cable, signal cable and Flight Controller's power cable. The cables are delicate parts.
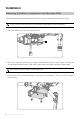
DJI M100-ZENMUSE X5 Series Gimbal Installation Kit 4. Remove the eight screws (M2.5x8) for the mounting rails on the upper and lower plates of the center frame. Replacing the Upper Plate 1. Remove the two screws (M3x8 self-tapping) on the Aircraft Status Indicator. Then gently remove the indicator without damaging the cables. Handle the indicator cable gently Aircraft Status Indicator 2. Remove the 16 screws (M2.5x5) on the original upper plate. Then remove the upper plate. © 2016 DJI.
DJI M100-ZENMUSE X5 Series Gimbal Installation Kit 3. Connect one end of the 10-pin and 8-pin gimbal cables to the Flight Controller. Flight Controller 10-pin Port 8-pin Port 4. Arrange the other ends of the gimbal cables near the nose of the aircraft. Aircraft Nose 5. Hold the new upper plate with the notch facing the left of the aircraft (with its tail facing you).
DJI M100-ZENMUSE X5 Series Gimbal Installation Kit Front Wire Outlet Back Wire Outlet 6. Mount the new upper plate onto the center frame and tighten the 16 screws (M2.5x5). Then, mount the new mounting rails A and B, and tighten the eight screws (M2.5x8). M2.5x8 Mounting Rail A Mounting Rail B M2.5x5 Aircraft Tail Notch 7. Re-mount the Aircraft Status Indicator and tighten the two screws (M3x8 self-tapping). Do not over tighten the screws to avoid damaging the threads.
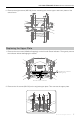
DJI M100-ZENMUSE X5 Series Gimbal Installation Kit Mounting the Battery Compartment 1. Mount the battery compartment (with the metal terminals facing the tail of the aircraft) onto the upper plate’s mounting rails. Adjust the aircraft’s center of gravity by moving the battery compartment along the mounting rails and then tightening the four screws (M2.5x5). 2. Connect the Aircraft Status Indicator cable to the 6-pin port. 3.
DJI M100-ZENMUSE X5 Series Gimbal Installation Kit 5. Pull the battery’s power extension cable through the hole on the battery cover and connect it to the center frame’s XT60 port. 6. Close the battery cover and tighten the screw. Battery Power Extension Cable XT60 Port Replacing the Landing Gear Leg 1. Unscrew the four landing gear legs from the frame arms and remove them. 2. Slide the new, longer landing gear leg into the notch of the antenna cover and screw it onto the frame arm.
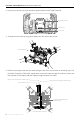
DJI M100-ZENMUSE X5 Series Gimbal Installation Kit Mounting the Gimbal The aircraft will weigh about 3.1 kg after the X5 series gimbal is attached. Be careful not to mount additional components, such as extra battery compartments or the DJI Guidance, which may cause it to exceed the maximum takeoff weight. 1. Mount the mounting rails C and D onto the center frame’s lower plate and tighten the eight screws (M2.5x8). M2.5x8 Mounting Rail C Mounting Rail D M2.5x5 2.
DJI M100-ZENMUSE X5 Series Gimbal Installation Kit 3. Mount the Gimbal Mounting Plate 1 Connect the other ends of the 10-pin and 8-pin gimbal cables to their corresponding ports on the Gimbal Lock. 2 Mount the Gimbal Mounting Plate and dampers to the Gimbal Mounting Brackets. 8-pin Port 10-pin Port The dampers may deteriorate over time. Ensure that all dampers are in good condition before each flight, and NEVER use worn or broken dampers. 4.
DJI M100-ZENMUSE X5 Series Gimbal Installation Kit Zenmuse X5R 1 Rotate the Gimbal Lock to the unlocked position. 2 While aligning the white lines on the Gimbal Connector and Gimbal Lock, insert the Gimbal Connector. 3 Rotate the Gimbal Lock to the locked position. 4 Turn the two keys on the other end of the mounting plate 90 degrees into the slots. Ke y 1 2 4 3 Slot Be careful not to damage the gimbal connector and its metal contacts when attaching or storing the Zenmuse X5 series gimbal.
This content is subject to change. Download the latest version from https://developer.dji.com/matrice-100 If you have any questions about this document, please contact DJI by sending a message to DocSupport@dji.com. © 2016 DJI. All Rights Reserved.