RONIN-S V1.2 2018.
Searching for Keywords Search for keywords such as “battery” and “install” to find a topic. If you are using Adobe Acrobat Reader to read this document, press Ctrl+F on Windows or Command+F on Mac to begin a search. Navigating to a Topic View a complete list of topics in the table of contents. Click on a topic to navigate to that section. Printing this Document This document supports high resolution printing. 2 © 2018 DJI OSMO All Rights Reserved.
Using this Manual Legend Warning Important Hints and Tips Reference Before You Begin The following documents have been produced to help you safely operate and make full use of your RONINTM-S. Ronin-S in the Box Ronin-S Quick Start Guide Ronin-S User Manual Ronin-S Disclaimer and Safety Guidelines Check all of the included parts listed in the In the Box manual. Read this entire User Manual and watch the informational and tutorial videos on the product page of DJI’s official website (http://www.dji.
Contents Using this Manual 1 Before You Begin 1 Download the Ronin App 1 Download DJI Pro Assistant for Ronin 1 Contents 2 Introduction 3 Getting Started 5 Ronin-S Diagram 4 Mounting the Grip 5 Attaching the Extended Grip 5 Mounting the Camera 6 Balancing 8 Before Balancing 8 Balancing the Vertical Tilt 8 Balancing Depth for the Tilt Axis 9 Balancing the Roll Axis 9 Balancing the Pan Axis 10 Grip and Built-in Battery 11 Charging 11 Using the Grip 11 Safety Guidelines
Introduction The DJI Ronin-S is a professional 3-axis single handled gimbal that’s specifically designed for DSLR and mirrorless cameras. It is compatible with almost any DSLR or mirrorless camera setup on the market. The Ronin-S also can be mounted to a tripod or a car for shooting, with operating speeds of 75 kph*. There are many modes of operation such as SmoothTrack and Lock mode, and the newly added Sport Mode allows you to capture fastmoving scenes effortlessly.
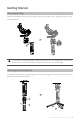
Ronin-S Diagram 10 12 1 2 3 4 5 6 7 13 11 19 18 17 14 8 16 15 9 1. Roll Motor 2. Pan Motor 3. Profile LED Indicators 4. Power Button 5. Joystick 6. M Button 7. Camera Control Button 8. Grip 9. Extended Grip/Tripod 10. Tilt Motor 4 © 2018 DJI OSMO All Rights Reserved. 11. 12. 13. 14. 15. 16. 17. 18. 19.
Getting Started Mounting the Grip Attach the gimbal to the grip by sliding it into the dovetail mount. Toggle the lever to the locked position. 2 1 The Ronin-S’ power/data ports and connectors are not waterproof. Ensure to protect them from harmful dust and water during use to avoid damage. Attaching the Extended Grip To attach the provided extended grip to the gimbal, toggle the safety lock to the locked position, and expand as shown. 1 2 3 © 2018 DJI OSMO All Rights Reserved.
Ronin-S User Manual Mounting the Camera Camera Size Requirements The maximum depth from the center of gravity on the camera base plate is 98 mm. The maximum height, measured from the top of the camera base plate is 150 mm. The maximum width is 205 mm. Make sure the camera is powered off during installation. It is recommended to use soft connection cables to avoid obstructing camera movement. Supported Cameras and Lenses Please refer to Ronin-S product page (www.dji.
Ronin-S User Manual Be sure the Ronin-S is not powered on when plugging/unplugging the RSS cable. Failure to do so may burn out the cable. When connecting to cameras with the USB cable, be sure to power on the Ronin-S prior to powering on the camera. Otherwise, camera control may fail. Mounting a Camera Before mounting the camera, make sure it is prepared ahead of time. Remove the lens cap and make sure the camera's battery and memory card are already inserted. 1.
Ronin-S User Manual 4. It is recommended to mount the camera using the Top Hotshoe Bracket when mounting the gimbal on a car or shooting in environments when traveling at high speeds where wind forces can affect the gimbal stability. The Top Hotshoe Bracket is sold separately. The installation is shown below. 1 2 Balancing To obtain the best performance from the Ronin-S, proper balancing is essential.
Ronin-S User Manual Balancing Depth for the Tilt Axis 1. Rotate the tilt axis so that the camera lens is pointing forward. Hold the tilt motor to check if the camera is front or back heavy. 2. Toggle the lever 1 to the unlocked position. Adjust the camera balance 2 until the camera stays still when rotating the tilt axis 45° upwards or downwards. 3. Toggle the lever 3 to the locked position. 3 1 2 Balancing the Roll Axis 1. Release the tilt motor to check the direction in which the motor swings. 2.
Ronin-S User Manual Balancing the Pan Axis 1. Grab the grip and tilt Ronin-S sideways to check for movement along the pan axis. 2. Loosen the knob 1 on the pan motor. Adjust the camera balance 2 until the camera stays still when rotating the pan axis 45° while lifting the grip. 3. Tighten the knob. 1 2 The knobs on the gimbal can be pulled outwards and repositioned if the knob rotation is hindered. It is necessary to use optional Counterweights if mounting a longer camera system.
Grip and Built-in Battery The Grip is for handheld use. The built-in battery within the Grip has a capacity of 2400 mAh and able to power the Ronin-S for up to 12 hours (when the Ronin-S is properly balanced and used under normal conditions). Charging Charge the grip using the 24W USB Power Adapter and USB-C cable provided by connecting to the USB-C port on the gimbal. Charging Time: approx.
Safety Guidelines The following terms are used throughout the product literature to indicate various levels of potential harm when operating this product: NOTICE: Procedures, which if not properly followed, create a possibility of physical property damage AND a little or no possibility of injury. WARNING: Procedures, which if not properly followed, create the probability of property damage, collateral damage, and serious injury OR create a high probability of superficial injury.
Ronin-S User Manual the grip in environments above 122° F (50° C) can lead to a fire or explosion. Use of grip below 5° F (-15° C) can lead to permanent damage. 8. DO NOT use the grip in strong electrostatic or electromagnetic environments. Otherwise, the battery control board may malfunction. 9. Never disassemble or pierce the grip in any way or the battery may leak, catch fire, or explode. 10. DO NOT drop or strike batteries. DO NOT place heavy objects on the grip or charger. 11.
Ronin-S User Manual Travel Notice 1. Before carrying the grip on an airline flight, it must first be discharged, its power level should be lower than 30%. Only discharge the grip in a fireproof location. Store grip in a ventilated location. 2. Keep the grip away from metal objects such as glasses, watches, jewelry, and hairpins. 3. Never transport a damaged grip or a grip with power level higher than 30%. Grip Disposal Dispose of the grip in specific recycling boxes only after a complete discharge.
Activating Ronin-S Make sure the camera is balanced before powering on Ronin-S. Do not turn on Ronin-S without a balanced load, as doing so may damage the gimbal motors. 1. Press the power button once to turn on the grip, and then press and hold the gimbal power button to turn on the gimbal. 2. Enable Bluetooth on your mobile device and launch the Ronin app. Select Ronin-S and input the default Bluetooth password 12345678 once it's detected. 3.
Ronin-S User Manual There are Stiffness, Strength, Filter and Control settings in the motor settings page. Stiffness should always be adjusted in accordance with the total payload mounted onto the gimbal, and the others are advanced settings. It is recommended to leave the settings as default. Stiffness: The motor stiffness adjustment allows you to fine-tune the amount of power that is applied by the motors as they react and balance the weight on each axis.
Ronin-S User Manual Filter: This setting can ease high-frequency vibrations of the Ronin-S. When the Ronin-S is vibrating at a high frequency, you may experience numbness while touching the gimbal motors of each axis. In such instances, it is recommended to lower the Filter settings. Control: It is recommended to leave this setting as default. Control can guide the Ronin-S to better handle low-frequency vibrations. If your Ronin-S vibrates at a visible range, you can suppress it by increasing Control.
Ronin-S User Manual Control Settings Use the Joystick to control the gimbal movements. To set up the joystick, enter the Control Settings page. Motion You can set up the joystick control by adjusting Deadband, Max Speed, Smoothing and Endpoint, for each axis, and there are 3 default profiles for each settings. Deadband: When this value increases, more stick movement will be required to translate into actual movement of the gimbal. Max Speed: Allows you to adjust the remote-controlled rotational speed.
Ronin-S User Manual System Settings General You can change the mounting mode in between Handheld and Car Mount to best suit your shooting plan. You may also switch in between different user profiles directly. The User 1, 2 and 3 profiles provide different default settings for SmoothTrack, Control Settings and Auto Tune.
Ronin-S User Manual Create Features Ronin-S features a set of Create features that can bring automation to a creator’s projects, including Capture, Panorama, Timeapse, Motionlapse and Track. It's recommended to set your camera to electronic shutter or silent shutter to reduce interference by the mirror slap from a DSLR when using the create features. Not doing so may result in shakiness during photo capture.
Ronin-S User Manual Timelapse In Timelapse mode, the Ronin-S will trigger the camera to capture still images with your desired interval time and will automatically stop when it’s done. You can set up the desired content duration for the final output timelapse clip and your project frame rate so that Ronin-S can calculate the exact number of images required.
Ronin-S User Manual Status Displays the real-time status of the gimbal, connected devices, and batteries. About Displays your account information, firmware version, and more. Button Functions Power Button 1. Press and hold to power on the gimbal. 2. Press twice to pause the gimbal’s motors, and press twice again to unpause. M Button 1. Press once to switch the user profiles. 2. Press and hold to enter Sport mode. 3.
Ronin-S User Manual Camera Control Button 1. Press halfway to auto focus, as you would for the shutter button on most DSLR cameras. 2. Press once to start/stop recording. 3. Press and hold to take a photo. Focus Wheel The Focus Wheel is used for controlling camera focus. When a compatible camera system connects to the Ronin-S, you can pull focus via the included cable. Button Functions 1 2 3 4 5 6 1. Focus Wheel Rotate to control camera focus. 2.
Ronin-S User Manual Solid yellow: external focus motor detected without travel calibration. Single yellow blinking: external focus motor is being travel calibrated. Solid green: connected to a camera with electronically controlled focus supported, or connected to an external focus motor with travel calibration complete. Single green blinking: external focus motor’s a-point end is set. Double green blinking: external focus motor’s a-b-point ends are set. 5.
Operation Modes There are three operation modes for the Ronin-S: Upright mode, Underslung mode and Flashlight mode. Roll 360 is available when using the Ronin-S in Flashlight mode. Thanks to the slip-ring on the Pan axis, the Ronin-S is capable of performing a continuous roll rotation. To set up the Ronin-S for Roll 360, first you need to connect to Ronin-S with the Ronin App.
Updating Firmware Download the DJI Pro Assistant for Ronin and update the firmware if there is new firmware released for Ronin-S. Follow the steps below to update the firmware: 1. 2. 3. 4. Connect the Ronin-S to your computer via the USB-C Cable. Click “Upgrade” and wait for the download to finish. Click “Upgrade” again and then click “Confirm”. Power the Ronin-S off and then on after the update is complete. Ensure that your computer is connected to the Internet.
Specifications General Built-In Functions Operation Modes Upright Mode, Underslung Mode, Flashlight Mode Mounting Modes Handheld, Car Mount Mode Built-in, independent IMU modules Advanced 32-Bit ARM Processor DJI Specialized Gimbal Drive Motors with Encoders Bluetooth Module S-Bus Receiver Supported DJI Pro Wireless Receiver Supported Extended GPS Supported USB-C Port 360° continuous rotation through Slip Ring Three profile settings, including SmoothTrack and joystick parameters Virtual Joystick operation
Ronin-S User Manual Mechanical & Electrical Characteristics Working Current Static current: ≈0.16 A Bluetooth Operating Frequency 2.4 to 2.48 GHz Bluetooth Transmitter Power 0 dBm Operating Temperature -4° to 113° F (-20℃ to 45℃) Weight Approx. 3.3 lb (1.5 kg) (gimbal only) Approx. 4.1 lb (1.86 kg) (gimbal and grip included) Dimensions Approx. 202×185×486 mm Working Performance Load Weight (Reference Value) 7.9 lb (3.6 kg) (handheld) Angular Vibration Range ±0.
Contents are subject to change. Download the latest version from http://www.dji.com/product/ronin-s If you have any questions about this document, please contact DJI by sending a message to DocSupport@dji.com. RONIN is a trademark of DJI OSMO. Copyright © 2018 DJI OSMO All Rights Reserved.